You may remember reading in a previous vacation blog that I got two more hermit crabs to make a little family of three! I also wrote about how the conditions in the store were awful (dead crabs, smelled bad, etc) and so I really felt like I was rescuing them more than anything! That week in the OBX I ended up doing a bit of hermit crab research and learned SO much. The Hermit Crab Patch is a great resource with so much information about hermit crabs. If you plan to get a hermit crab next year on vacation then please check out that website. There's so much more to them than you thought! Or at least, than I thought. They're really cool little creatures and they need more than a tiny, crummy home than this...
Can you really be surprised when they die within a year?
I have a 10 gallon tank that I had from my first hamster when I was 13 at my parent's house and we picked it up over Thanksgiving. The tank has housed hamsters, gerbils, even a turtle, and now, hermit crabs!
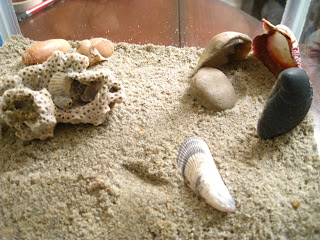
I gathered my shells and other pieces for the tank. I've got various shell halves and a couple larger shells for the crabs to grow into. I also had a sandwich bag full of small shell pieces that I collected from the surf in Avon, NC.
I bought this cool coral piece in a little shop in Avon. I doubt it's actually from the area but I thought it would be cool in the tank and provide a place for the crabs to climb. Oh and did I mention I took home 3 gallon-sized bags of sand as well? I figured 3 gallons would be a good amount in a 10 gallon tank.
As far as cleaning the sand, I put about half a bag full into a bucket with water. I mixed the water and sand and then dumped the water to get any loose particles out. Then I spread the sand onto a black plastic bag laid out on the patio and let it "bake" in the sun for several days. I've heard you can also boil sand but I figured that would be too time consuming for as much as I had.
Then all I did was spread the sand into the tank and placed shells throughout. Into their new home they go!
They started exploring right away...I think they like it! I can imagine it's got to be much better than their previous home.
I took a plastic tray and filled half with the small shells and poured filtered water in their along with their sponges. This way they have lots of fresh water and can even take a little dip if they want.
Rhett is in the green shell, Scarlett is on top of the right sponge, and Ashley is the blue shell. They're actually all girls but I just love Gone With The Wind!
This is the other side of the tank. They like to hide in the shell "condo" on the right. My husband and I were talking about getting a small heat lamp to place over this side so they can get some warmth, especially over the winter. Not to mention they need warm temperatures and we have yet to even turn the heat on in our house! Brrr!
There we go...happy little hermit crabs! I know it may seem silly but they're cool little animals and I want them to live a good life. I don't want to just buy them as a novelty and let them die! I learned at The Hermit Crab Patch that they usually dig underground when they move into a new shell to molt so hopefully I'll get to see them do that soon!
Side note: I also want to use some of the sand and shells in a shadowbox project! It's such a cute idea...can't wait to try!
Did you have hermit crabs as a kid? Do you buy them for your kids?
Till next time,
Catherine


No comments:
Post a Comment
Thank you for your comment! I try to reply to all of the comments so be sure to check back if you asked a question. You can also leave your e-mail address in the comment and I'll let you know when I have replied!