About a month after our wedding in March of 2012, I found an awesome Groupon deal for this photo album website called Printerpix. The deal was for an 8"x8" leather bound 20 page photo book for only $9! It's normally $50! We decided to get two so each of our sets of parents would get one.
Enter stage right: Procrastination.
After hours and hours of looking through my wedding photos to choose which ones would go online and more hours captioning and tagging them, I honestly didn't feel like looking through them for a while! It sounds weird, I know but I was tired of it. I love looking through my wedding photos and relieving the moments but man, there's a point where you just have to take a break.
So here we are, January 31st, about 10 months after we bought the deal and today is the last day before it expires. Ahh! Needless to say, I'm going as fast as I can!
With that being said, I'm done here!
Do you procrastinate? What kind of cool Groupon or LivingSocial deals have you scored?
Till next time,
Catherine
Thursday, January 31, 2013
Wednesday, January 30, 2013
DIY: Glass Etching

First of all, I have got to say that this is my new favorite thing! I want to etch every piece of glassware that we own!
This is another project that I had been dying to try and finally got around to it! The reason it kept getting postponed was that the Armour Etch isn't exactly cheap. We fortunately found a little kit that only cost about $18 at Michael's. It was over $20 for the individual bottle but they were sold out and the next size up was almost $40 and it was way more than we needed. I think the kit was a good value because it gives you better detailed instructions and tips as well as a paint brush, stencils, and a craft stick. It also came with a small square piece of glass to practice on.

(via)
Here is my inspiration from, you guessed it, Pinterest. Maybe one of these days I'll be clever enough to make up my own crafts! But doesn't that look awesome? I knew I wanted to etch my last name into a couple dishes, especially our casserole dish so that if I were to ever bring it somewhere, there'd be no question as to which one is ours!
Let's get going :)
What you'll need:
- Glassware
- Contact paper or masking tape and your printed design
- Xacto Knife
- Armour Etch
- Junk paint brush
- Preferably rubber gloves
Directions:

Gather your materials. First, if you're using my method, place a layer of masking tape onto the area you want to etch. Sorry there's no picture for this step.

Now tape down your design on top.

CAREFULLY cut out the design. You may need to press fairly hard to cut through the layer of paper and tape. Take your time for the best results! The circles were pretty challenging but it got easier as I kept going.

Peel off both layers. Be sure to leave the masking tape layer for the inside of letters like "O," "A," "R," etc.

By the magic of the internet, that was fast!

Pull off the paper layer and inspect your work. Use the Xacto knife to fix any mistakes.

Now get your handy dandy little kit!

This is a small bottle but I don't think it's necessary to buy anything bigger unless you plan on etching a LOT of glass!

Shake the bottle vigorously to mix up the cream. Apply a thick amount onto your stencil. When it's done, you can carefully scrape it back into the bottle if you used a lot.

Now let it sit for about 5-10 minutes. It really works in a minute but I left it for longer to ensure a good result.

Carefully wash off the cream and wash and dry as normal. Voila!


I also etched our name into our glass pie dish.

But it didn't stop there! I even did the only fancy glasses we own!

So if you look close you can see it's not perfect but really, who's looking that close? I'm super happy with the way they turned out! I love, love, love every piece!!
A couple hints:
- The instructions that came with the kit said that Armour Etch may not work with Pyrex products but it worked fine on ours!
- Be super careful! This stuff can be very dangerous. Wear rubber gloves or just make sure to not get any on your skin. If you do, be sure to wash it immediately!
- We only found one roll of contact paper at the craft store and it was a massive amount. I knew we would never use that much so we opted for masking tape and paper. It worked fine, though!
- If you plan to make bigger designs, then I would suggest following the original tutorial here.
- Only etch the OUTSIDE of glassware that food/lips won't touch!
Have you ever used Armour Etch before? I think doing this to any type of glassware with a couple's last name or initial would be an adorable wedding or housewarming gift...don't you? I'll be keeping my eye out at Goodwill and thrift stores for some great glassware to work with!
Till next time,
Catherine
I've linked up to Pinworthy Projects #77 with Just Us Four, My Favorite Finds, and Atkison Drive!
Tuesday, January 29, 2013
Maya Angelou and New Friends!
The wonderful and wise Maya Angelou spoke tonight at Randolph College in Lynchburg. I'd love to tell you how great she was, but unfortunately I didn't get in!
I met up with a new friend from a book club I just joined and we had a delicious light dinner at Rivermont Pizza before getting in a tremendously long line just before 6pm. Dr. Angelou was scheduled to speak at 7pm. We knew we should arrive early because students and teachers were allowed in first but there were no tickets, just first-come, first-served basis. What we didn't realize was that all of Lynchburg decided to show up!
After waiting for over two hours and meeting up two other ladies from the book club, some police officers came and told everyone that the building was full and we had to leave. Such a bummer! We got as far as her tour bus, but no further. Despite not being able to see Maya Angelou speak, we had a great time hanging out and chatting with other folks in line. It ended up being really fun!
We left Randolph's campus and walked a couple blocks over to Mangia to sit and chat some more with drinks and appetizers. They had the most adorable old man playing classic and ragtime piano the whole evening! One more lady from the book club came by and joined us and shared some things that Ms. Angelou said. She was lucky enough to know a Randolph alumni and was able to get in!
Overall we had a great night, had a little preview book discussion, ate good food, swapped stories and came up with great ideas like a cooking club expanded from the book club.
Did I mention I ran out into the street to try and help catch a loose dog?
Yeah that happened too.
It was a great night and we made some great memories! Can't wait for our first book club meeting on Saturday! We're reading MWF Seeks BFF-My Yearlong Search for a New Best Friend. It's really good!
P.S. This was my 100th post!!!
Have you ever read any of Maya Angelou's work? What's your favorite poem or book?
Till next time,
Catherine
Monday, January 28, 2013
Cleaning Clogged Drains with Vinegar and Baking Soda
I don't know about you, but the fewer chemicals I have in my house, the better. If I can use a natural cleaner over something harsh like bleach, ammonia, or other conventional cleaners, I will. I had heard that vinegar is great on just about anything to clean. You can read one of my first posts where I cleaned mold off of a door with vinegar here and here! The second link has visuals. In addition to being a great mold killer, vinegar, especially paired with baking soda, works wonders.
I first heard about using vinegar and baking soda to clean pipes/drains on Pinterest. Of course. One of these days I'll come up with something original! Ha. The link to the original pin site is here.
So if you're like me, your hair seems to constantly clog the drain in the tub/shower. And if you're not fortunate enough to have a garbage disposal, eventually crumbs and bits of food cause a gross buildup in your kitchen sink. You might be ready to reach for the Drano but wait! There's an easier way!
I have no idea how much Drano costs, but I'm fairly certain that white vinegar and baking soda is cheaper. And, much safer.
So read on if you want to effectively, cheaply, and safely clean that nasty, backed up drain!

All you need is:
- Distilled white vinegar
- Baking soda
- Boiling water
- Lemon juice (Optional: I used it to shine the sink)
And in no time you'll have a sparkling sink and no more standing water!


Dump a lot of baking soda into your drain. Fill it up if you want! It's fun to watch the reaction.

Then pour in your vinegar. No precise measurement, just pour until it foams nicely.

Bubble bubble toil and trouble! That pesky junk in the drain shall be no more!

Let the baking soda/vinegar reaction sit for a minute, up to 15 if you want, then pour in a kettle full of boiling water. This will help flush everything down.
I was so excited to see how fast the water drained after I did this! I'll definitely be doing it on all of our drains, especially the tub! Gross.
I quickly got motivated to give the sink a good scrub down. I sprinkled baking soda all around the sink then scrubbed with a regular sponge. The mild abrasiveness cleaned it really well. I then poured lemon juice on the sponge and wiped down the sink for a lovely shine.
It may not seem like much, but it's a big difference, I swear! It's not the nicest sink, but it's what we've got! And that was probably the best it's looked since it was installed. The joys of renting.
What are some of your favorite cleaning methods? Do you like to go all out with the strongest grade stuff available or do you like to use the not-so-harsh natural versions?
Catherine
Saturday, January 26, 2013
YEC East
No time to write...so late! We had a great first day of YEC despite 2-3" of snow here in Virginia Beach!

YEC was wonderful. I love waking up to a beautiful beach sunrise every year.
Till next time,
Catherine

YEC was wonderful. I love waking up to a beautiful beach sunrise every year.
Till next time,
Catherine
Thursday, January 24, 2013
YEC East Weekend
Well, my husband and I are in Richmond safe and sound! We're staying with my parents tonight then they are dog sitting for us while we head to Virginia Beach early in the morning for the second YEC!
We love going to VA Beach for YEC even if it is in the winter. We get up early in the day and we get to see the most beautiful sunrises from our hotel. I hope to have some great photos to share soon! Lets just hope the snow that's on it's way doesn't keep any students from coming to YEC!
Till next time,
Catherine
Wednesday, January 23, 2013
DIY: Make Your Own Vanilla Extract!
Vanilla is a delightful flavor that most of us probably use quite often in the kitchen. If you buy the real stuff, it can be expensive! I've recently learned that it can be made fairly inexpensively. All you need is a couple vanilla beans and some vodka!
My husband and I really don't drink (if anything, a small glass of wine with family) so buying a whole bottle of vodka just seemed silly. I told my mom about making vanilla and she offered some of hers. That being said, she helped drop the cost of this project for me! The cost of vanilla beans can seem high, but if you're making vanilla, it seems to even out. I paid almost $7 for two vanilla beans at my local Food Lion but you can find them online at a wholesale price. I included an affiliate link below for your convenience!
I first found this nifty DIY on A Beautiful Mess. These girls gave a quick tutorial here. She reused a maple syrup bottle which I think looks adorable! I have real maple syrup in a similar bottle that I wanted to use but it wasn't empty when I wanted to try this! Maybe next time.

Gather your supplies!
- Vodka
- Vanilla Bean(s)
- Bottle or jar
- Liquid measuring cup
- Scissors
- A funnel can be helpful

All Natural Madagascar Vanilla Beans

I love this little bottle with a cork stopper. It originally had bread dipping oil in it that my aunt had given to my mom as a gift. I've recently developed a borderline obsession with saving jars and bottles so I made sure she saved it for me!
Directions:

Cut the beans down the middle long-ways. Some sites have recommended scraping the beans out from the inside. If you do that, you'll need to filter your extract before using it in a recipe to keep the beans out. But then again, it probably doesn't make a difference.

Two beans cut length-ways will give you, obviously, four strips.

Now measure out your vodka. You will need 4oz for every vanilla bean. (Psst, 8oz=1 cup). I had two beans so I poured a whole cup.

This is where the funnel comes in handy. Shove the beans into the bottle and then pour in the vodka. And this is where I warn you to measure how much your bottle/jar can hold beforehand! My bottle held just under a whole cup. It was maybe 1/10th of a cup too much or some absurdly small amount. I doubt it will effect the extract. I've actually read that you can continue to add vodka as you use the vanilla and it will continue to "brew" more extract. It was also advised on one site to keep the liquid line above the beans so they don't dry out.

And now, we wait! This picture was taken as soon as I finished. It only took about an hour to begin showing color but it will take about a month before you should start using it. I've got a little bit of store bought extract left so by the time I use that up, I'm sure the homemade stuff will be ready.
This was taken about 2-3 weeks later.
.JPG)
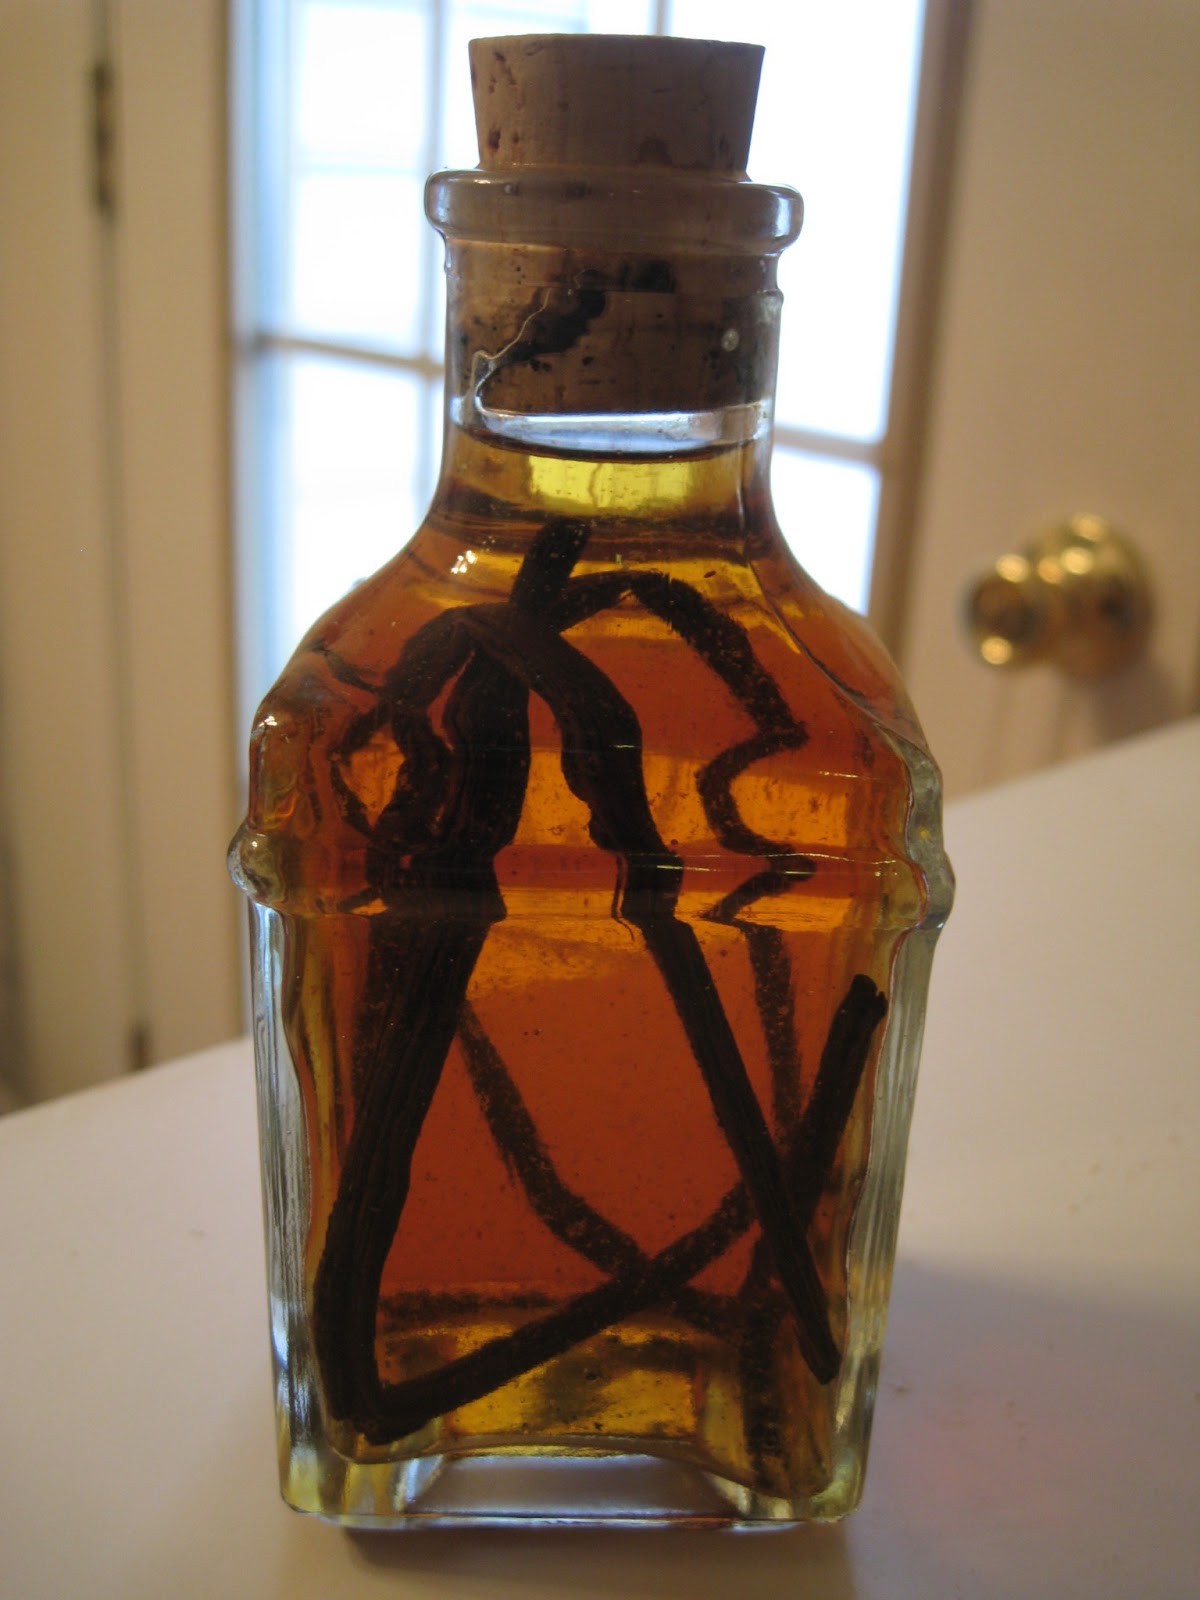
This is after more than a month. It's dark amber and ready to use! I don't bake a whole lot (trying to keep sweets out of the house!) so I haven't used it yet but I'll try and whip something up soon to tell you all how it was!
Tips:
- The brand of vodka isn't very important. It's said that you can basically just get the cheapest one because you're not going to be drinking it so the quality doesn't matter. The alcohol is the necessity.
- It will take at least a month before you can use the extract. It takes time for it to age. 6 months is best from what I've read. It can last indefinitely but the beans should probably be cut to shorter lengths so that the liquid does not drop below the tops of the beans.
- "I don't want to put vodka in my cupcakes!!" ....is what you might be thinking. Don't worry! The alcohol will burn off when you cook whatever treat you're making! Not to mention, the amount of vanilla usually used in a recipe is fairly small in comparison.
- Making lots of bottles of vanilla extract would make great gifts! Just keep in mind you'll need to make them at least a month in advance!
- According to BlogHer, vanilla may be in short supply very soon! So, stock up!
- Some helpful websites: Vanilla Review and Amadeus Vanilla Beans.
Do you always buy real vanilla extract or do you go with imitation? Can you tell if there's a difference?
Till next time,
Catherine
Disclaimer: I may be compensated for any purchases made through affiliate links.

I've linked up to Make Your Own Mondays 10/14/13 with Nourishing Treasures!
Tuesday, January 22, 2013
Brand New Patio Fire Pit
Disclaimer: This is a post I wrote a couple of weekends ago when we had an abnormal day of 70 degree weather in JANUARY! I figured it would be appropriate to post on a day where it is only 20 degrees and dropping. I know I'm not the only one longing for warmer temperatures!
Thanks to Hip2Save I scored this awesome patio fire pit for only $25! And there was free shipping! The original post alerting the masses is here. I follow Colin on Facebook as well so I jumped on the deal when I saw her post it! If you're not following her blog or her Facebook...you're missing out! She's always posting great freebies and sales. I've gotten a ton of cool free stuff from following her! I've mentioned some of those things here and here.
Thanks to Hip2Save I scored this awesome patio fire pit for only $25! And there was free shipping! The original post alerting the masses is here. I follow Colin on Facebook as well so I jumped on the deal when I saw her post it! If you're not following her blog or her Facebook...you're missing out! She's always posting great freebies and sales. I've gotten a ton of cool free stuff from following her! I've mentioned some of those things here and here.
These patio fire pits are rarely any cheaper than $50. My husband and I have been hoping and waiting for a sale on the one that Target sells. It's regularly priced at $70. They can range up to $200 or more for the really nice ones. I was so excited when I found one for $25!
The package finally came in on a Friday evening and we immediately put it together. I was way too excited about such a little thing!
It was already late and very dark out so we decided to wait till the following evening. When we got back from our visit to Ivy Creek Park we gathered some small logs and sticks from the tree line behind our townhouse. The high that day was 70 degrees! It's mid-January people! It was crazy but we did all we could to enjoy it!

I set up a good fire. Gotta make my dad proud!

Lighting it!

In no time it became a beautiful little fire.


And for a couple of nice, relaxing hours, we pretended we lived out in the country again. Don't get my wrong, we love Lynchburg! We just miss living in the country.
Now all we need is some patio furniture...
How do you take advantage of unseasonably warm days? How do you deal with the extra cold ones?
Till next time,
Catherine
Monday, January 21, 2013
Cook: Maple Mustard Chicken

Ok, I know that's not the most appetizing title but trust me when I say this stuff was good! The original recipe can be found here.
Ingredients:
- 4-6 boneless, skinless chicken breasts or strips
- 1/4-1/2 cup sweet and spicy mustard
- 1/4-1/2 cup maple syrup
- Salt and pepper
- Olive oil
- Parsley and/or chives for garnish
Directions:

Preheat your oven to 400 degrees. Mix together the mustard and maple syrup. Don't skimp and use crappy syrup. Get REAL maple syrup...you know...the kind from a tree! Mrs. Butterworth and Aunt Jemima aren't cuttin' it anymore. Not in this household anyways! I used 1/4 cup of each but I think next time I'll do 1/2 cup of each so there's more sauce. Just do it however you think it'll taste best! If you like mustard, add more mustard!
This is how I made the recipe, but I think it would be even better if the chicken was marinated overnight in this sauce. That's how I plan to make it next time.

Lay your chicken out in an oven safe dish.

Drizzle your EVOO on top.

Salt and pepper those bad boys!

Pour on the maple mustard dressing.

Sprinkle some parsley and/or chives (I did both because I already had them mixed) for some pretty garnish. Just do it, it's not like they taste bad! Or like anything for that matter.

Bake for about 30 minutes. The downside to this is that the sugars in the maple syrup burn and make a horrible black crust on the dish. Another note for next time, either use a disposable baking pan or line your dish with aluminum foil! It's nothing a good soak in the sink won't cure, but still, if you're like me, you hate dishes and especially ones that require more work!


A very delicious dish that will be sure to please your family! My husband couldn't get enough of it!
Are you a fan of mustard? What kind do you like to stick with? This recipe would be great with just about any type of mustard!
Till next time,
Catherine
Subscribe to:
Posts (Atom)