This is your last call, folks! Only a few more hours and the contest will be over! I've received an AMAZING response to this contest. I never thought I'd get so many entries! Click HERE to go to the contest and enter before it's over!
I want to take this post to thank YOU my lovely readers for participating and I wish you all the best of luck! I wish I could give you all free coconut oil! Thank you for entering and for commenting, liking, sharing, etc! You're the best!
I always want to take the time to especially thank the following bloggers for so graciously helping out a little blog like mine and promoting me and my first contest on their Facebook pages! I am so extremely grateful for how welcoming and sweet they all were about promoting my blog and contest! Much love to each and every one of them! :-)
Attempts at Domestication
Common Sense Homesteading
Are We Crazy or What?
Giving Away Love
The Cottage Homestead
Live the Fit
Inspire & Indulge
The Nutritionalist Reviews
Nourishing Mama
Krysta Steen
Now you guys should all go "LIKE" their pages and follow their blogs! There's so much great information that you can learn from them all! Just click on the name of the blog you want to check out and it will take you to their Facebook page.
Alrighty people...only about 4 hours to go!
Till next time,
Catherine
Thursday, February 28, 2013
Bad Blogger
Man I'm such a bad blogger! I totally forgot to post something yesterday! I went with my husband and his co-workers to film a conference in Colonial Heights and we were so busy I never had a chance to get to my computer!
I won't let you down again!
Well, no promises. I'm only human after all!
Till next time,
Catherine
I won't let you down again!
Well, no promises. I'm only human after all!
Till next time,
Catherine
Tuesday, February 26, 2013
Breaks Interstate Park

Only this awfully cold, dreary and wet day in Lynchburg, I thought I'd share with you a quick post about a weekend trip to Breaks Interstate Park. It's a place I had never heard of but we stayed there for a weekend when my husband had a weekend job nearby.
To get there we had to drive through the most insanely curvy roads I have ever seen!!

This Mapquest picture doesn't do it justice! These roads were ridiculous! My husband and I were both feeling car sick it was so bad! Haysi, Virginia, where the pin on the map is, is the area he had to work in but Breaks Interstate Park was nearby. All of the dark green area at the top-left is the park. Oh and not to mention in addition to the curvy roads, everything was either a hill or a mountain! It's right in the heart of the Appalachian Mountains and right by the Virginia/Kentucky border.

The park was really pretty and nice. The photo above was taken from the restaurant in the park. They've got it set up like a combination resort/hotel but relaxed. Breaks Interstate Park is considered "The Grand Canyon of the South" because of the immense ravine between the mountains. It's pretty spectacular.

Here we are in front of the "Grand Canyon of the South"...not that you can tell!

The pictures don't do it justice but it was really a sight to see. Much greener than the real Grand Canyon!
Where's your favorite little-known tourist attraction? Is it local or in another state?
Till next time,
Catherine
Monday, February 25, 2013
Have you entered yet?
Only a few more days of my very first giveaway contest!!!
Click HERE now and go enter!
I mean it, go!
Let's be honest, I've got a little teeny-tiny blog going on here...you've got a pretty darn good chance of winning! Not so with most of those other freebie contests out there! Not to mention you can earn up to 8 entries!
Ok I'll give you the link again. My very first giveaway contest ever that I'm so excited about! Can you tell I'm still a bit too excited about this thing? Indulge me...go enter it!
Have you entered???
Till next time,
Catherine
Friday, February 22, 2013
DIY: Greeting Card Binder
OK are you prepared for this?
Gather your sweet and lovely cards from your wedding, your baby shower, past birthdays, whatever you want.
Dust off your hole puncher.
Buy binder clips from Target (about $3 for an assorted pack of 8) in the office supply section.
Now get to work.

I don't really need to give a tutorial for this do I?
What a "Duh!" moment on how easy this is and what a great solution for all those cards you can't toss! I did this with all the cards from my bridal shower and wedding. I also cut cardboard to fit in the front and back as covers but haven't gotten around to doing anything cute with them. Maybe I'll glue some cute scrapbooking paper over it or even Mod Podge some pretty fabric.
Another cool aspect of this project is that you can always unclip the rings and add more cards as time goes on!
What would you do to make it look cute and decorative?
Till next time,
Catherine
Thursday, February 21, 2013
DIY: Laundry Detergent!

Back when I first got an account on Pinterest, I pinned this recipe for making homemade laundry detergent from Being Creative to Keep My Sanity for a fraction of the price of buying it from the store every month. I made this quite a while ago and also recently made dishwasher detergent! I love this because it's cheap, easy, lasts forever, and I actually know what's in my detergent, not just random chemicals!
Ingredients:
- 1 4lb 12oz box of Borax (found in the detergent isle)
- 1 4lb box of Arm & Hammer Baking Soda (found in the baking isle)
- 1 3lb 7oz box of Arm & Hammer Super Washing Soda (found in the detergent isle)
- 3 bars of Octagon soap OR 2 bars of Zote soap OR 3 bars of Fels-Naptha soap (all found in the detergent isle)
- 3 lb container of Oxy Clean
You'll also need:
- A large bucket, such as a 5 gallon one
- Large trash bag or multiple plastic grocery bags
- Large spoon to mix with
- Cheese grater
All you need is 1-2 Tablespoons per load! Save your Oxy Clean scoop and measure it that way, which is what I do! It doesn't sound like much but it's all you need, trust me!

Directions:
Grate the bar soap in your cheese grater. I used the regular size holes. Actually, I put my husband to work for this step ;-) It will dissolve in the water, so no worries! I only wash laundry in cold water and I've never had a problem with it not dissolving.
Now dump everything into the trash bag-lined bucket and mix! I tried to pour each ingredient in layers so it was easier to mix.
Do I pick the easy projects or what?

My absolutely adorable jar I found at a local thrift store for about $5! I had been wanting to do this project for ages but hadn't found the right jar for it yet. I was ecstatic when I did! It's a little cracked and definitely not perfect but I think it adds to the charm!

And here it is, all done and ready to go! I had a grocery bag FULL of extra but this was all that would fit into the jar. The little fabric bits are dryer sheets I made with flax seed and dried lavender! They smell amazing and save tons of money also. Keep reading for why I decided to make my own!

I took this screen shot while I was watching the show My Strange Addiction about a lady who ate dryer sheets. So weird! What's worse is that the chemicals in dryer sheets have been proven to cause cancer and nervous system disorders! Why on earth would I want to put that on my clothing and linens? No thanks! Did you know that many brands of dryer sheets also contain animal fat? Heads up, vegan friends! Now you understand why I either use my own or don't use any at all!

Here are a couple more shots of the jar I gave as part of a bridal shower gift to a sweet friend. My husband designed the label for me...what a good graphic designer husband! I had him put the ingredients on the label so if she wanted to make more she had the recipe right there!

On the other side I listed Directions to Use and then Directions to Make. At the bottom I put a little note saying congratulations, etc.
What a simple gift, right? I combined this with a homemade flax seed/lavender dryer sheet and a laundry basket from her registry. I think I added more laundry related items but now for the life of me I can't remember!
I've also given several jar-fulls to my mom and my mother-in-law and guess what...I've still got tons left! I don't remember exactly when I made it but it's getting close to the year mark I think. This stuff is great!
Helpful hints:
- I had a hard time finding Super Washing Soda. My local Food Lion, Target and CVS didn't have it but Kroger did.
- My local Food Lion didn't have Fels-Naptha soap or Zote so I bought Octagon brand. They're all basically the same. Zote can be found at Home Depot.
- The Oxy Clean is optional but definitely can't hurt, especially if you have kids or work a messy job!
- Remember, you only need 1-2 Tablespoons per load! This stuff will last you FOREVER!
- The recipe makes about 2 gallons so be prepared!
Have you ever made your own detergent? What's your favorite detergent to use?
Don't forget to go HERE and enter my very first giveaway!! It's an amazing prize!
Till next time,
Catherine
Wednesday, February 20, 2013
My First giveaway! Coconut Oil! [Closed]
Ok guys I am just about BURSTING at the seams to tell you about this!
I'm joining up with Tropical Traditions, an amazing company that sells primarily coconut oil, and having my first giveaway contest!
One of you lucky dogs will win a free jar of coconut oil!
I was first introduced to Tropical Traditions brand about 5 years ago when working at a small local natural food store. My boss swore by coconut oil and primarily used Tropical Traditions. Now I'm hooked! I used it for everything and I love it!

You can view my previous post about how much I love coconut oil here.
Lately I have been using Expeller-Pressed Coconut Oil from Tropical Traditions. I'd have to say primarily because it is cheaper. Gold Label is a much higher grade and quality and retains much more of the coconut scent and flavor. Which brings me to another reason I choose the Expeller-Pressed over the Gold-Label. For me personally, I have never been a fan of the flavor of coconut and I know many others aren't either. I cook with coconut oil often and I don't always want the flavor or smell of coconut oil. Now don't get me wrong, MANY people love the flavor and scent but to stay on the safe side, I prefer coconut oil without it. That way I'm able to sneak it into more foods without people catching on and whining "Ewww did you put healthy stuff in this??" Why yes, yes I did. But what they don't know, can't hurt 'em!
All that being said, the Gold Label is much higher quality and better overall. My mother-in-law and I did a smell/taste test and she really enjoyed the fact that the Gold Label had a stronger flavor and scent.
I highly recommend Tropical Traditions coconut oil and that's coming from years of using it, not getting a free sample!

If you're interested in buying coconut oil or any of their other great products, be sure to go through the following link!
![]()
Virgin Coconut Oil, Gold Label - 1 quart
If you order by clicking on the above link and have never ordered from Tropical Traditions in the past, you will receive a free book on Virgin Coconut Oil, and I will receive a discount coupon for referring you.
Disclaimer: Tropical Traditions provided me with a free sample of this product to review, and I was under no obligation to review it if I so chose. Nor was I under any obligation to write a positive review or sponsor a product giveaway in return for the free product.
Good luck everyone!
Till next time,
Catherine
I'm joining up with Tropical Traditions, an amazing company that sells primarily coconut oil, and having my first giveaway contest!
One of you lucky dogs will win a free jar of coconut oil!
I was first introduced to Tropical Traditions brand about 5 years ago when working at a small local natural food store. My boss swore by coconut oil and primarily used Tropical Traditions. Now I'm hooked! I used it for everything and I love it!
(Source)
Lately I have been using Expeller-Pressed Coconut Oil from Tropical Traditions. I'd have to say primarily because it is cheaper. Gold Label is a much higher grade and quality and retains much more of the coconut scent and flavor. Which brings me to another reason I choose the Expeller-Pressed over the Gold-Label. For me personally, I have never been a fan of the flavor of coconut and I know many others aren't either. I cook with coconut oil often and I don't always want the flavor or smell of coconut oil. Now don't get me wrong, MANY people love the flavor and scent but to stay on the safe side, I prefer coconut oil without it. That way I'm able to sneak it into more foods without people catching on and whining "Ewww did you put healthy stuff in this??" Why yes, yes I did. But what they don't know, can't hurt 'em!
All that being said, the Gold Label is much higher quality and better overall. My mother-in-law and I did a smell/taste test and she really enjoyed the fact that the Gold Label had a stronger flavor and scent.
I highly recommend Tropical Traditions coconut oil and that's coming from years of using it, not getting a free sample!
Win 1 quart of Gold Label Virgin Coconut Oil!
Tropical Traditions is America’s source for coconut oil. Their Gold Label Virgin Coconut Oil is hand crafted in small batches by family producers, and it is the highest quality coconut oil they offer. You can read more about how virgin coconut oil is different from other coconut oils on their website: What is Virgin Coconut Oil?
Tropical Traditions also carries other varieties of affordable high quality coconut oil. Visit their website to check on current sales, to learn about the many uses of coconut oil, and to read about all the advantages of buying coconut oil online. Since the FDA does not want us to discuss the health benefits of coconut oil on a page where it is being sold or given away, here is the best website to read about the health benefits of coconut oil.
DETAILS!
a Rafflecopter giveaway
DETAILS!
- Prize: 1 quart of Gold Label Virgin Coconut Oil from Tropical Traditions
- To enter: Follow the prompts on my Rafflecopter widget below!
- Starts: Wednesday, February 20th, 2013
- Ends: Thursday, February 28th, 2013
- Only one winner and it's available to U.S. and Canada residents (sorry!)
- The winner will be chosen at random and announced on Friday, March 1st, 2013! I will e-mail the winner as well to confirm.
If you're interested in buying coconut oil or any of their other great products, be sure to go through the following link!
If you order by clicking on the above link and have never ordered from Tropical Traditions in the past, you will receive a free book on Virgin Coconut Oil, and I will receive a discount coupon for referring you.
Disclaimer: Tropical Traditions provided me with a free sample of this product to review, and I was under no obligation to review it if I so chose. Nor was I under any obligation to write a positive review or sponsor a product giveaway in return for the free product.
Good luck everyone!
Till next time,
Catherine
Tuesday, February 19, 2013
Exciting Blog News!
Tomorrow marks the start of my very first blog giveaway!!
I couldn't be more excited about this!
I can't really give any other details away but be sure to come back tomorrow and enter the giveaway!!!
Is the anticipation killing you? It killed me to wait this long to share but it's worth it! Any guesses as to what I'm giving away?
Till next time,
Catherine
Monday, February 18, 2013
DIY: Melted Crayon Art
Happy Monday, everyone! What? You're not happy it's Monday? Well, smile anyways!
Today I thought I'd bring out a project I did BEFORE I started my blog, which is why there aren't any pictures of the DIY process in action. But I'll tell you, it's easy to do!

Supplies:
- Crayons (whichever colors you prefer)
- Canvas (size is up to you)
- Hair dryer
- Tape
Directions:
Pick out the color crayons you want in your project. I chose greens, a few yellows, and oranges. I wanted this to go in my kitchen and green/orange are my current kitchen colors.
Now line them up on the canvas in whatever pattern you'd like. I've seen all sorts of cool variations like wavey patterns, flower patterns and other neat ideas. For the first one, I decide to just go straight across the top. One good friend of mine picked colors that matched her favorite wedding photo from the Bahamas. It turned out beautifully and sits on her fireplace mantel next to the photo. Seeing hers is what made me say, "Ok, enough is enough...I'm making one of those!"
I would recommend removing the labels from the crayons before taping them down. That way they won't slip out of the wrapper right away.
Now bust out that hair dryer and get to work!
Melt the crayons until you get the look you want!

Voila! Simple, cheap, and fun art! It even matched the fruit! We've since moved the canvas over top of a little metal baker's rack and replaced it with these awesome free kitchen printables.

For this one I taped off a small area so that I can put a picture in there and the melted crayons act like a frame. I think it's cool! I also cut the crayons into 1" pieces so it wouldn't overflow the canvas. I haven't picked a photo yet so it's not hung up yet but I'm getting there!

My husband made this one on his own. He just really wanted to play and melt more wax. He likes it, though so we may still hang it somewhere!
Helpful hints:
- Keep the hair dryer on low heat. If it's going too fast it will knock the crayon pieces off the canvas.
- Full size crayons produces a lot of melted wax. Remember that if you're using a smaller canvas.
- If you have white or light colored walls where you're going to hang the canvas, you may want to cover the back where the crayon ran the wrong way so it doesn't "draw" on your wall.
- Lay down newspaper or something so you don't get melted wax everywhere!
- Prop the canvas at an angle so the wax melts and drips nicely but the crayons don't slip and fall down the canvas, messing up your design.
- Take your time! It's not a race.
- Point your hair dryer down at the crayons. That way you don't blow them off to the sides and the crayons melt and drip downwards nicely. Unless you want a different effect then go for it!
Have you made melted crayon art before? What sort of pattern did you use? Send me a photo of how it turned out, whether it's good, bad or ugly! I'd love to see your versions!
Till next time,
Catherine
Friday, February 15, 2013
Weekend Visit From the In-Laws
They should be here anytime now! I'm so excited...every card door slamming that I hear sends me running to the windows. I'm such a little kid.
I'm just so excited for them to be here and visit with us considering it's always us going to them. My father-in-law has visited once while I was out of town and another time when I was out of town he brought my brother-in-law as well. My mother-in-law and sister-in-law haven't been here since last January when we first moved my husband in!
Needless to say, I'm excited to show off our townhome and all the little things we've done to really make it our home!
Tonight we are going with his parents to a marriage conference/seminar thing at a nearby church. It's Valentine's weekend...I hope it's not chock full of pink and read hearts and love-dovey mush.
Have I mentioned I hate Valentine's Day?
I do. I think it's silly.
Don't think that I hate 'love' though! I love 'love'!
Moving on.
I've planned some meals, made lots of bread and stocked up on groceries. Mmm can't wait to pop the cinnamon bread into the oven!! It's on its second rise now. It'll make the house smell heavenly!
Unfortunately I have to work Saturday morning but other than that hopefully we'll have the rest of the weekend to hang out and show off some of the fun places we've found in Lynchburg!
Can't wait!
Got any big weekend plans?
Till next time,
Catherine
Thursday, February 14, 2013
Visitors!
My in-laws are coming! My in-laws are coming!
I swear that's a good thing and not a call for help! My in-laws are amazing and they're coming to visit us this weekend! Even my brother-in-law and sister-in-law!
Today I was a mad woman cleaning everything in sight. Not to show off "Oh I'm such a wonderful Suzie Homemaker" but to showcase a clean home because dirt is gross. Plus, it's good to have an "excuse" to deep-clean your home once and a while.
This is actually the first time they've all come to visit since we all helped my husband first move in last January. I'm so excited to spend time with them and show them some of our favorite Lynchburg spots!
Any good suggestions for fun Lynchburg activities? Do you get along with your in-laws? Why or why not?
Till next time,
Catherine
Wednesday, February 13, 2013
DIY: Memory Keepsake Shadow Box
Ready for a super easy DIY project?
Are you sure? It's really easy.
If you're like me, you like to save little things like movie ticket stubs, exhibit passes, concert tickets, fortune cookies and other little momentos of dates and special times with your significant other or friends. I always try to keep them in the same general place, like a giant plastic bin full of other memory items.
So, if you've got 'em, gather 'em up.
Now buy a shadow box. The size is up to you. The one I bought is maybe a 5"x7" but don't quote me on that.
Open up the shadow box, toss in the little treasures. Close it up.
You're done!
If you want to get all fancy schmancy with it you can cut a slit in the top so you can just drop in new ticket stubs as you get them.
You can also cut a cute piece of scrapbooking paper to fit and be the background.
I didn't do either of those but I'm keeping them in consideration!

I've always liked to save little things like that but never had a way to display them. I love this because it's so simple and it's so sweet to be reminded of these fun memories.
Do you save little things like that? What do you do with yours?
Till next time,
Catherine
Tuesday, February 12, 2013
Overwhelmed Cook
Ok so overwhelmed may be an excessive word. But today, just an hour before my husband got home from work, I decided to conquer all of my cooking tasks at once. I needed to make ketchup, breakfast pockets, and bread. All at the same exact time.
Apparently I suck at making time estimations. If you don't know, when you make your own bread, you have to proof the yeast (aka, let it sit for about 10-15 minutes). I started the honey wheat bread and the whole wheat pizza dough (for the pockets) at the same time, thinking it would work out A-OK. I also had ketchup simmering at the same time. Then suddenly I remembered I hadn't made the two dozen eggs and 2lbs of sausage for the breakfast pockets! Oh man things got crazy quick.
Again, I'm exaggerating but it seemed very overwhelming at the time!
Suddenly there were eggs to be cracked, sausage to be cut and cooked, grease to be drained, ketchup to whisk, yeast to check on, cheese to cut and so on. All while rocking out to one of my Pandora radio stations. It's how I kept my sanity I think.
Fortunately, it doesn't hurt bread to proof the yeast a little longer so I let those sit and I rushed to make the sausage and eggs.
Right when I'm getting the most flustered switching between flipping sausages (getting burned by popping grease...ouch!), scrambling eggs, and whisking the honey into the finally cooled off ketchup, my husband comes to the rescue. How sweet.
So he took over the stove top and I went into kneading bread as fast as my hands could go! I started with the pizza dough for the breakfast pockets because that needed to sit for 15 minutes once it was a workable dough. The bread takes over an hour to rise so that came next.
We switched once the pizza dough was ready and he rolled out small pieces and I filled them with the eggs and sausage and popped them into the oven. They came out perfectly this time! Woohoo! Third time's the charm!
In a matter of 45 minutes we were all pretty much said and done. Thank God for helpful husbands! The bread is still on its second rise but the dishes are in the dishwasher and most everything is cleaned up. It all worked out very nicely in the end. Glad I didn't let that mini panic attack take over in the midst of it all!
You can find my recipes for the things I cooked here:


Do you have a hard time cooking multiple things at once and having them all work out time wise? What's your secret?
Till next time,
Catherine
Grow: Container Potato Plant
Did you know you can plant potatoes in containers and they'll do great? According to many internet sources they do! Since we're still living in a townhouse, we don't have our own land to garden on so I'm trying to do what I can to have a lot of green!
I've been on the hunt for a cute barrel for quite some time. I had seen them at Lowe's and Home Depot but they just seem so expensive! Like this one at Lowe's is super cute but $35 seems steep to me!

And then I found this wooden beauty! My husband and I went into a huge estate sale store that was going out of business. It was priced at $7...not bad! But then we get to the counter and we are told everything is 40% off! We paid a little over $4 for this cool little barrel!

It's not quite as big as I wanted but for $4 how can you go wrong? It's maybe a foot tall.

There's a tiny hole in the bottom too. Not sure why, though.

We decided to line it with a plastic bag just to be safe so it wouldn't rot the wood. It was pressure fit, sanded and sealed with something so I think it would have been fine, but it can't hurt to have that layer of protection.

I didn't want to drown my taters so I gathered some old decorative rocks and stones to lay in the bottom.


We left about 4-6" open from the top.

I grabbed our quite sprouted potato that I had cut in half a couple days beforehand. You can tell I've been hoping to find a good barrel like this for a while!

I then set them on top of the soil. Because the roots were so long already, I made sure to bury them into the soil first.

About another 2-3" of soil on top, some water and we're good to go!

Now we wait! I really hope we get some little potatoes in a few months!

I got my first sprout in just a couple of weeks!


It's important to note that if the potatoes start showing to cover them up with another inch or two of soil. You want the stem to be under soil by about an inch and a half.
Stay tuned for updates on the potato growth!
What are some veggies you've grown in containers? Which ones seem to work the best?
Till next time,
Catherine
Friday, February 8, 2013
Cheese Making Kit!

When I got this in the mail recently I could hardly wait to open it up!!

It's my cheese making kit that I bought from a Living Social deal! It includes all the things you need to make tons of different cheeses! I have always wanted to try my hand at making cheese and now the possibilities are endless. I'm way too excited about this!
The cheese making kit was sent by Standing Stone Farms out in Tennessee. They raise Nubian goats for their milk and are famous for their immense knowledge of all things cheese.
There are so many cheese recipes that I'm having a hard time deciding where to start!
Any suggestions? What's a good cheese to make for a first-timer like me?
Till next time,
Catherine
Thursday, February 7, 2013
DIY: Dish Detergent!
Are you tired of spending way too much money on dishwasher detergent/tabs/liquid? Fortunately for me, just before I got married and my husband was living the final bachelor days in our townhouse, I found a big box of 85 dishwasher tabs for about $12. We only just now ran out so it lasted us about a year, which is great! I found this great recipe on Being Creative to Keep My Sanity on Pinterest and it was actually one of the first things I had pinned on my DIY pinboard. I wanted to wait till we ran out of our existing tabs before making more dishwasher detergent.
Today was that day! Well, it was a few days ago but I knew it could wait. Even better, my awesome husband hand washed all the dishes that had piled up last night! Gave me some extra time which was great because I was having a hard time finding the Arm & Hammer Super Washing Soda. Note: I couldn't find it at Food Lion, CVS, or even Target but they had it at Kroger.
All you need is:
- 1 box of Borax (4lb 12oz - Found in the detergent isle)
- 1 box of Arm & Hammer Super Washing Soda (3lb 7oz - Found in the detergent isle)
- 0.5lb/24 Tbs citric acid (Found in the canning isle but I got mine at a local farm Auburnlea Farm)
- 3 cups Epsom Salt (Found in the health isle near hydrogen peroxide and such)
- LemiShine Rinse Aid or Distilled White Vinegar (Especially important if you get hard water spots)

Directions:
Are you ready for how easy this is?

Mix everything together in a huge bowl. Or even a big bucket. My bowl was just barely big enough.

Now pour it into your jar/container. I saved this Oxi-Clean container and the dishwasher tab container from before. Everything fit into these two containers and I counted about 16 cups of detergent. And get this...all you need is 1 Tablespoon per load!! Can you imagine how long this will last? My guess is a VERY long time. For my husband and I, we run a load of dishes at least once a week but sometimes twice so this should last us forever!
If you have a problem with hard water you'll definitely want to use the rinse aid, whether it's vinegar or LemiShine. With either one, just sprinkle a little bit in the bottom of the dishwasher before running it. Don't worry, your dishes won't smell like vinegar!
Price breakdown:
Borax $4.80
Washing Soda $3.29
Citric Acid $2.65
Epsom Salt $3.00 (Estimate)
Vinegar $2.35
Total: $16.09
Now that comes to 256 Tablespoons in 16 cups...that's a lot of dishes!!
If you buy LemiShine instead of Vinegar, it's about $4 for a small container. Not sure how long it lasts.
Verdict: Well, not sure yet! I just made it today so I haven't had a chance to use it yet but I will update as soon as I do! I'll do one load without the vinegar as a rinse aid and one with it so I can let you all know how it does.
Oh and here's a fun story for you all. Last week I used a sample detergent that I had. I just assumed it was dishwashER liquid...until the next morning when we got up. My husband was the first one into the kitchen and he called to me to let me know our kitchen floor was FULL of suds. Uh oh. Ok so it wasn't that bad, just a quick clean up with some towels. But, moral of the story...read the label. I felt like such a dummy but it helped us start the day with a good laugh!
UPDATE: I have since washed dishes several times and have not used LemiShine or vinegar as a rinse aid and I haven't gotten any spots on my glassware. I guess we don't have hard water! Just keep in mind if you do have hard water you'll need a rinse aid. Otherwise, the dishes are coming out sparking clean!
How much do you spend on dishwasher detergent every month? It adds up quick! Or do you wash all your dishes by hand?
Till next time,
Catherine
Wednesday, February 6, 2013
Don't Get Sick!
Lately I feel like not a day goes by where I don't hear tons of people say that they're sick! I absolutely hate getting sick and try my best to avoid it so the more people get sick around me, the more careful I get. I figured I'd write some basic tips on how to stay healthy during cold and flu season and during all these crazy weather changes were getting. 20 degrees one day, 60 the next...only in Virginia.

As for the flu shot...I personally don't get a one. Never have, never will. Same goes for my husband. In my opinion and research, there is too much risk in getting the flu vaccine. They put MERCURY in flu vaccines for crying out loud. Do you realize how horrible mercury is to the human body? No thanks. I even have one mercury amalgam filling that I want replaced. What you do is up to you...but I highly encourage you to do some research first.
So there you have it...simple ways to stay healthy in the remaining months of cold and flu season!
Stay well, everyone!
How do you stay healthy when everyone else is getting sick?
Till next time,
Catherine

I've linked up to Wellness Wednesday 9/11/2013 with Intoxicated on Life, Nourishing Treasures, Raising the Barrs and Finding the Source.

(via)
With weather like this...people are bound to get sick...even if it's only allergies!
Here are some things that I like to do to keep myself and my husband healthy when everyone else is getting sick! And a few others that I may not be so consistent on doing, but are good tips!
- Eat lots of fruits and veggies! If you keep eating healthy, your immune system will stay strong. If you eat junk, your immune system will crash because your body isn't being fueled properly.
- Don't forget to wash your fruits and veggies before eating them. They've been through a lot before getting into your kitchen. Buying local always helps though!
- Take vitamins. A multi vitamin is always good, but vitamin C, or a vitamin B complex is helpful too. My husband and I take all 3. Well, he takes the C, I take the B.
- WASH YOUR HANDS! How basic...yet we still don't do it enough.
- Don't touch your face or bite your nails. Germs are all over your hands. If you rub your face, you have more of a chance of those germs getting into your eyes/nose/mouth.
- Sneeze and cough into your elbow/shoulder or a tissue if possible. Do NOT cover your mouth with your hand...that's gross.
- Use hand sanitizer when washing your hands isn't possible.
- Keep your distance from people who say they're sick or are visibly sick. It's not rude...you don't need to catch what they've got!
- If you work in a place with a lot of client interaction, keep Lysol handy and use it often.
- The essential oil blend called Thieves from Young Living Essential Oils is a great natural antibacterial/antifungal/antibiotic and it smells great! It comes in oil form, foam hand wash, spray, household cleaner, and hand sanitizer. I also love the blend Purification. It's also great for killing germs and freshening a stale room. Go buy them and use them...they're awesome.
- And don't forget to exercise. A strong body is a healthy body!
As for the flu shot...I personally don't get a one. Never have, never will. Same goes for my husband. In my opinion and research, there is too much risk in getting the flu vaccine. They put MERCURY in flu vaccines for crying out loud. Do you realize how horrible mercury is to the human body? No thanks. I even have one mercury amalgam filling that I want replaced. What you do is up to you...but I highly encourage you to do some research first.
So there you have it...simple ways to stay healthy in the remaining months of cold and flu season!
Stay well, everyone!
How do you stay healthy when everyone else is getting sick?
Till next time,
Catherine

I've linked up to Wellness Wednesday 9/11/2013 with Intoxicated on Life, Nourishing Treasures, Raising the Barrs and Finding the Source.
Tuesday, February 5, 2013
Cook: Make Your Own Cream of "Something" Soup!
I don't know about you guys, but I feel like I never have cream of chicken soup when I need it. Or cream of whatever else I might be wanting to use. When I saw this post from Pinterest, I knew it was something I wanted to try. Even if it didn't work, it was worth a try to save money and grocery store trips!
Oh and did I mention it's way healthier? I love making alternatives to store bought items because I actually know what's in the food I'm eating and feeding to my husband. Store bought cream of "something" soups are always high in sodium and full of other junk we don't need.
Ingredients:
- 1 cup non-fat dried milk
- 3/4 cup cornstarch
- 1/4 cup bouillon (beef, veggie, chicken, whichever you prefer. I used chicken)
- 4 Tablespoons freeze dried minced onions
- 1 teaspoon basil
- 1 teaspoon thyme
- 1 teaspoon pepper
- 1 teaspoon parsley
- 1 teaspoon chives
When you're ready to use it, mix 1/3 cup of your dry mix with 1 1/4 cup of water. This is the equivalent of one can of condensed soup. Cook it until it thickens up.
Directions:

If you have cubed bouillon you'll need to crush it. I love using my mortar and pestle! It's so fun. I used a total of 10 cubes and that was about 1/4 cup.
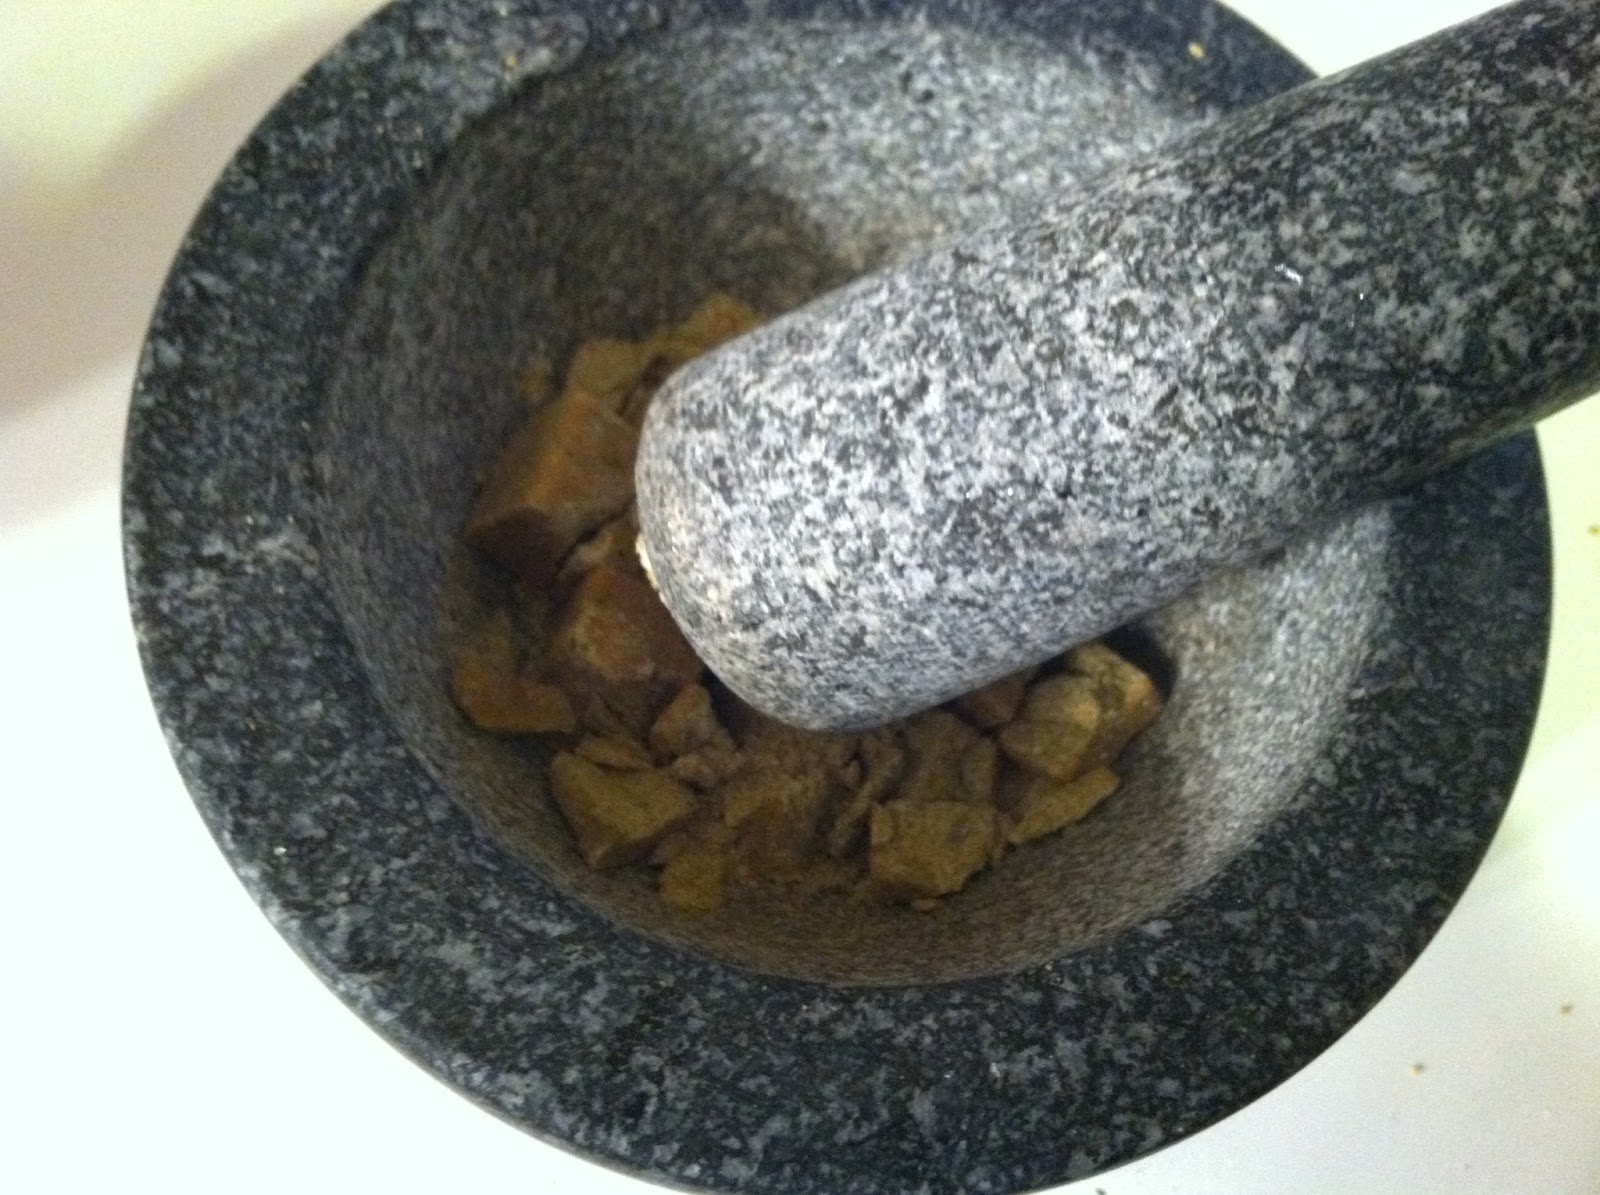
Crush it well.

Pour all your ingredients into a medium bowl.

Stir it all up till everything is well mixed.

Now fill up a jar and you're good to go! I'm going to make a label for it with the recipe for making the actual soup as well as the ingredients for one batch so I always have it handy. As you can see, one batch made over half of a mason jar full. I haven't cooked with it yet but as soon as I do I'll give you an update on how it was!
Also, I added the parsley and chives just because but they weren't included in the original recipe.
Can't wait to try it out! Too bad this post just gave me a mini To-Do list!
1. Make a label for the jar
2. Actually try out the mix
I'll get right on it...
UPDATE 8/13/13: I painted the jar with chalkboard paint to create a label and I use this mix all the time! It's delicious!
Have you ever made your own version of a cream of "something" soup? Do you prefer to stick with the cans at the store instead?
Till next time,
Catherine

Subscribe to:
Posts (Atom)