//Google Analytics

Friday, November 30, 2012

Pinterest Fail: Veggie Turkey Tray

Just thought I'd share with you all a little Pinterest fail that I attempted on Thanksgiving. It was sort of spur of the moment as I was arranging the veggies that I spent all night cutting. I thought, "Oh I'll try and make it look like a turkey like I've seen on Pinterest! That will be cute!"


I had seen this one first and thought it would be cute to try! 


Or this one...


This one is great too!


Even this little one is cute!


This is what mine looked like. Yikes. 

Pinterest. Fail.

Such a simple task yet...not quite so easy. 

Do you like to make your veggie trays fancy or just functional? Have you ever dressed up a veggie tray to look like something else?

Till next time,
Catherine

Thursday, November 29, 2012

Cook: Crispy Sweet Potato Fries


Mmmm....sweet potato fries have been a favorite of mine for several years now! They're heavenly and delicious and I've heard they're healthier than regular fries. Don't quote me on that, I haven't fully done my research yet! 

Nevertheless...they are delicious.

But they are the devil to make!

I have made sweet potato fries so many times and, although they usually still taste good, the consistency is never right! They're either burnt or soggy. Ugh. Am I the only one who's been dealing with this? 

Well one day on fabulous Pinterest, I came across this blog The Art of Doing Stuff with an eye catching post title, Guaranteed Crunchy Sweet Potato Fries. I stopped dead and immediately put "sweet potatoes" on my grocery list. 

Give this a try and let me know how it turns out!

Ingredients: 
  • 2-3 medium sized sweet potatoes
  • A few tablespoons of arrowroot powder or corn starch
  • A few tablespoons of olive oil (or you choice of oil. I try to stick with EVOO as it's usually the healthier choice)

Directions:

Wash the sweet potatoes. Also preheat your oven to 425.

Now cut them into medium size fries. Not too thick like steak fries but not shoestring either. Peeling them is up to you. I chose not to in order to save time and the skin doesn't bother me. 

Fill up a pot with cold water and soak your fries anywhere from an hour to all day. This step helps remove the starch which will make them more crispy later. You can even drain and refill the pot a couple times if you'd like. 


Next, drain the pot of water and toss the fries in a bag with a few tablespoons of corn starch. Shake the bag until the fries are evenly coated.


They don't need to be covered so thick that they're all white, but a light coating will do just fine. 


Spread them onto a cookie sheet.


Now drizzle your oil on the fries. Get in there with your hands and make sure there's a nice even distribution of oil on all the fries. Start with a couple tablespoons and add more as you need it. Generally, the more oil, the crispier the fries. This is also the time to sprinkle salt or any other spices you want to add. I prefer not to add salt because I eat the fries with ketchup and there's plenty of saltiness in ketchup.


Be sure to spread the fries evenly on the cookie sheet so they're not really touching. Bake them for 15 minutes. Don't forget to flip them about halfway through! Check them at 15 minutes. If they're still not quite ready, flip them again and pop 'em back in the oven for another 5 minutes or so.


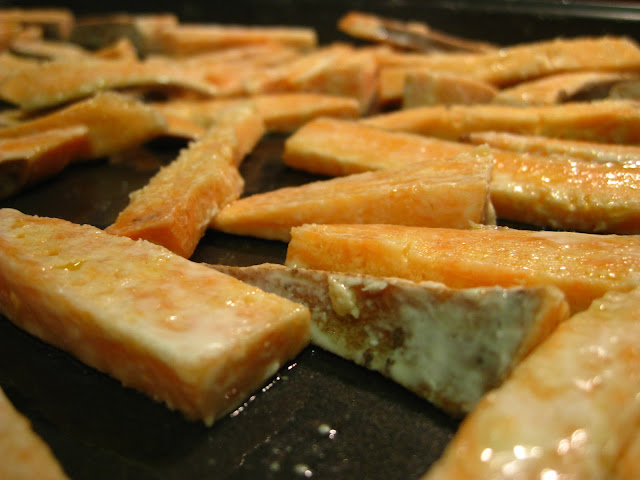
When they're done, they should look as mouth watering as this!

I had a tough time with the fries sticking to the cookie sheet but I think it was just that I didn't flip them soon enough. Making the perfect sweet potato fries is definitely an art form because it is so time consuming and tricky to get it just right! The results are so worth it! If it doesn't work just right, keep trying! It takes time to get them the way you like them. I've just accepted it's not the easiest food to make and never will be unless you buy the prepackaged kind from the store! 

If you enjoy your sweet potato fries with ketchup, check out my blog on making homemade ketchup that is delicious and much healthier than store-bought. It's easy to make too!

Do you prefer sweet potato fries or good ol' French fries? What's your method to making them just right? Deep-fry or bake?

Till next time,
Catherine

Be sure to check out the awesome blogs where I've linked up this post! Spread the blog love! 


I've linked up to Make Your Own Mondays 9/16/13 with Nourishing Treasures!


I've linked up to Mostly Homemade Mondays Week 46 with Frugal By Choice, Cheap By Necessity, Homegrown and Healthy, Scratch Mommy, and Mindful Mama!


I've linked up with Plucky's Second Thought Link Up #12 with Plucky's Second Thought!


I've linked up to the In and Out of the Kitchen Link Party #34 with Feeding Big!


Wednesday, November 28, 2012

Family Farm Findings: Part 1

Hello all! 

No recipes or tutorials today, sorry! 

Although I do have some awesome findings to share with you!

Over Thanksgiving weekend, my mother and I went to visit The Farm as we like to call it. It's my grandparent's former home. It's a beautiful 200+ acre farm with a charming old yellow farm house as its center. My grandparents have both passed, my grandpa only 2 years ago. Two of my aunts and their children now live in the house along with an uncle. Since my grandpa passed it has been a hard process because all of his estate needed to be settled. My family is not rich by any means but it has been tough for my 8 aunts and uncles to deal with it all. Recently they have been working towards cleaning out the house and many sheds. Doing this is always tough as there are memories attached to everything! Instead of letting everything collect dust, the family has been going through things and deciding what they wanted to keep and what would be donated or thrown away. 

I hadn't gotten anything yet and wanted some things of my grandparents' before it just got taken to the thrift store. I got a lot of really amazing stuff that I really will treasure for many years. I'll post more on the special items later. I first got pictures of the items I got from one of my grandpa's sheds so that's what I'll share with you today. These are all cool things that my husband and I will need some day and I love that they were my grandpa's! 


My grandparents were flea market connoisseurs and I can tell you that's where a lot of my thriftiness came from! I found so many items with flea market stickers still attached! I love this wooden tool caddy that I found. It also has a flea market price written on the side! 


Heavy duty drop forged steel scissors, pipe wrench, and a Made in the USA C-clamp.


Made in the USA square! Sensing a pattern? 


Skilsaw (one of 3 I found), some rasps, sandpaper block a pencil engraver, handsaw, coping saw, and a brush (one of MANY I found.) If you look closely at the brush you can see the flea market price!


I'm sensing some cool projects with this gadget! We researched and found out it can etch glass!


Awesome multi-pocket tool belt with an army pocket attachment. 


Really sharp and just a little rust.


Skilsaw.


I also found a couple horse halters and a bunch of dog collars and leashes. Keep in mind there haven't been horses at The Farm in probably 20 years! I also found my grandpa's old dog Fluppy's harness, name tag and all. I'd be lying if I said I didn't get a little misty eyed when I found that! Fluppy was a silly old black poodle mix and he was a super sweet little guy. He was always at my grandpa's side.


I even found an assortment of fishing lures like this one. I'm not sure what kind it is or what type of fishing it's used for but I figured we could use them to start our tackle box! 


There was a box of tiny hooks too. 


And The Fisherman's Friend multi-tool. You can measure, cut, and weight your fish with this one gadget!


There was also some fishing line and a fish scaler as well. Oh and one little bobber. It's a start to our little collection! 

The day was a bit emotional but it was nice to know I can hold on to some things that were my grandpa's and will think of him whenever we get to use them. 

Stay tuned for another blog where I'll post about some of the more meaningful items I found!

Do you like to hold onto your passed relatives things? Do you feel like it keeps you closer to your heritage? Or would you rather hold onto just a couple things and send the rest to Goodwill?

Till next time,
Catherine


Tuesday, November 27, 2012

Hermit Crabitat


You may remember reading in a previous vacation blog that I got two more hermit crabs to make a little family of three! I also wrote about how the conditions in the store were awful (dead crabs, smelled bad, etc) and so I really felt like I was rescuing them more than anything! That week in the OBX I ended up doing a bit of hermit crab research and learned SO much. The Hermit Crab Patch is a great resource with so much information about hermit crabs. If you plan to get a hermit crab next year on vacation then please check out that website. There's so much more to them than you thought! Or at least, than I thought. They're really cool little creatures and they need more than a tiny, crummy home than this...


Can you really be surprised when they die within a year?

I have a 10 gallon tank that I had from my first hamster when I was 13 at my parent's house and we picked it up over Thanksgiving. The tank has housed hamsters, gerbils, even a turtle, and now, hermit crabs!


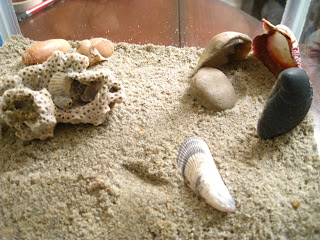
I gathered my shells and other pieces for the tank. I've got various shell halves and a couple larger shells for the crabs to grow into. I also had a sandwich bag full of small shell pieces that I collected from the surf in Avon, NC.


I bought this cool coral piece in a little shop in Avon. I doubt it's actually from the area but I thought it would be cool in the tank and provide a place for the crabs to climb. Oh and did I mention I took home 3 gallon-sized bags of sand as well? I figured 3 gallons would be a good amount in a 10 gallon tank. 

As far as cleaning the sand, I put about half a bag full into a bucket with water. I mixed the water and sand and then dumped the water to get any loose particles out. Then I spread the sand onto a black plastic bag laid out on the patio and let it "bake" in the sun for several days. I've heard you can also boil sand but I figured that would be too time consuming for as much as I had. 


Then all I did was spread the sand into the tank and placed shells throughout. Into their new home they go!


They started exploring right away...I think they like it! I can imagine it's got to be much better than their previous home. 


 I took a plastic tray and filled half with the small shells and poured filtered water in their along with their sponges. This way they have lots of fresh water and can even take a little dip if they want.


Rhett is in the green shell, Scarlett is on top of the right sponge, and Ashley is the blue shell. They're actually all girls but I just love Gone With The Wind!


This is the other side of the tank. They like to hide in the shell "condo" on the right. My husband and I were talking about getting a small heat lamp to place over this side so they can get some warmth, especially over the winter. Not to mention they need warm temperatures and we have yet to even turn the heat on in our house! Brrr!


There we go...happy little hermit crabs! I know it may seem silly but they're cool little animals and I want them to live a good life. I don't want to just buy them as a novelty and let them die! I learned at The Hermit Crab Patch that they usually dig underground when they move into a new shell to molt so hopefully I'll get to see them do that soon!

Side note: I also want to use some of the sand and shells in a shadowbox project! It's such a cute idea...can't wait to try!

Did you have hermit crabs as a kid? Do you buy them for your kids? 

Till next time,
Catherine


Monday, November 26, 2012

Decorating for Christmas!


Now that we're back home from visiting family in Richmond for Thanksgiving...it is finally time to decorate!! We don't really have a lot, which is actually fine by me...less work! We have a small 4 foot tall tree that my parents are letting us use and it's just right! Not too large to take up a huge chunk of our living room but not a Charlie Brown tree either! As you can see in the above picture, we've got some twinkly lights on the stair railing and our stockings are hung on the stairs because we don't have a mantel. I might move them onto the TV stand instead so they'll hang nicer.


Step 1: LIGHTS! My husband LOVES Christmas. He would cover the house in Christmas lights if I let him!


Step 2: Gather and hang new ornaments and childhood ornaments. 


My mom bought me a whole lot of Breyer ornaments one year...I love that we can finally hang them! 

The silver stars I bought at Ten Thousand Villages quite a few years ago. My mom cross stitched the caroler ornament herself. 


I found this adorable little ornament at a craft show in Richmond last year. I love it!


I got a musical note for my husband since he is a great musician. Plus, it's super pretty and handmade!


We bought this ornament while on our honeymoon at Split Rock Resort in Pennsylvania!


And our panda stockings!!! How adorable are they?? 


Cat in the way...


So it may not look like much but we love it and it's full of so many precious ornaments that mean so much to us!!! We've decided that every time we go on a trip or vacation that we'll buy another ornament as a souvenir. There are several ornaments missing that we have gotten during trips to the OBX but I have to dig them out first. I plan to write on the back of the ornaments the month/year that we bought them so we don't forget. 

I LOVE CHRISTMAS! Yet somehow, I'm not ready to get rid of my fall decorations...

Which is your favorite to decorate for, fall or Christmas? Do you like to go all out or keep it simple? What are some of your favorite traditions?

Till next time,
Catherine