//Google Analytics
Showing posts with label plant. Show all posts

Wednesday, August 7, 2013

Grow: Tomato Plant Suckers - What they are and how to get rid of them

Have you ever heard that you should pinch the suckers off of your tomato plants?

You want me to do what to the what on my tomato plants?

I know, I know, I said the same thing!

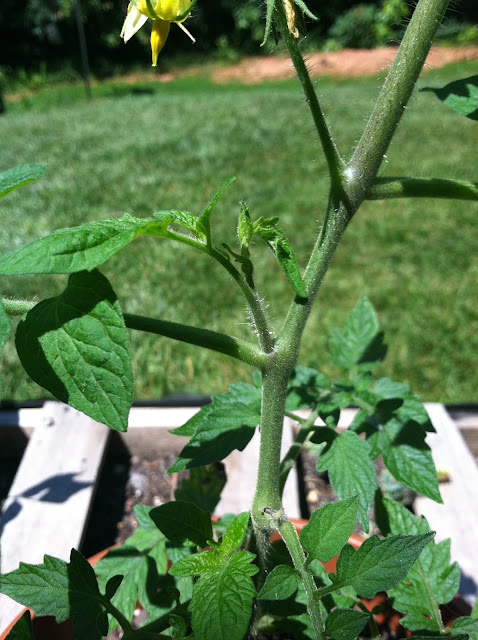
Well after some research I found out that suckers are extra branches that grow between the stem and the branch of tomato plants. They rarely produce any fruit and just "suck" the nutrients up and not use it towards producing. 

Now my dad (who I view as a master gardner) said that he never pinches suckers off. Partly because he doesn't feel like wasting time but also because he said he never sees much of a difference. I, on the other hand, need all the help in the garden as I can so off with their heads! I mean, suckers. 


The stem of the plant is the tall, vertical part and the branch is the horizontal part. The sucker you can see right there in between the two. I try to scan for them any time I'm in my "garden" and catch them when they're very little but this one I let grow for a good photo explination.


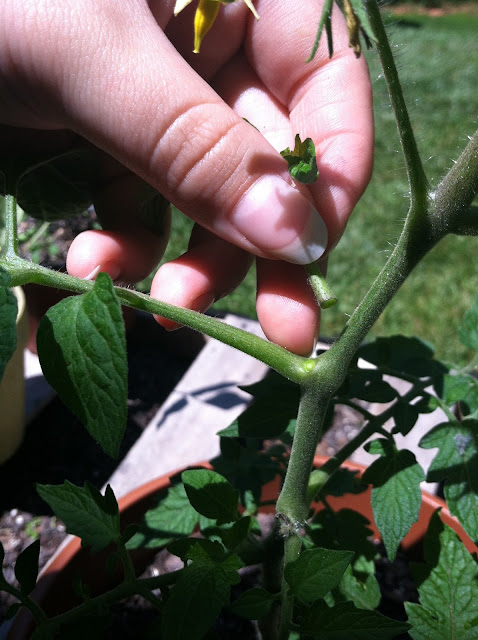
To remove them, just grasp it as close to the stem/branch corner as you can, pinch it between your fingers or nails and pull.


Try to break it all at once and not let it tear. But really, that's all you have to do and then you'll have that yummy-nostalgic-but-kinda-gross tomato plant smell on your hands. You'll thank me later.


I was simply so excited when I was pulling those suckers because I discovered a couple of teeny tiny roma tomatoes starting! 


Here they are just a few weeks later. It felt like months. The anticipation of harvesting food from my little garden was ridiculous! I have since gotten two more romas but not much else. I have four roma plants and about five other tomato plants, some of which are grape and some are Big Boy but until they produce, I really don't remember which was which! Garden surprise!

This is my first year gardening on my own so I've definitely got a lot to learn! My poor little roma plants almost didn't make it because here in Drenchburg, sorry, I mean Lynchburg, it rained most of the summer! That was my first tomato plant lesson. Here are some of the others. 
  1. Tomato plants don't like a lot of water.
  2. Drainage is key.
  3. They love a lot of sunlight.
  4. Pinch those suckers.
  5. One plant per pot.
  6. Make sure those pots are big!
  7. They take a lot of nutrients so be sure to have good soil, compost or fertilizer!

What are some of your tomato growing tricks? What's your favorite tomato to grow and why?

Till next time,

Friday, May 17, 2013

My Wee Strawberry Plant

Around early April we bought 4 roma tomato plants and one strawberry plant from a local greenhouse. I picked the best strawberry plant I could find and it already had 3 little strawberries growing! 


This is what they looked like the week we bought the plant. 


And after maybe 5-6 weeks they were getting huge! 


Then after close to 7 weeks out, I managed to pluck this beauty at the perfect time! I was like a little kid I was so excited! Way too excited about one measly strawberry! 


 This little guy was delicious! I must have waited till the right time because it was so good!

But alas, just one strawberry at a time is not very filling. I've decided I need about 99 more strawberry plants.

Since that's not very practical, I'm thinking just 3-5 more plants would be a good deal. At least with that many we can have a handful now and then.

Looking at these pictures reminds me that there's one more that's just about ready to eat! Yum!

What fruit are you growing in your garden? What's your favorite fruit? 

Till next time,
Catherine

Thursday, April 25, 2013

My Other Container Plants

I recently showed you all how to make an awesome (and cheap!) pallet garden, well, I've also got a few things in pots that are growing on our patio! I've also shown you my container potato plants as well. I've also got a small pallet garden going with herbs but I'll have to share that on another day. 

Apparently I'm just never satisfied! I still want more food to grow! I'm thinking another strawberry plant and a couple blueberry plants...what do you think?


Actually before we made the pallet garden, we went to a local greenhouse and picked up a few plants and some seeds. The soil is the cheap stuff from Ollie's at $2 a bag! What a deal! Even if the quality of the soil isn't too great, I've got my worm farm to supplement it! 

The bag of seeds are Improved Tendergreen Beans. I never knew there were so many types of beans! I just picked the one that looked the most like the classic green beans I used to snap with my grandma. 


I got four Roma Tomato plants. I personally don't like tomatoes (I know, I know!) but my husband does so since he'll be eating them the most, he picked them out. I'll cook with them though!


And my little Allstar Strawberry plant! I can't even tell you how excited I was to get a strawberry plant! It's little, though...definitely think I should get another one. Or two...


Wittle baby strawberries!! They've almost doubled in size in just a couple of weeks!


Ready to plant!


Senor Strawberry seems to be settling in ok!


I doubled up the tomato plants so I didn't have to buy 4 pots. If they grow really large I'll repot them, though. 
Update: Lesson learned...tomato plants need lots of space! They won't thrive if they're crowded!


My little garden in the making! 

What are you growing in your garden?

Till next time,
Catherine

Thursday, April 11, 2013

Container Potato Plant Update

Several months ago I read that potatoes do really well in container gardens and I just knew it was something I wanted to try! I posted about my beginning ventures HERE. My potatoes were growing really well for a couple of months. At one point there were three different sprouts (even though I only planted two sprouted potato halves) and one of them even got over 2 feet tall! 

Well, I finally decided it was warm enough outside to put the plants on the patio (AKA: concrete slab, but patio sounds nicer) and then the tallest one died! I'm not sure if it dried out too quickly or maybe it got too cold one night. Either way, it's wilted and sad. I gave up hope of it bouncing back.

I gave in and dug it up to see if anything was underneath and lo and behold!


A tiny tater!!!! Ask my husband, I was WAY too excited about such a little potato!


But I grew it! With my own two hands I planted it and cared for it and it grew! 


I know it's not much, but I'm thrilled. I'm even more excited to see what else is under the dirt!!


This is what's left. This plant is over a foot tall and appears to be doing well. After taking this picture I decided to replant the one I dug up...just in case it wasn't quite dead yet. The base of the stalk was still firm and so I thought I'd give it another chance. 

Hopefully in my next update I'll have bigger and better potatoes to show off!!

Were you excited like I was the first time you harvested something you grew? What was it? What's your favorite plant to grow in your garden?

Till next time,
Catherine

Tuesday, February 12, 2013

Grow: Container Potato Plant

Did you know you can plant potatoes in containers and they'll do great? According to many internet sources they do! Since we're still living in a townhouse, we don't have our own land to garden on so I'm trying to do what I can to have a lot of green! 

I've been on the hunt for a cute barrel for quite some time. I had seen them at Lowe's and Home Depot but they just seem so expensive! Like this one at Lowe's is super cute but $35 seems steep to me! 


And then I found this wooden beauty! My husband and I went into a huge estate sale store that was going out of business. It was priced at $7...not bad! But then we get to the counter and we are told everything is 40% off! We paid a little over $4 for this cool little barrel! 


It's not quite as big as I wanted but for $4 how can you go wrong? It's maybe a foot tall. 


There's a tiny hole in the bottom too. Not sure why, though.


We decided to line it with a plastic bag just to be safe so it wouldn't rot the wood. It was pressure fit, sanded and sealed with something so I think it would have been fine, but it can't hurt to have that layer of protection. 


I didn't want to drown my taters so I gathered some old decorative rocks and stones to lay in the bottom.


 Then we filled it most of the way with soil.


We left about 4-6" open from the top. 


I grabbed our quite sprouted potato that I had cut in half a couple days beforehand. You can tell I've been hoping to find a good barrel like this for a while! 


I then set them on top of the soil. Because the roots were so long already, I made sure to bury them into the soil first.


About another 2-3" of soil on top, some water and we're good to go! 


Now we wait! I really hope we get some little potatoes in a few months!


I got my first sprout in just a couple of weeks!


 After over 3 weeks, they've both sprouted and are even growing leaves. I'm so excited!


It's important to note that if the potatoes start showing to cover them up with another inch or two of soil. You want the stem to be under soil by about an inch and a half. 

Stay tuned for updates on the potato growth!

What are some veggies you've grown in containers? Which ones seem to work the best?

Till next time,
Catherine