//Google Analytics
Showing posts with label natural. Show all posts

Friday, May 2, 2014

Apothekayla the *book* {GIVEAWAY} [Closed]

Happy May everyone!

What? You don't remember me?

It's me, Catherine! Blogger behind Happily Ever Crafter. I know, I know...I took a LONG hiatus for the holidays. My last post was December 18th and it is now May 2nd! Ouch.

Well you see, what had happened was...

I decided to take a break for the holidays and while we were dealing with the craziness of moving. Then just overall life happened, and after that I've had very busy work schedules. I've been working a seasonal evening job while trying to find a good day job. I was even working 70+ hour weeks for over a month. Let's just say, that was a bad idea. A very bad idea. Things seem to be settling down now but it's still busy! Although I can't guarantee I'll be back consistently for another short while, I'll do my best! Work, work work! It feels good to be back, though...I've missed you guys!!


And now, to celebrate my return to blogging AND a blogger friend of mine's birthday...I have a fantastic giveaway for you all!


My lovely blogger friend Kayla, the wonderwoman behind Winterstead and ApotheKayla, just launched her very first book! It's called ApotheKayla: Year One: A Beginner's Guide to Making Holistic Health and Beauty Recipe and we're working together to bring you all this wonderful giveaway! One winner will receive an AUTOGRAPHED copy of the book! 

So this giveaway is celebrating three awesome events! 

1. Kayla's birthday is today!!! 
2. Kayla just launched this awesome book!
3. My *triumphant* return to blogging!


Hemp paste is just one of the many awesome recipes you will get if you win (or buy!) the book!


Who wouldn't love some luxurious, homemade, all natural shaving cream?? This book is chock full of recipes that will have DIYing all your health and beauty needs in no time! 


GIVEAWAY DETAILS!
  • Prize: One copy of ApotheKayla: Year One: A Beginner's Guide to Making Holistic Health and Beauty Recipe
  • To enter: Follow the prompts on my Rafflecopter widget below! The more you do the more entries you get!
  • Starts: Friday, May 2nd, 2014
  • Ends: Friday, May 9th, 2014 at midnight
  • Limited to U.S. residents only, sorry! 
  • The winner will be chosen at random and announced on Saturday, May 10th, 2014! I will e-mail the winner to confirm. If I don't get a confirmation within 48 hours I will have to choose another winner, so  be sure to check back here and check your e-mail!
  • Kayla will be signing the winning book and shipping directly to you if you're the winner! 

Now all you have to do is follow the Rafflecopter instructions below to enter!! 


a Rafflecopter giveaway
Good luck! 

CONGRATULATIONS TARA B.!!!!!!!!!!!!!!! A huge THANK YOU to everyone who entered!!!


And hey, if you feel like you're Bad Luck Brian and just want to go ahead and buy your own copy, you can head over to Amazon and get yours! Plus, it's never too early to shop for Christmas presents! This book is a great addition to any home that's becoming more and more 'crunchy'!

Didja miss me? I missed you!! What's been happening in your life in the fabulous year 2014??

Till next time,
Catherine

Wednesday, August 7, 2013

Grow: Tomato Plant Suckers - What they are and how to get rid of them

Have you ever heard that you should pinch the suckers off of your tomato plants?

You want me to do what to the what on my tomato plants?

I know, I know, I said the same thing!

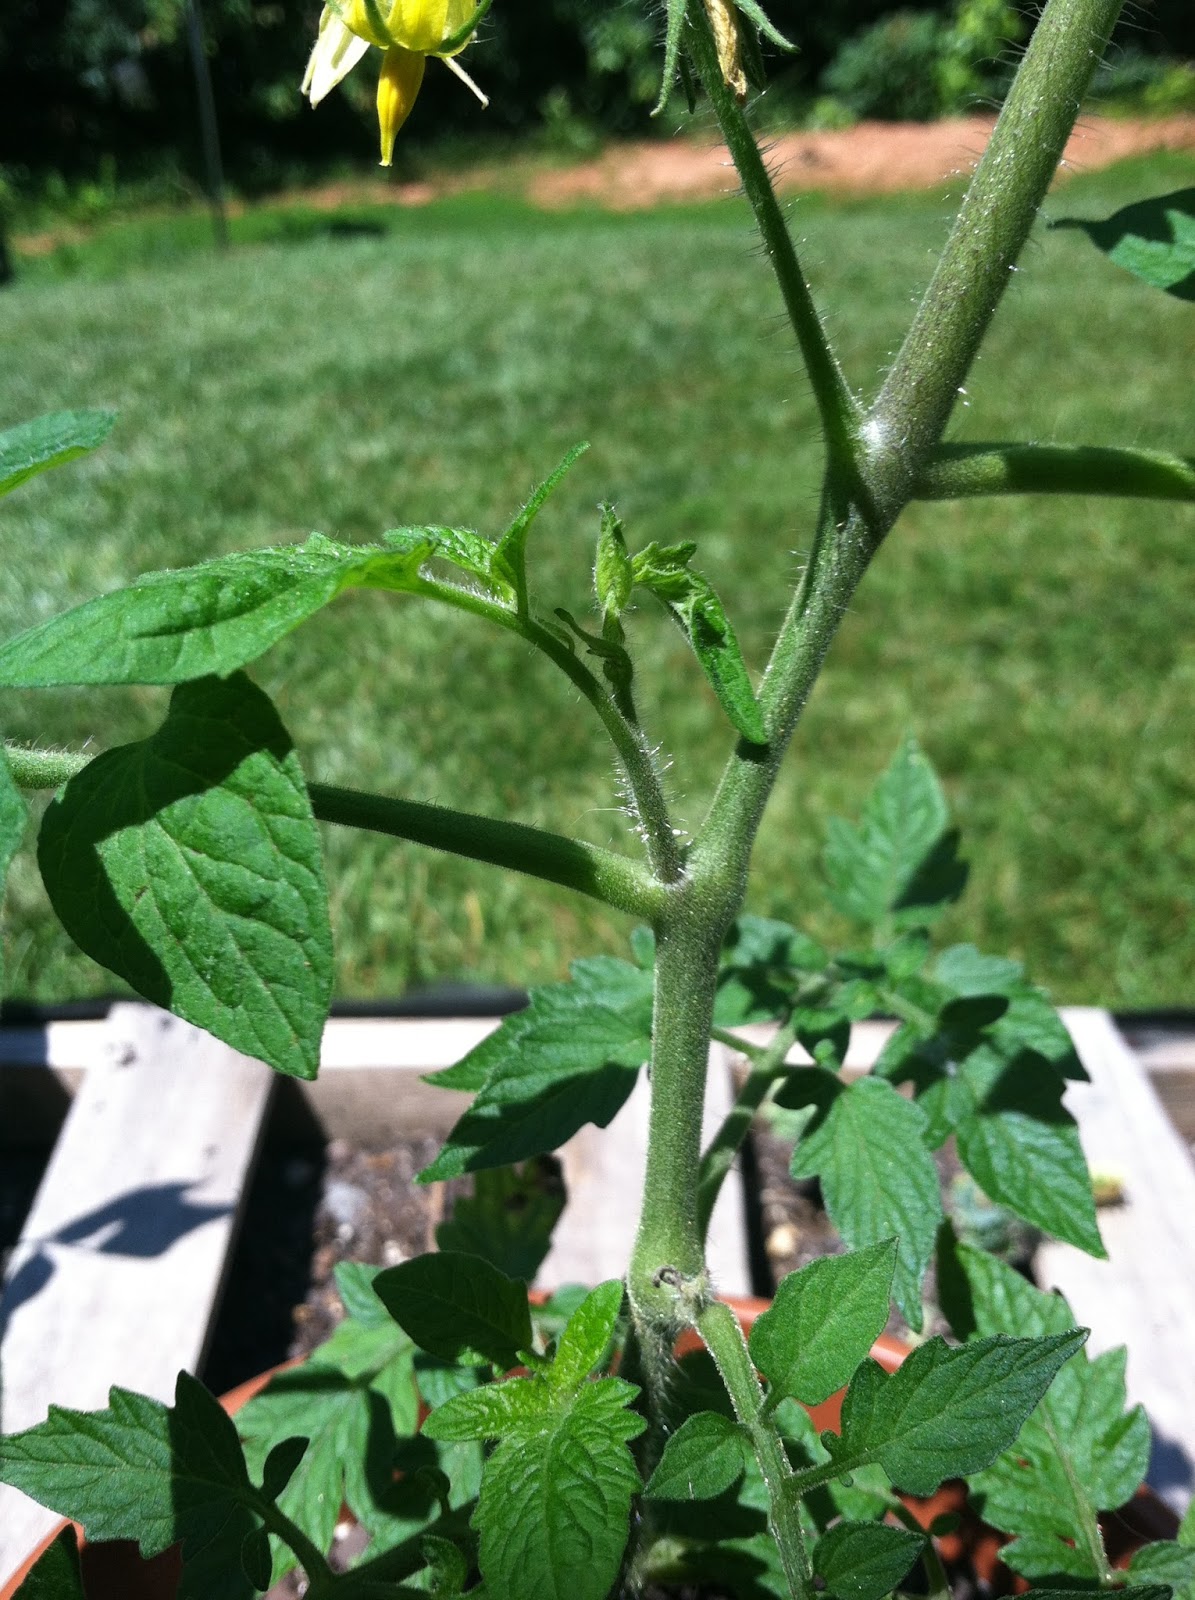
Well after some research I found out that suckers are extra branches that grow between the stem and the branch of tomato plants. They rarely produce any fruit and just "suck" the nutrients up and not use it towards producing. 

Now my dad (who I view as a master gardner) said that he never pinches suckers off. Partly because he doesn't feel like wasting time but also because he said he never sees much of a difference. I, on the other hand, need all the help in the garden as I can so off with their heads! I mean, suckers. 


The stem of the plant is the tall, vertical part and the branch is the horizontal part. The sucker you can see right there in between the two. I try to scan for them any time I'm in my "garden" and catch them when they're very little but this one I let grow for a good photo explination.


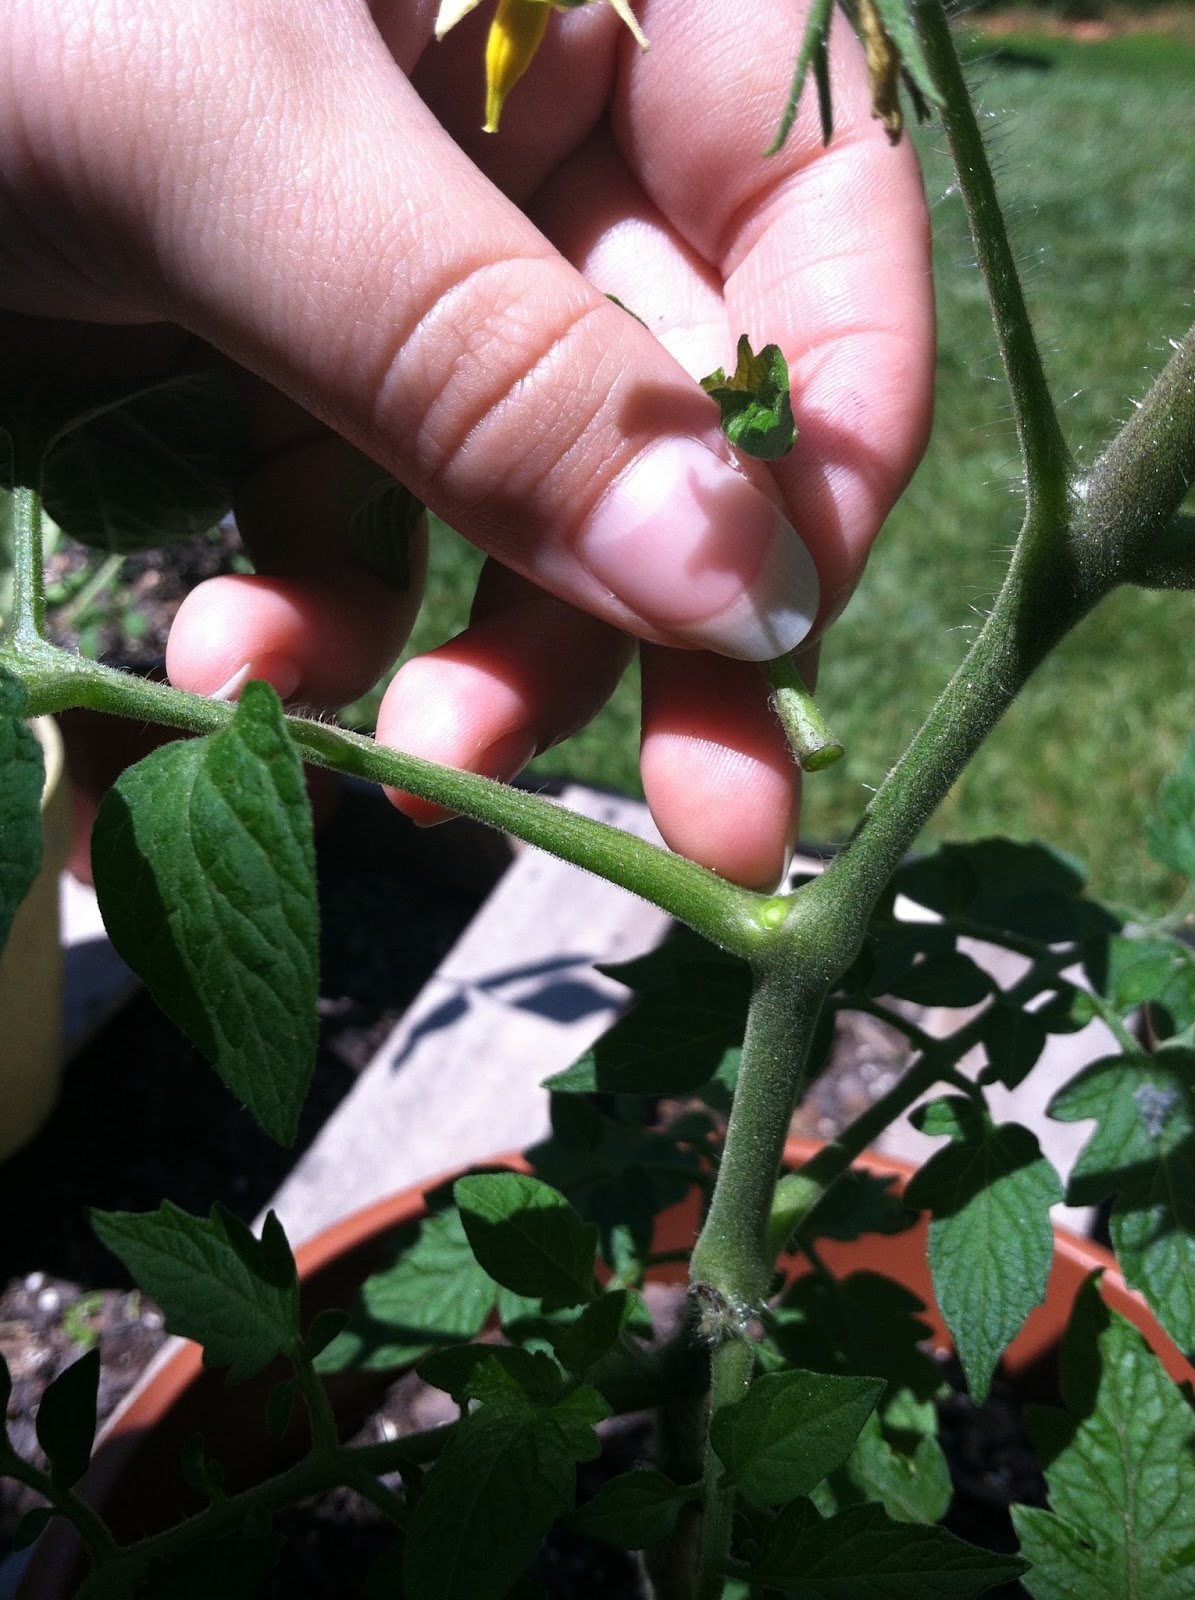
To remove them, just grasp it as close to the stem/branch corner as you can, pinch it between your fingers or nails and pull.


Try to break it all at once and not let it tear. But really, that's all you have to do and then you'll have that yummy-nostalgic-but-kinda-gross tomato plant smell on your hands. You'll thank me later.


I was simply so excited when I was pulling those suckers because I discovered a couple of teeny tiny roma tomatoes starting! 


Here they are just a few weeks later. It felt like months. The anticipation of harvesting food from my little garden was ridiculous! I have since gotten two more romas but not much else. I have four roma plants and about five other tomato plants, some of which are grape and some are Big Boy but until they produce, I really don't remember which was which! Garden surprise!

This is my first year gardening on my own so I've definitely got a lot to learn! My poor little roma plants almost didn't make it because here in Drenchburg, sorry, I mean Lynchburg, it rained most of the summer! That was my first tomato plant lesson. Here are some of the others. 
  1. Tomato plants don't like a lot of water.
  2. Drainage is key.
  3. They love a lot of sunlight.
  4. Pinch those suckers.
  5. One plant per pot.
  6. Make sure those pots are big!
  7. They take a lot of nutrients so be sure to have good soil, compost or fertilizer!

What are some of your tomato growing tricks? What's your favorite tomato to grow and why?

Till next time,

Friday, June 21, 2013

DIY: Skin-Safe Homemade Deodorant {Guest Post}

Look at me on a roll with guest posting lately! Ok, this is only the second one so maybe "on a roll" isn't the best choice of words. Either way, I'm excited to have my good blog buddy Rachael from The Aliso Kitchen guest posting for me! I'm over at her blog today writing about My Biggest Real Food Challenge for her series on the topic. So after you read this post, be sure to visit The Aliso Kitchen for all kinds of awesome recipes, natural alternatives for health and beauty, and real, honest blogging and life and living better. 

Skin-Safe Homemade Deodorant Recipe

Hello! This is my first post for Happily Ever Crafter, but it’s right at home with some of Catherine’s other posts. I’m Rachael, the blogger behind The Aliso Kitchen, and Catherine and I met on Facebook. We have similar interests regarding homemade beauty products, healthy recipes, and gardening. Today, we’re swapping blogs! For me, she wrote a great post on heranti-green thumb, which is her biggest real food challenge.

Today, I’m sharing my kind of messy, but pretty awesome homemade deodorant recipe. Why? Because I love your pits.


Conventional deodorants are scary things. They’re full of all kinds of nasty ingredients, and I’m still not sold about rubbing aluminum anything under my arms. These are special things there, like lymph nodes! I have a pretty high breast cancer risk in my family, and I just can’t wrap my head about placing potentially toxic and carcinogenic substances (like parabens and preservatives) near such sensitive areas. Or anywhere, really.

But when you head to your natural market, you see that many natural deodorants for sale there have different, but similarly weird and unnecessary chemicals. Plus, their prices are way too high.
Instead of wasting my time and money, I decided to whip up my very own deodorant based on recipes 
I’ve seen around the blogosphere.

The cornerstone of my recipe is baking soda as it helps eliminate odors and keeps you fresh!

The ingredients:


-    Coconut oil
-        Arrowroot powder
-        Baking soda
-       Essential oils (I used basil and sweet orange)
     You’ll also need one empty deodorant stick. You can purchase them in bulk on eBay or Amazon, or simply clean out an old tube you have! I used an old Dove stick with an ounce measurement so I could travel through airport security with this stuff.

Did I measure?
…No. Really, I was set to measure! Then, I shook out too much arrowroot powder and realized it didn’t matter. Start off small. Add 1 tbs of baking soda, a couple of drops of a skin-safe essential oil you like (many use tea tree, but it is too harsh for me), and then start mixing in your arrowroot powder and coconut oil. You’ll want a thick paste, so you’ll probably end up using about ½ a cup of arrowroot powder and maybe ¼ - 1/3 c of coconut oil. Maybe less, maybe more! ­


Once you good, thick paste, carefully spoon it into your deodorant stick.


When done, set it in the fridge for a few minutes so it firms up. That’s it!


The only thing I don’t love about this recipe is that it’s a little messy. If you live in a hot environment, the coconut oil will melt. You can remedy this by keeping your deodorant in the refrigerator (weird) or by melting in some beeswax. Since I don’t mind a little mess and do not have any beeswax on hand, I went without. Just a thought!

Why not cornstarch?
Arrowroot powder and cornstarch are two totally different ingredients that feel and do pretty much the same thing. But, arrowroot powder is not a genetically modified food, and is almost a perfect replacement for cornstarch. You can use it to roll out my yogurt dough cracker recipe, to thicken sauces and puddings, as a base for your homemade foundation, or as a skin-sensitive binder in your deodorant.
You could always opt to use just coconut oil and baking soda, but baking soda can be a little rough on the skin in large quantities. Arrowroot powder is the perfect filler: it’s safe for your skin, adds the necessary bulk, and is a healthy ingredient to have around.

Don’t have a stick to use? 
Make a dry deodorant by combining a few tablespoons of arrowroot powder and 1 tablespoon of baking soda in a reusable container. Then, use a makeup puff or cotton balls to dab under your arms when needed.

A note on stink: Some people take time to adjust from conventional deodorants to homemade ones. I was surprised how sweaty and funky I smelled while processing out the traditional, chemically laden stuff. It took about a month for that phase to pass, and now this deodorant is strong enough to get me through long days at the cheese shop. Plus, I have no white build-up or residue on my shirts after. That might vary with people, but it’s a cheap, easy, and safe alternative for me!

Again, thank you, Catherine, for giving me the opportunity to share this with your readers! I’m excited to meet you all, and look forward to next time!


Do you use deodorant? Do you make your own or buy from the store? Have you ever made your own health or beauty products? Tell us below!


Thanks again, Rachael for your great post! I'm planning to try this as soon as I pick up some arrowroot powder! 

Till next time,

Wednesday, April 3, 2013

DIY: Make Your Own Make-Up!

This is the post that I have been anticipating for a while. I probably over did it. My husband and I like to call it, The Chipotle Effect. Basically when you or someone else talks something up so much and then you finally see/try/taste it and you're kind of like, "Eh." while shrugging your shoulders. Or if you enjoy it, but it's not nearly as awesome as everyone has said. Well, I did that to myself I think.

But don't let that deter you right away! I'm going to do more research and see what I can add/take away to make this even better. It's too awesome to not work!

All you need is:

  • French Green Clay (I bought mine at Whole Foods)
  • Corn Starch
  • Cocoa Powder (optional for color)


And all you do is mix the three together! The original tutorial says to do 1 part clay to 1 part corn starch. Basically, if you use 1 Tablespoon of clay, use 1 Tablespoon of corn starch as well. The cocoa powder is optional but I wouldn't recommend using an equal 1 part as well. Add it in slowly to ensure you get the color you want.

Here's how it went for me.


I started small, with a 1/2 tsp of corn starch.


Then a 1/2 tsp of French green clay.


Then about 1/16 tsp of cocoa powder. 


 And this is what it looked like. A bit too green for me.


So I added more cocoa powder. 


Better. 


And more...


Then more corn starch to lighten it. 


Even better, but not quite. 


More of each! 


This was my final color. It's not what I was expecting but it doesn't look like that color on your face. It blends into your skin very well.


As you can see, I didn't make all that much. This old spice jar works perfectly, especially if I make more! 

Tips and hints:
  • This is more of a translucent powder than a powder foundation. 
  • French green clay is used widely for facial masks and is completely natural. It's full of important minerals for our bodies and skin. 
  • Corn starch acts as an oil absorber but it won't dry out your skin.
  • Some with sensitive skin may have reactions so be cautious if you have sensitive skin. I had no issues.
  • If you want, buy all organic ingredients. I just used what I had on hand. Even all organic you can buy the ingredients for less than $10. How many make up brands are THAT cheap??
  • Because it's a powder, you'll need to apply a moisturizer first in order for the powder to stick to your skin. I recommend using Alba Organics SPF 15 Daily Moisturizer. It's light, organic and I love it! (Not paid, just love the stuff.) 
  • One awesome benefit of this is you can simply add more cocoa powder for the summer months when you're more tan then make a lighter batch for winter! So awesome! 
  • It's gluten-free!! I know this is extremely important for many people. Before this, I didn't have any clue that make up could have gluten in it!
  • Even if it doesn't turn out right, you didn't waste hardly anything but time! French green clay is great for face masks so mix your leftovers with some water for a mini spa night. Treat yo'self! 


Conclusion: 

I haven't made one yet. I really didn't see a major difference with the make up. It also seemed to wipe off way too easily. I'm not giving up yet, though because I really want this to work. How cool would it be to make all of your own make up for pennies?? I'm glad I didn't buy the 1lb jar of green clay to start with, though! I'm going to do more research and see what I can find to improve upon this. I don't want to give it up yet! 

What's your favorite kind of make up? Do you go au-natural whenever possible? What's your best make up trick? If you've used this recipe before, any tips or tricks for me? 

Till next time,
Catherine

Tuesday, April 2, 2013

Busy bee

My newest little DIY is something I've been dying to do for a while! I finally got the final material necessary over the weekend (Hint: I found it at Whole Foods) but have been working extra shifts so I haven't really had the time to actually try it out!

I'll go ahead and spoil it for you...I'm going to attempt to make my own make up out of 3 simple ingredients!!

How cool is that?!

Well, if it works, anyhow.

My mom and sister were very skeptical when I told them but I think this is totally worth a try! I am very picky about make up even though I don't wear it often. I only use powder because liquid make up feels funky to me. But of course, the only brands I'm willing to use are expensive. Therefore, I don't buy it. If this works well, I will be saving tons of money for years to come. Plus, I know exactly what's in my make up and can feel very confident about my decision being healthy, safe, non-toxic, natural, cruelty-free, gluten-free, and so on and so forth.

I'm super excited to try this out and share it with you all tomorrow!!

Any guesses to the three ingredients? 

Till next time,
Catherine

Wednesday, February 6, 2013

Don't Get Sick!

Lately I feel like not a day goes by where I don't hear tons of people say that they're sick! I absolutely hate getting sick and try my best to avoid it so the more people get sick around me, the more careful I get. I figured I'd write some basic tips on how to stay healthy during cold and flu season and during all these crazy weather changes were getting. 20 degrees one day, 60 the next...only in Virginia.

(via)

With weather like this...people are bound to get sick...even if it's only allergies! 

Here are some things that I like to do to keep myself and my husband healthy when everyone else is getting sick! And a few others that I may not be so consistent on doing, but are good tips!
  • Eat lots of fruits and veggies! If you keep eating healthy, your immune system will stay strong. If you eat junk, your immune system will crash because your body isn't being fueled properly.
  • Don't forget to wash your fruits and veggies before eating them. They've been through a lot before getting into your kitchen. Buying local always helps though! 
  • Take vitamins. A multi vitamin is always good, but vitamin C, or a vitamin B complex is helpful too. My husband and I take all 3. Well, he takes the C, I take the B. 
  • WASH YOUR HANDS! How basic...yet we still don't do it enough.
  • Don't touch your face or bite your nails. Germs are all over your hands. If you rub your face, you have more of a chance of those germs getting into your eyes/nose/mouth.
  • Sneeze and cough into your elbow/shoulder or a tissue if possible. Do NOT cover your mouth with your hand...that's gross.
  • Use hand sanitizer when washing your hands isn't possible. 
  • Keep your distance from people who say they're sick or are visibly sick. It's not rude...you don't need to catch what they've got! 
  • If you work in a place with a lot of client interaction, keep Lysol handy and use it often. 
  • The essential oil blend called Thieves from Young Living Essential Oils is a great natural antibacterial/antifungal/antibiotic and it smells great! It comes in oil form, foam hand wash, spray, household cleaner, and hand sanitizer. I also love the blend Purification. It's also great for killing germs and freshening a stale room. Go buy them and use them...they're awesome. 
  • And don't forget to exercise. A strong body is a healthy body!
If you know you're prone to getting sick easily, be sure to follow these steps extra close. There's no need to get sick when you can do some simple things to stay healthy! One of my favorite quotes is "An ounce of prevention is worth a pound of cure!"

As for the flu shot...I personally don't get a one. Never have, never will. Same goes for my husband. In my opinion and research, there is too much risk in getting the flu vaccine. They put MERCURY in flu vaccines for crying out loud. Do you realize how horrible mercury is to the human body? No thanks. I even have one mercury amalgam filling that I want replaced. What you do is up to you...but I highly encourage you to do some research first.

So there you have it...simple ways to stay healthy in the remaining months of cold and flu season!

Stay well, everyone!

How do you stay healthy when everyone else is getting sick?

Till next time,
Catherine


I've linked up to Wellness Wednesday 9/11/2013 with Intoxicated on Life, Nourishing Treasures, Raising the Barrs and Finding the Source.