//Google Analytics
Showing posts with label garden. Show all posts

Tuesday, August 20, 2013

Homemade Garden Salsa - Alternate Recipe

So you may remember my fresh garden salsa recipe from a couple of weeks ago. 


Just looking at these pictures makes me want some! 


Well, we've been making it as often as we can because it's SO delicious! While we were visiting family last weekend and after raiding my parent's and in-law's gardens, we made more! This time it was a little different though.


This time we didn't use tomato paste since they didn't have any. (Well, the first batch anyways, my mother-in-law ended up insisting on running to the store.) I was bummed at first that it might not taste right but one by one every gave it a try and before I knew it a whole bowl of it was gone! 


These pictures don't do it justice by any means but it was a beautiful and colorful "pico de gallo -esque" salsa and my in-laws devoured it! 


It just proves that going strictly by the recipe isn't always the best choice! Have fun, experiment! Try something new! With this salsa, just use my recipe as a starting point but turn it into your own! You can dice all of your ingredients rather than blend them, use more peppers, add hot sauce, etc. There are so many ways to make it your perfect salsa! 

Do you like spicy salsa or mild salsa? Restaurant style or grocery store brand? Chunky or smooth?

Till next time,
Catherine

Wednesday, August 7, 2013

Grow: Tomato Plant Suckers - What they are and how to get rid of them

Have you ever heard that you should pinch the suckers off of your tomato plants?

You want me to do what to the what on my tomato plants?

I know, I know, I said the same thing!

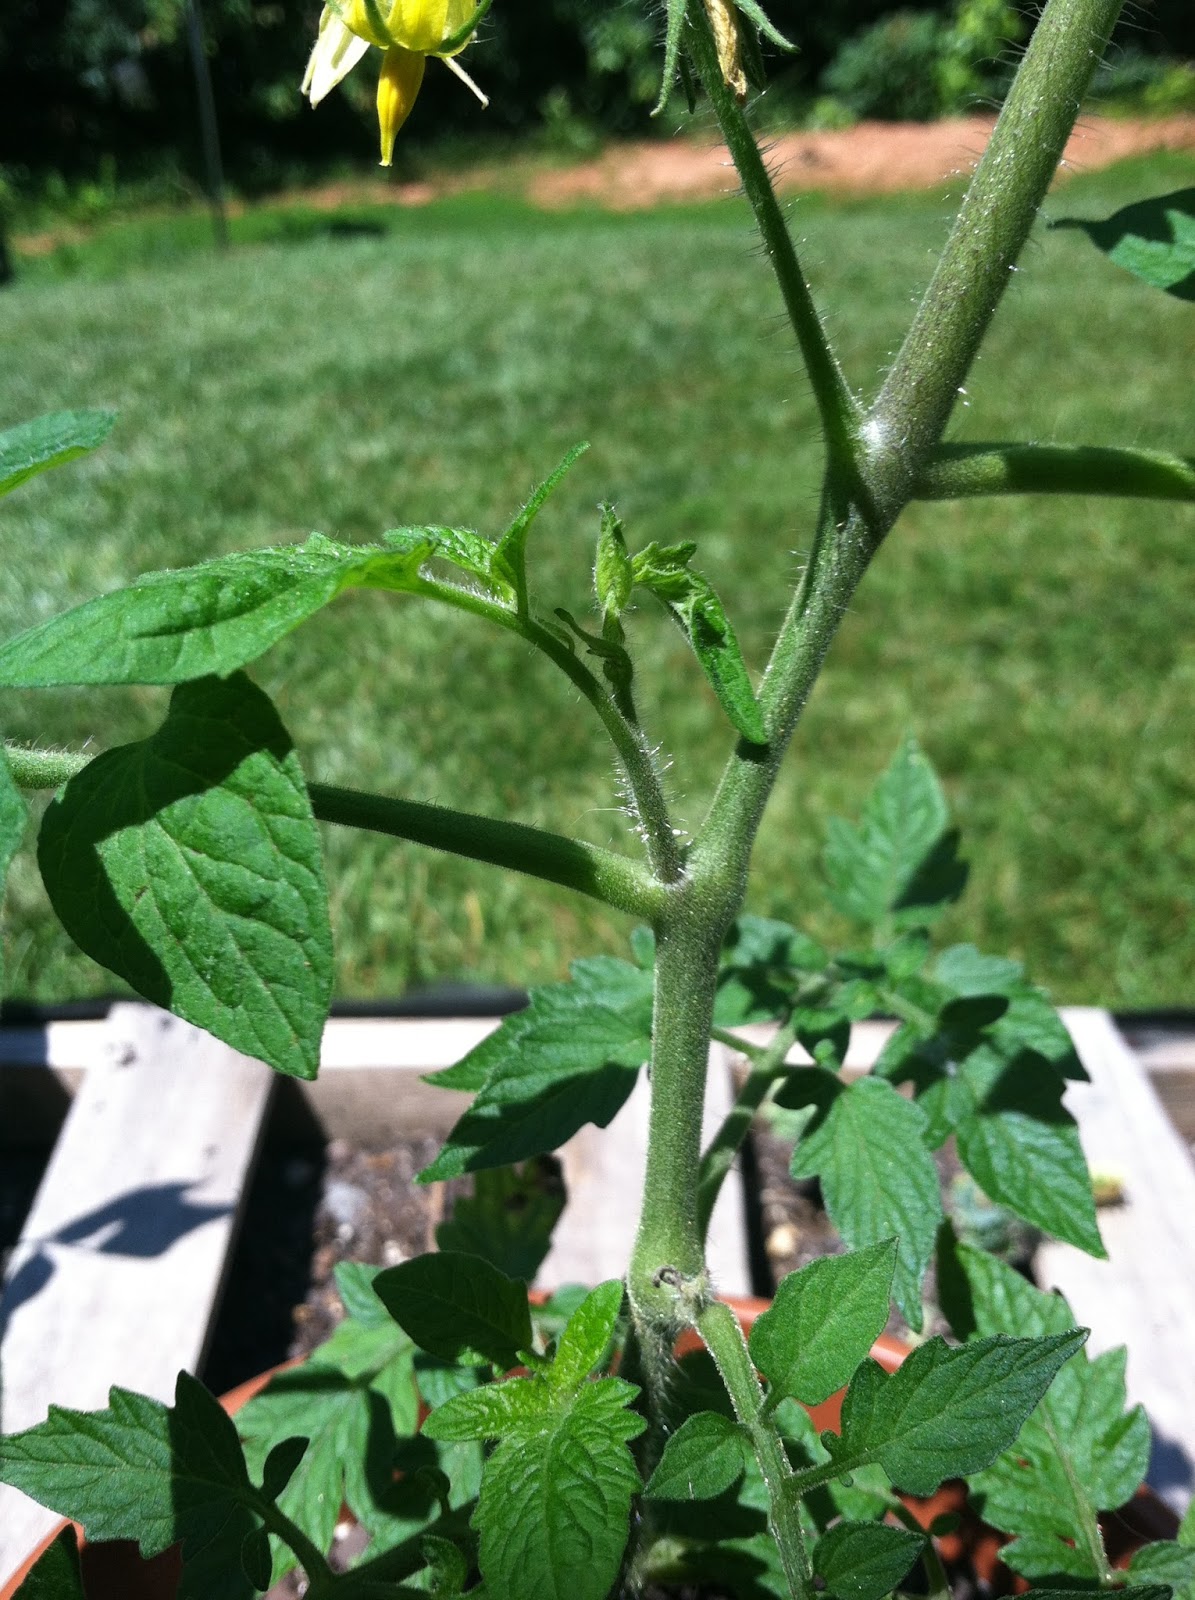
Well after some research I found out that suckers are extra branches that grow between the stem and the branch of tomato plants. They rarely produce any fruit and just "suck" the nutrients up and not use it towards producing. 

Now my dad (who I view as a master gardner) said that he never pinches suckers off. Partly because he doesn't feel like wasting time but also because he said he never sees much of a difference. I, on the other hand, need all the help in the garden as I can so off with their heads! I mean, suckers. 


The stem of the plant is the tall, vertical part and the branch is the horizontal part. The sucker you can see right there in between the two. I try to scan for them any time I'm in my "garden" and catch them when they're very little but this one I let grow for a good photo explination.


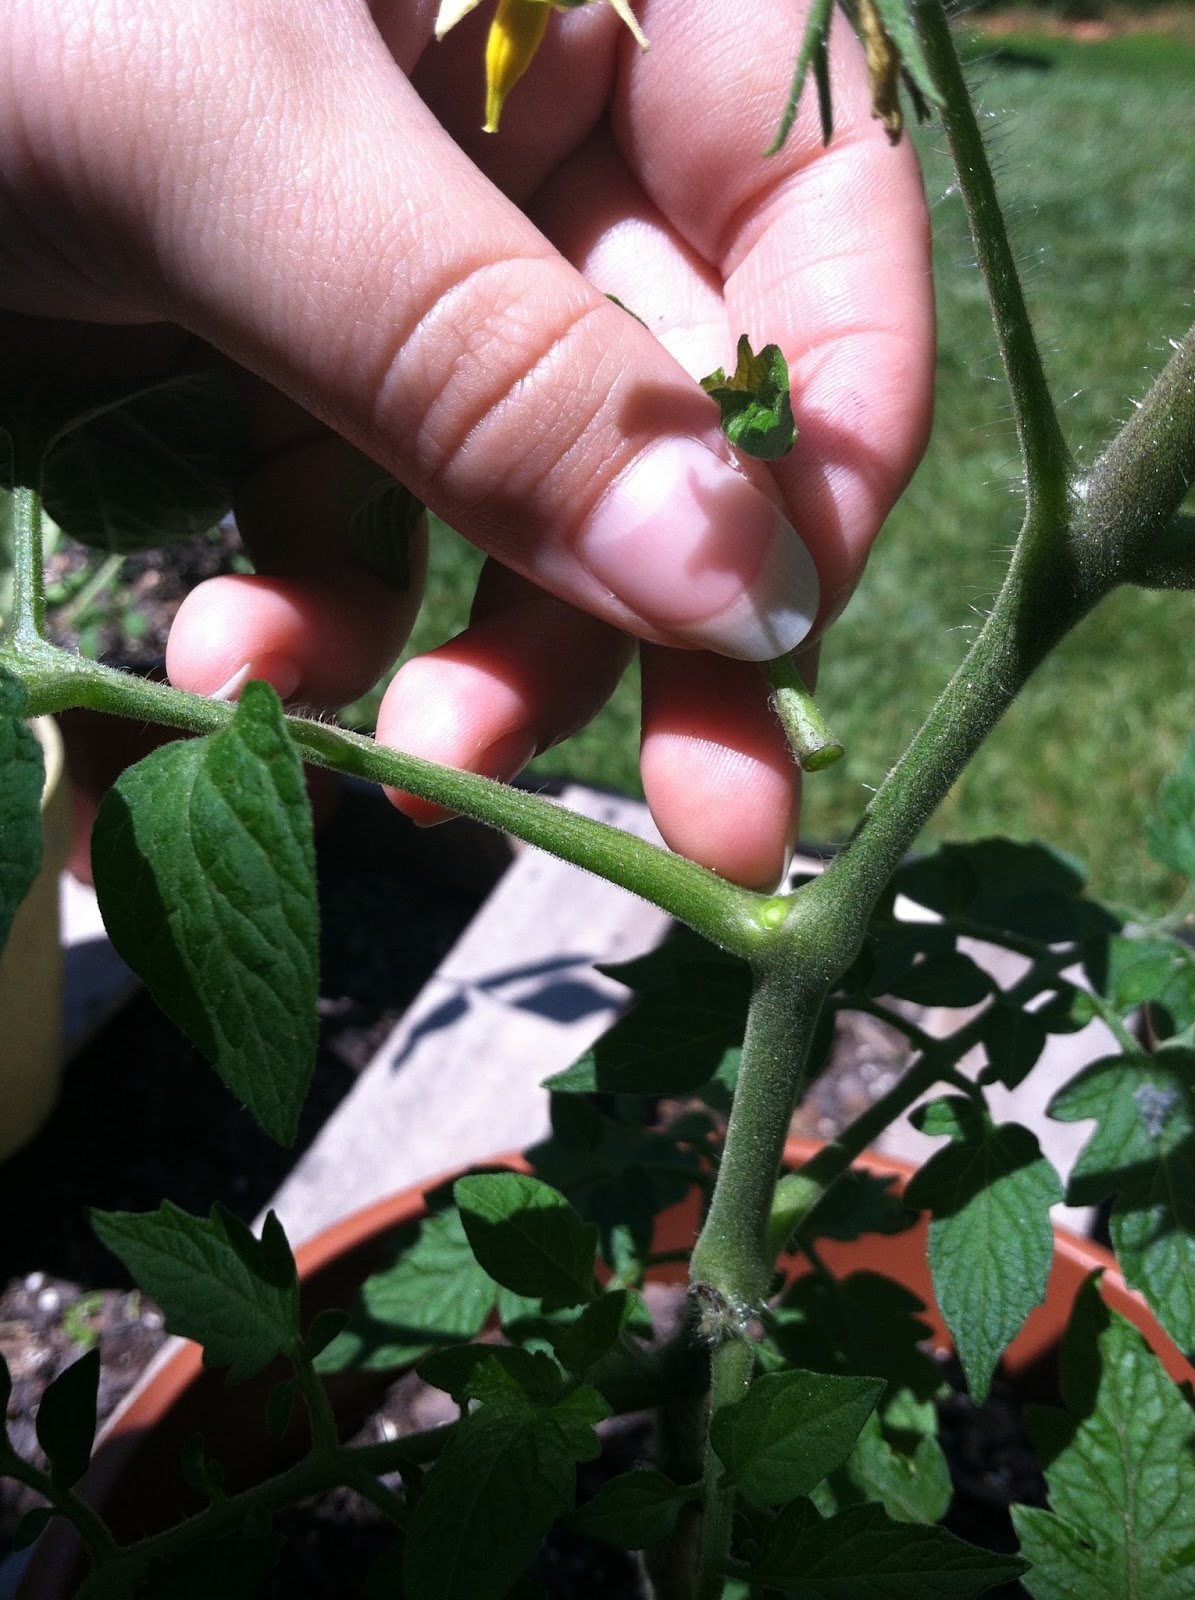
To remove them, just grasp it as close to the stem/branch corner as you can, pinch it between your fingers or nails and pull.


Try to break it all at once and not let it tear. But really, that's all you have to do and then you'll have that yummy-nostalgic-but-kinda-gross tomato plant smell on your hands. You'll thank me later.


I was simply so excited when I was pulling those suckers because I discovered a couple of teeny tiny roma tomatoes starting! 


Here they are just a few weeks later. It felt like months. The anticipation of harvesting food from my little garden was ridiculous! I have since gotten two more romas but not much else. I have four roma plants and about five other tomato plants, some of which are grape and some are Big Boy but until they produce, I really don't remember which was which! Garden surprise!

This is my first year gardening on my own so I've definitely got a lot to learn! My poor little roma plants almost didn't make it because here in Drenchburg, sorry, I mean Lynchburg, it rained most of the summer! That was my first tomato plant lesson. Here are some of the others. 
  1. Tomato plants don't like a lot of water.
  2. Drainage is key.
  3. They love a lot of sunlight.
  4. Pinch those suckers.
  5. One plant per pot.
  6. Make sure those pots are big!
  7. They take a lot of nutrients so be sure to have good soil, compost or fertilizer!

What are some of your tomato growing tricks? What's your favorite tomato to grow and why?

Till next time,

Monday, August 5, 2013

Cook: Garden Fresh Salsa

This past weekend my husband was super excited to harvest a few jalapeños form his plants. Yes, his plants. He said he wants the 4 jalapeño plants to be his little project so, I don't touch 'em. Plus, I can't handle any hot stuff so it works out. 

So he managed to harvest three jalapeños that were just right (or so he says). I asked him what we were going to do with them. Brian said he was going to save the seeds from one for next year and eat maybe one slice. Well, what do we do with the rest? 


Make salsa!

I did a quick Google search to find an easy recipe that we had the ingredients for and came up with this one here. I definitely adapted the recipe to our taste and what we had in the kitchen but that's where I got my starting point. 

Disclaimer: This salsa is NOT spicy or chunky! I don't like spicy or chunky salsa. Fortunately for those of you who do, the method is only slightly different! Simply dice up your ingredients and stir them together rather than blend. And for spice, you can leave the jalapeño seeds or add in your favorite hot sauce! Easy peasy! 

Oh and this makes a lot of salsa! I got two full 16oz jars and two full 8oz jars. I used old salsa jars and jelly jars. I definitely want to double the recipe and then can it with my mom soon! Fresh salsa all year long would be fantastic!

Ingredients: 
  • 2-3 large tomatoes
  • 16oz can of tomato paste
  • 1/2 - 1 cup of water
  • 1 can of petite cut tomatoes (or not, I had it so I tossed it in)
  • 1-2 jalapeños (I only used one)
  • 2-3 cloves of garlic (or 1 tsp of garlic powder)
  • 3 teaspoons onion powder (or 1 onion)
  • 3 teaspoons salt
  • 2 Tablespoons parsley (fresh is great too!)
  • 3 Tablespoons lemon juice (or lime. Fresh is best!)
  • 1 teaspoon olive oil
  • 2 teaspoons sugar
No tomato paste? No problem! Check out this version for an alternate way of preparing this!

Directions:


Cut up your produce. Remember to wear gloves and don't touch your face when you cut up the jalapeño! Remove the seeds if you don't like spicy salsa or keep them in if you're feeling brave!


Toss all your ingredients into the blender.


It's like a fiesta going on in there!


Blend on puree but only for a few seconds. It doesn't need much. 


Inhale and try not to drool into the salsa.

At this point do, break out the tortilla chips and do a taste test! Add more tomato chunks, hot sauce, another splash of lemon juice or whatever you want! That's exactly what Brian and I did. At first I tried to follow the original recipe just with extra tomato (in various forms) so it came out very tomato-y. So I added a little of this, a little of that and suddenly, it was just right! Since there is so much tomato in this salsa, it is very tomato-y but the best part is, you can customize this to your taste in no time! 


I put three of these right into the freezer so they would hopefully last us a little longer. The 4th one is now half empty. That's how good this stuff turned out! 


Oh and it looks so pretty too! I may need to just make this in large batches and not go back to store bought! Although, I do love me some Newman's Own Mild Salsa!


The tomatoes we used were from a friend's garden so we were so excited to use them in a delicious recipe! I think it would amazing for all of the ingredients to be straight from the garden! Mmm!


My plan for next year either at our house or my parent's house is to plant a Salsa Garden. It's one of those new things sweeping the internet. I think it would be really cool to do a themed garden like that, though. Or at least one section of the garden. Mine would have big tomatoes, jalapeños, onions, garlic, cilantro, and parsley planted in it.


If that chip looks funny you're right. It's actually a failed tortilla. More on that later.

What's your favorite brand of salsa? Do you make your own? What would you plant in your salsa garden?

Till next time,
Catherine

I linked up this post with Nourishing Treasures' Make Your Own Monday!

Monday, July 29, 2013

Weekend and Winning

All last week Brian was gone at Studentz Camp for work and this was the first year I was unable to go! This year it was held in Harrisonburg, Virginia at James Madison University, so almost 2 hours away from us, instead of at Liberty University in Lynchburg. It was sad to not be able to work camp but also very quiet and boring at home alone. He came home very tired but he had lots of awesome stories to share.

As soon as he came home, we got back into the car and drove out to Richmond to visit our families. It was a blast, as usual, but also exhausting, as usual.

Friday evening was spent with my family, gardening and playing with my 2 year old niece. Check out all the green veggies we harvested!


We got all of this on Friday evening. I even strapped on a headlamp to finish getting all those green beans because it got dark too quick!


The watermelon had some claw marks...we're guessing from a squirrel. Otherwise it was fine! Very heavy and perfectly shaped!


What a good harvest!

But that's not all!


Saturday morning we got back out to the garden because we knew we didn't get everything. It must be the Year of the Cucumber because we are up to our eyeballs in cukes! Yet tomatoes aren't ripening and when they do, they either rot or get eaten. Anyone else having these issues?


Those are some huge cucumbers! We're trying to give them away to friends and neighbors but everyone seems to have cucumbers out the wazoo!

I also helped out in my in-laws' garden on Saturday evening but I didn't get any pictures. My mother-in-law had just picked all the goodies before we arrived. Although we did get plenty of cherry tomatoes, cucumbers, and regular tomatoes.

All in all, a fantastic weekend of gardening, catching up with friends, and spending quality time with family. The way it should be!

Oh right...you're probably wondering where the "winning" part of the post title comes in. Well I entered a contest to win one pound of red wiggler worms for my worm farm and I won!!! I never win anything! The contest was put on by Swan's Organics. They're a company out in California that has all things gardening and composting! I'm excited to get my new worms and put them in with their new little family. "Little" may be the wrong word as they double their population every 3 months. I started with 500 worms in April and it's now almost August. You do the math! Because I suck at math, that's why.

What's your garden producing this week? How was your weekend?

Till next time,
Catherine

Monday, June 24, 2013

Don't Trash Those Eggshells! Why You Should Save Them and How to Prepare Them

Eggshells can be used for a variety of things (you can even eat them!) but they are especially a fantastic fertilizer for your garden! 

Most notably, eggshells are packed with calcium. In addition to calcium, they are also rich in magnesium, phosphorus, potassium, and sodium! All of which are fantastic minerals for pumping up your plants! According to NutritionData, 1/2 teaspoon of crushed eggshell provides 90% of your daily calcium intake.  That's quite a large percentage for such a small amount! 

When I made my pallet garden I just used cheap soil from Ollie's so I knew I'd need to supplement my plants a bit. I made a worm farm as well but a more immediate solution is crushing eggshells and spreading them around my plants!

So instead of throwing your eggshells into the trash can, save them in a bowl and let them dry out. You could also just toss them into your compost or worm bin but if you want pure eggshell to sprinkle on your garden, follow the next easy steps. 


Let them sit for a while so they're completely dry. You can even take the time to rinse each piece to get all of the slimy whites out but it's not necessary. Unless you plan on ingesting them. If you plan to do that you need to completely wash out the whites. For your garden you just want them dry. I've never had an issue with bugs being attracted to the bowl so that shouldn't be a problem. 


Next, dump them into your blender! 


Blend them until they're thoroughly crushed. 


I told you it was easy. 


Now just store them in a jar until you're ready to spread them around your plants! This jar probably has about 2 dozen crushed eggshells in it. 


I sprinkled some of the crushed eggshell around all of my plants. Here you see it on my lettuce blend when they first sprouted. They're doing great now! I'm about ready to thin them out. 

Jill over at The Prairie Homestead has a great list of 30+ Things to Do With Eggshells so go check that out for more ideas!

What other uses for eggshell do you know of? Would you ever eat them?

Till next time,
Catherine


Friday, May 17, 2013

My Wee Strawberry Plant

Around early April we bought 4 roma tomato plants and one strawberry plant from a local greenhouse. I picked the best strawberry plant I could find and it already had 3 little strawberries growing! 


This is what they looked like the week we bought the plant. 


And after maybe 5-6 weeks they were getting huge! 


Then after close to 7 weeks out, I managed to pluck this beauty at the perfect time! I was like a little kid I was so excited! Way too excited about one measly strawberry! 


 This little guy was delicious! I must have waited till the right time because it was so good!

But alas, just one strawberry at a time is not very filling. I've decided I need about 99 more strawberry plants.

Since that's not very practical, I'm thinking just 3-5 more plants would be a good deal. At least with that many we can have a handful now and then.

Looking at these pictures reminds me that there's one more that's just about ready to eat! Yum!

What fruit are you growing in your garden? What's your favorite fruit? 

Till next time,
Catherine

Monday, May 6, 2013

Foraging

Ok that title may be a little deceptive. Over my busy weekend in Richmond, I spent some quality time with my mom and part of that involved walking my parents' property. 

It started because I was looking through my dad's collection of veggie seeds and I found a couple of old big bags of flower seed mixes. My mom and I decided to spread them outside in hopes of some pretty blooms over the summer. 

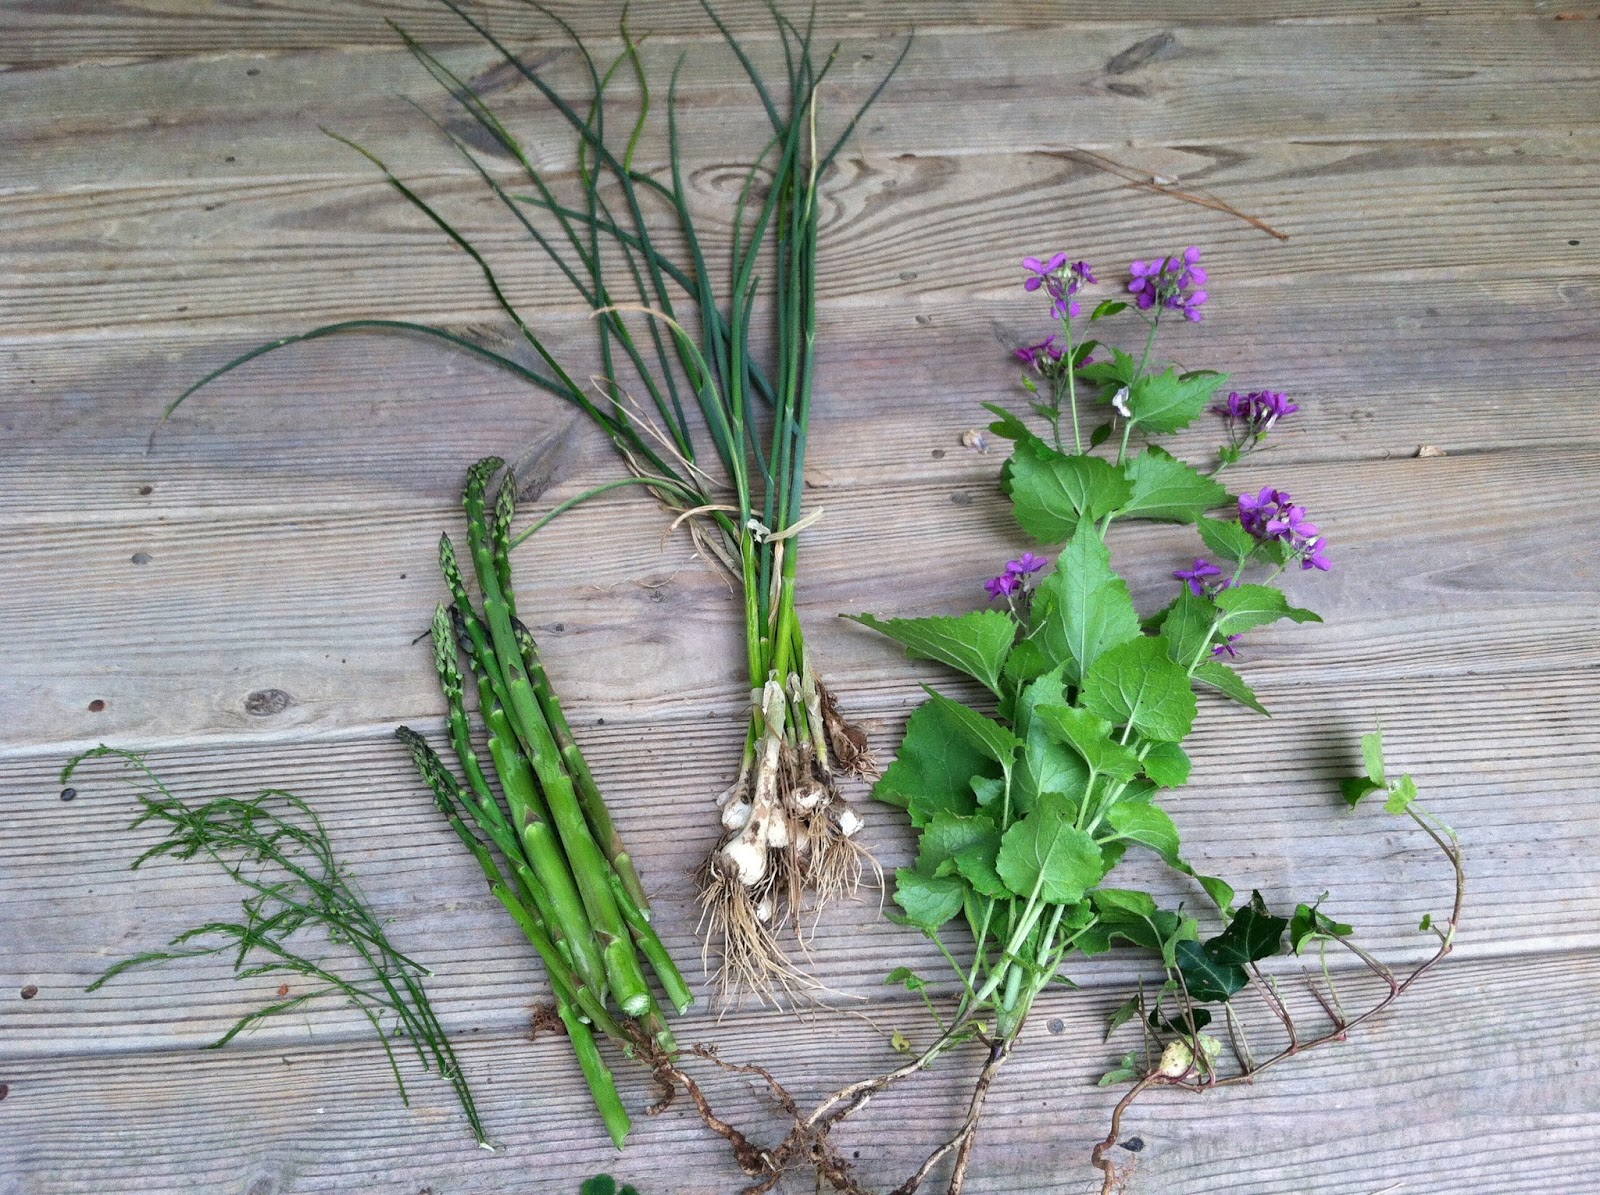
We ventured through the path in the woods down to the garden, spreading the wildflower seed bag along the path. I found a four-leaf clover (it got cut off the bottom of the picture) while my mom got a little harvest of asparagus. My dad hasn't had a chance to start the garden up for the year so that asparagus was just some that popped up from last year! I love a garden that produces year round!


So we walked through the garden for a bit, looking for asparagus and trying to identify any other odd plants. I pulled off some stems of an asparagus plant that had gone to seed (far left) and I'm going to let it dry out and collect the seeds.

The middle plant is a bunch of wild green onions. I don't know much about them but that I've always considered them a weed. I've never heard that they're harmful to eat so we picked a bunch and my mom said they'd try them in salads. But hey, if they taste good, weed shmeed! It's free food!

The purple flowers are what we call money plant but they're also called honesty or the silver dollar plant. You can't see any of the seed pods in the picture but they are round and flat, hence the name. They spread pretty quickly but are really pretty. If nothing else, I think they're a really cool plant to gift to someone. 

The far right is some ivy that was growing near the woods so I dug it up too. I love ivy! 

Picking all this just got me excited for when I'll be able to harvest my little patio garden! Can't wait!

Have you ever picked and eaten wild onion? Do you consider it a weed or a veggie?

Till next time,
Catherine


Tuesday, April 23, 2013

DIY: Worm Farm


In addition to my lovely pallet garden that we made last week, we also made a worm composting farm to partner up with our mini garden! This is something I've been wanting to try for a while now but I didn't want to start it until the temperature would be staying above freezing. 

Growing up out in the country, we always recycled everything and we always composted food scraps. Tossing food into the trash can was a huge no-no. Since being married it kills me to throw food in the trash can...it just seems so wrong. Now that we have hungry little composters, no more food will be wasted! Well, except dairy and meat of course. That stuff is no good for worms. 

I think I originally saw this idea on Pinterest but I can't remember for sure. I have an entire list of references at the bottom of the post so you can see all the awesome bloggers/vloggers who helped me figure this project out. 

All you need is:
  • 3 large plastic bins (anywhere from 10 gallon to 18 gallon)
  • A drill and drill bits
  • Newspaper (no shiny stuff)
  • Cardboard/old egg cartons
  • Coconut coir or peat moss
  • 500-1000 Red Wriggler Worms


Directions:


Gather your bins. I found two 10 gallon totes and one 14 gallon tote that fit together perfectly. 


This is how they'll fit together when I'm done. The top layer will house the worms and the scraps. The middle layer is for extra bedding but also for swapping when the top layer is full. The bottom layer is for the "worm tea" which is the liquid that drains from the compost. It's extremely beneficial for plants so don't toss it out!

The reason I bought two smaller bins and one larger bins is so that the bins with the compost in them will be elevated from the liquid in the bottom. You can get three bins of the same size but you will need to add a couple bricks or large rocks to elevate the top bins. Make sense?


I  had a couple of cardboard egg cartons so I ripped them into small pieces for more bedding for the wormies.


Brand new drill bit set and a drill that my aunt and uncle bought for us as a wedding gift! The drill set was only $14 on sale at Lowe's


One of the tutorials I watched highly recommended using coconut coir as bedding because it is pH balanced. Home Depot and Lowe's had them but I would have had to buy large bricks of it and I knew I wouldn't need that much. I found this planter liner at a local nursery for only $3. I'm sure you can find them in most nurseries and greenhouses. 


Newspaper too! These guys need a good foundation. 


Don't forget to paint a colorful sign on the side and be sure to paint it like a 7 year old would. Wait, I think that's just me. 


Get your drill bits out. We used a 1/8" bit for the sides and 1/4" for the bottoms. 


Start by drilling holes all around the top sides of the bins. There's no formula here. Just drill a ton of holes for ventilation! The size of the holes also isn't precise. I used a smaller bit for the sides to hopefully avoid any flying bugs invading the bin.


Drill these side holes in both of the top bins. Do not drill any holes in the bottom bin! 


 Now drill holes in the bottoms of the bins. Be sure to drill holes in the depressions where liquid is more likely to collect. 


Now lay a piece of newspaper in the bottom of the middle bin. This is just extra caution because I was worried the worms might fall into the bottom bin. They shouldn't do that though. 


I put some soil on top of it so that if they make it down to the middle bin they have something to live in and won't dry out before making their way back to the top. 


In the top bin, where the worms will go, I shredded some coconut coir fiber and added just regular potting soil. 


Then I added the torn cardboard. 


And shredded newspaper. 


Then I wet it all down. You want your bedding to stay moist but not soaked. The worms will try to escape if there is too much moisture. 


Now it's time to add your worms! I bought mine from Uncle Jim's Worm Farm. I received mine in about 3 days. They ship worms out on Mondays and it usually takes about 2-3 days so plan accordingly. You want your worm bin ready when they arrive. 


There they are! Wait...where are there?


I see a few of them. 


There they are! They were all clumped together after their long journey. They are shipped in dry peat moss so gently pour about 1/2-1 cup of water over them so they can return to normal. One resource I read said that you should give them 48 hours to settle in before feeding them. I gave them more than a day. I think they should have at least 24 hours to rest and get used to their new surroundings before bombarding them with work.


Their first meal consisted of coffee grounds and a banana peel! That's all I had at the time but they've gotten more goodies since. 

Side note: Starbucks gives away used coffee grounds for FREE so stop by and ask for some for your worm bin or compost pile! Waste not!


There you have it...an easy and cheap worm composting bin for your home! I'll write another post soon about the care and upkeep of your worm farm!

UPDATE 9/17/13: The worms are doing GREAT and working HARD! I've read that they double their population every 3 months so my assumption is that I've now got over 2000 worms turning my scraps into nutrient rich compost! It took a few months before they could handle consistent scraps but now that their numbers are so high, anything I put in there is gone in no time!

References: 


Does your family compost? Wouldn't it be nice to toss scraps to the worms instead of letting them stink up the trash can?

Till next time,
Catherine

I've linked up to {Wow Me} Wednesday #121 with Gingersnap Crafts