//Google Analytics
Showing posts with label fresh. Show all posts

Thursday, October 10, 2013

Make Butter At Home!

Bear with me folks, we're hoping to get a good DSLR soon. But in the meantime, iPhone photos are going to have to do. 

The longer I'm in this healthy/natural/frugal living lifestyle, the more I learn that we have gotten so lazy!

There are so many things that used to be made by hand at home or by members of the community but now, everything is bought at the store, made in China. Simple, cheap things that take a very short amount of time to make/do. 


Like butter.  

Butter is incredibly easy to make! 

Let me show you. 


Buy some heavy cream and grab an empty salsa/spaghetti/jam jar from your stash in the cabinet. 

(What? I'm the only one who has one of those?) 

Organic and local is best but this was the best I could find. 

Let the cream sit out overnight or about 8-12 hours. Sounds weird but that's how we do it.


Fill the jar about halfway with cream and secure the lid VERY TIGHTLY. 

Be sure to adopt a steely look of intense concentration!

Now shake it like a Polaroid picture! And then keep shaking. 


We divided it equally into four old salsa jars because there were four of us makin' butta. 


After a couple of minutes you'll see butter start to form!! Keep shaking! 


Pour out the liquid. But not into the sink because that's pure buttermilk! Save that in another jar. 


Now you can really see the butter. At this point you may want to mush the butter around with a knife to really get the buttermilk out. You can even put a little water in the jar and shake for another little bit. You just want to be sure to get all the buttermilk out or else it causes the butter to spoil faster. 


Now that you're butter is done, flavor it! We kept one jar as just plain butter, which was delicious, a salted butter, and a honey butter. The four of us ended up devouring one jar of butter (it was maybe 6 tablespoons or so) on toast because it was so fresh and perfect! 

The jar on the right is full of the buttermilk we got out of it! That's a ton of butter AND buttermilk for the price of heavy cream. That's a good deal to me! 


And there you have it, delicious, fresh, creamy butter! I think next I'm going to try making homemade mayonnaise


Don't forget to save that buttermilk! I don't use buttermilk very often so I froze it in an ice cube tray so I have it when I need it. 

Fresh butter on homemade bread. YUM!

Enjoy!


For an awesome and in depth video to understand the science behind making butter, watch this video

What's something you prefer to make fresh at home? 

Till next time,
Catherine


I've linked up to Swap N Share Sunday Week 27 with Spatulas on Parade!


I've linked up to Less Laundry, More Linking #11 with Life After Laundry and Sensational Creations!


Monday, August 26, 2013

How to Perk Up Wilted Broccoli

A while back we were walking through the local Farmer's Market as it was closing up (I had to work that morning so we almost missed all the vendors!) and one of the vendors was selling quarts of broccoli for only $1. There was nothing wrong with them, she was just ready to sell the last bit and head home. 

So, of course we bought some.

Silly me didn't plan very well and I let the broccoli sit in the fridge longer than I should have. It got a bit soft making me want to cook it even less.


But then after a quick Google search, I found out that (supposedly) all you have to do is put the stems in cold water for a few hours and voila! The crunch is back in the broccoli! 

Let's work together to make that the new phrase. Instead of something like, "There's a pep in his step!" it can be "The crunch is back in his broccoli!" 

No?

Ok.

But sure enough, it works! I placed mine in the fridge until I was ready to cook it and it worked like a charm! Try it next time you've got broccoli a day or two past its prime! 

Till next time,
Catherine

Tuesday, August 20, 2013

Homemade Garden Salsa - Alternate Recipe

So you may remember my fresh garden salsa recipe from a couple of weeks ago. 


Just looking at these pictures makes me want some! 


Well, we've been making it as often as we can because it's SO delicious! While we were visiting family last weekend and after raiding my parent's and in-law's gardens, we made more! This time it was a little different though.


This time we didn't use tomato paste since they didn't have any. (Well, the first batch anyways, my mother-in-law ended up insisting on running to the store.) I was bummed at first that it might not taste right but one by one every gave it a try and before I knew it a whole bowl of it was gone! 


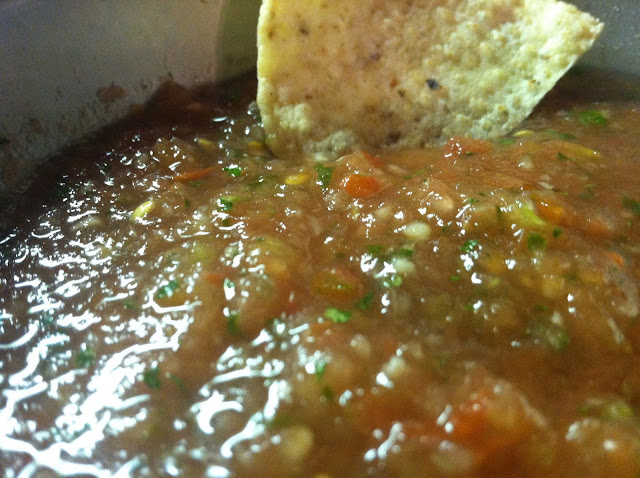
These pictures don't do it justice by any means but it was a beautiful and colorful "pico de gallo -esque" salsa and my in-laws devoured it! 


It just proves that going strictly by the recipe isn't always the best choice! Have fun, experiment! Try something new! With this salsa, just use my recipe as a starting point but turn it into your own! You can dice all of your ingredients rather than blend them, use more peppers, add hot sauce, etc. There are so many ways to make it your perfect salsa! 

Do you like spicy salsa or mild salsa? Restaurant style or grocery store brand? Chunky or smooth?

Till next time,
Catherine

Wednesday, August 7, 2013

Grow: Tomato Plant Suckers - What they are and how to get rid of them

Have you ever heard that you should pinch the suckers off of your tomato plants?

You want me to do what to the what on my tomato plants?

I know, I know, I said the same thing!

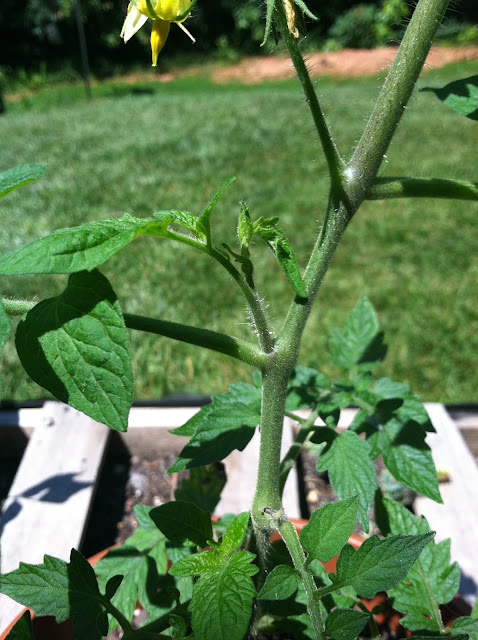
Well after some research I found out that suckers are extra branches that grow between the stem and the branch of tomato plants. They rarely produce any fruit and just "suck" the nutrients up and not use it towards producing. 

Now my dad (who I view as a master gardner) said that he never pinches suckers off. Partly because he doesn't feel like wasting time but also because he said he never sees much of a difference. I, on the other hand, need all the help in the garden as I can so off with their heads! I mean, suckers. 


The stem of the plant is the tall, vertical part and the branch is the horizontal part. The sucker you can see right there in between the two. I try to scan for them any time I'm in my "garden" and catch them when they're very little but this one I let grow for a good photo explination.


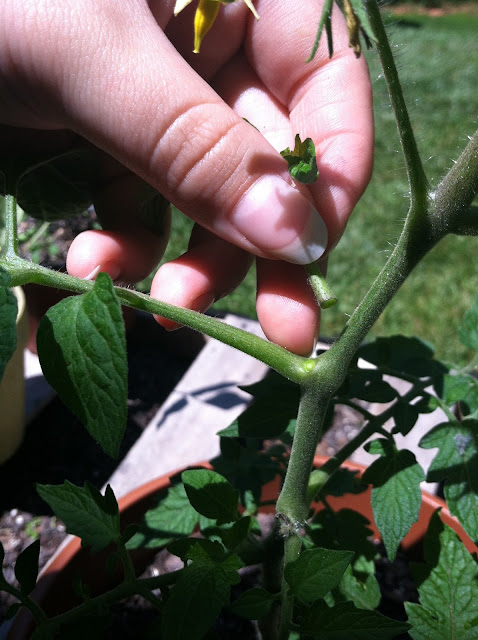
To remove them, just grasp it as close to the stem/branch corner as you can, pinch it between your fingers or nails and pull.


Try to break it all at once and not let it tear. But really, that's all you have to do and then you'll have that yummy-nostalgic-but-kinda-gross tomato plant smell on your hands. You'll thank me later.


I was simply so excited when I was pulling those suckers because I discovered a couple of teeny tiny roma tomatoes starting! 


Here they are just a few weeks later. It felt like months. The anticipation of harvesting food from my little garden was ridiculous! I have since gotten two more romas but not much else. I have four roma plants and about five other tomato plants, some of which are grape and some are Big Boy but until they produce, I really don't remember which was which! Garden surprise!

This is my first year gardening on my own so I've definitely got a lot to learn! My poor little roma plants almost didn't make it because here in Drenchburg, sorry, I mean Lynchburg, it rained most of the summer! That was my first tomato plant lesson. Here are some of the others. 
  1. Tomato plants don't like a lot of water.
  2. Drainage is key.
  3. They love a lot of sunlight.
  4. Pinch those suckers.
  5. One plant per pot.
  6. Make sure those pots are big!
  7. They take a lot of nutrients so be sure to have good soil, compost or fertilizer!

What are some of your tomato growing tricks? What's your favorite tomato to grow and why?

Till next time,

Monday, August 5, 2013

Cook: Garden Fresh Salsa

This past weekend my husband was super excited to harvest a few jalapeƱos form his plants. Yes, his plants. He said he wants the 4 jalapeƱo plants to be his little project so, I don't touch 'em. Plus, I can't handle any hot stuff so it works out. 

So he managed to harvest three jalapeƱos that were just right (or so he says). I asked him what we were going to do with them. Brian said he was going to save the seeds from one for next year and eat maybe one slice. Well, what do we do with the rest? 


Make salsa!

I did a quick Google search to find an easy recipe that we had the ingredients for and came up with this one here. I definitely adapted the recipe to our taste and what we had in the kitchen but that's where I got my starting point. 

Disclaimer: This salsa is NOT spicy or chunky! I don't like spicy or chunky salsa. Fortunately for those of you who do, the method is only slightly different! Simply dice up your ingredients and stir them together rather than blend. And for spice, you can leave the jalapeƱo seeds or add in your favorite hot sauce! Easy peasy! 

Oh and this makes a lot of salsa! I got two full 16oz jars and two full 8oz jars. I used old salsa jars and jelly jars. I definitely want to double the recipe and then can it with my mom soon! Fresh salsa all year long would be fantastic!

Ingredients: 
  • 2-3 large tomatoes
  • 16oz can of tomato paste
  • 1/2 - 1 cup of water
  • 1 can of petite cut tomatoes (or not, I had it so I tossed it in)
  • 1-2 jalapeƱos (I only used one)
  • 2-3 cloves of garlic (or 1 tsp of garlic powder)
  • 3 teaspoons onion powder (or 1 onion)
  • 3 teaspoons salt
  • 2 Tablespoons parsley (fresh is great too!)
  • 3 Tablespoons lemon juice (or lime. Fresh is best!)
  • 1 teaspoon olive oil
  • 2 teaspoons sugar
No tomato paste? No problem! Check out this version for an alternate way of preparing this!

Directions:


Cut up your produce. Remember to wear gloves and don't touch your face when you cut up the jalapeƱo! Remove the seeds if you don't like spicy salsa or keep them in if you're feeling brave!


Toss all your ingredients into the blender.


It's like a fiesta going on in there!


Blend on puree but only for a few seconds. It doesn't need much. 


Inhale and try not to drool into the salsa.

At this point do, break out the tortilla chips and do a taste test! Add more tomato chunks, hot sauce, another splash of lemon juice or whatever you want! That's exactly what Brian and I did. At first I tried to follow the original recipe just with extra tomato (in various forms) so it came out very tomato-y. So I added a little of this, a little of that and suddenly, it was just right! Since there is so much tomato in this salsa, it is very tomato-y but the best part is, you can customize this to your taste in no time! 


I put three of these right into the freezer so they would hopefully last us a little longer. The 4th one is now half empty. That's how good this stuff turned out! 


Oh and it looks so pretty too! I may need to just make this in large batches and not go back to store bought! Although, I do love me some Newman's Own Mild Salsa!


The tomatoes we used were from a friend's garden so we were so excited to use them in a delicious recipe! I think it would amazing for all of the ingredients to be straight from the garden! Mmm!


My plan for next year either at our house or my parent's house is to plant a Salsa Garden. It's one of those new things sweeping the internet. I think it would be really cool to do a themed garden like that, though. Or at least one section of the garden. Mine would have big tomatoes, jalapeƱos, onions, garlic, cilantro, and parsley planted in it.


If that chip looks funny you're right. It's actually a failed tortilla. More on that later.

What's your favorite brand of salsa? Do you make your own? What would you plant in your salsa garden?

Till next time,
Catherine

I linked up this post with Nourishing Treasures' Make Your Own Monday!

Friday, May 24, 2013

Cook-Strawberry Freezer Jam

I've been learning lately that there are many things in our daily lives that we use or consume that we don't realize how simple it is to make it ourselves!


One of these things is strawberry jam (or any jam, really). Yes, jam! It only requires 3 ingredients and takes maybe 15 minutes to make a 6-8 cup batch that will last you months!

Why haven't I been doing this for years?!

Oh and for anyone wondering, jam is made with the FRUIT, jelly is made with the JUICE! I learned that maybe a year ago and it blew my mind. It's the little things, right?

Moving on.

Brian and I went strawberry picking this past weekend and had over 10 quarts (about 15lbs) of strawberries to eat and use!

We've been eating strawberries since we headed home from the strawberry farm! We also prepared and froze a gallon and a half of them, made smoothies and now, freezer jam!

I always thought if you made things like jam you had to can them but that's not true! This recipe is so simple and easy and after the jam sets, you can pop it into the freezer until you need it!

Ingredients:

  • Pectin (I used Sure-Jell but there are other brands that are good)
  • 4 cups of sugar (raw, unbleached, organic is best!)
  • 2 cups of mashed strawberries (over 4 cups whole)
  • 1/4 cup of water

Directions:


Gather and prepare your ingredients. Sure-Jell has a great insert in the box with directions for many kinds of jams and jellies. Sure-Jell has one packet in the box and you use the entire thing. 


Wash your strawberries. 


Hull them. 


Mash them! The fun part! I used my potato masher but I'm sure something like an immersion blender would work as well. Mash them but don't puree them because jam is best with chunks of fruit!


Mine measured at a little over 2 cups. 


 Pour your sugar into another bowl. I know, 4 cups of sugar is A LOT of sugar. I read from many sources that you can't use any more or less because the pectin won't set correctly. Sure-Jell also makes a low-sugar/no-sugar pectin as well which I plan to try soon!


Pour the strawberries into the sugar and mix well.


Mix the water and pectin together in a small saucepan. Bring to a boil for about a minute, stirring constantly. Don't let it get away from you!


When it's done boiling, pour the pectin/water mixture into the strawberry/sugar mixture and stir constantly until the sugar is well dissolved.


Now pour it into cups, bowls, jars, Pyrex or whatever you want to store it in. Be sure they have been washed thoroughly to keep any bacteria out. This is especially crucial if you are canning this recipe. Leave about an inch or more of space between the jam and the top of the jars to allow for expansion. 


I used two 2-cup size plastic containers (Ziploc brand?) and two small jars that previously had jam in them. I estimate they hold about a cup each.


Be sure to leave the lids off or just resting on top for 24 hours to let the jam set properly. 


If you're putting them in the freezer right away, leave the lids off until they're fully frozen, ESPECIALLY if you're using glass! 


Once it's fully set, spread on some toast, have a PB&J or just eat it by the spoonful! This stuff is awesome! 


Best PB&J on the block! On homemade bread, of course! 

Have you ever made your own homemade jam or jelly? What's your favorite combo of fruit? I want to try triple berry!

Till next time,
Catherine