//Google Analytics
Showing posts with label grow. Show all posts

Wednesday, August 7, 2013

Grow: Tomato Plant Suckers - What they are and how to get rid of them

Have you ever heard that you should pinch the suckers off of your tomato plants?

You want me to do what to the what on my tomato plants?

I know, I know, I said the same thing!

Well after some research I found out that suckers are extra branches that grow between the stem and the branch of tomato plants. They rarely produce any fruit and just "suck" the nutrients up and not use it towards producing. 

Now my dad (who I view as a master gardner) said that he never pinches suckers off. Partly because he doesn't feel like wasting time but also because he said he never sees much of a difference. I, on the other hand, need all the help in the garden as I can so off with their heads! I mean, suckers. 


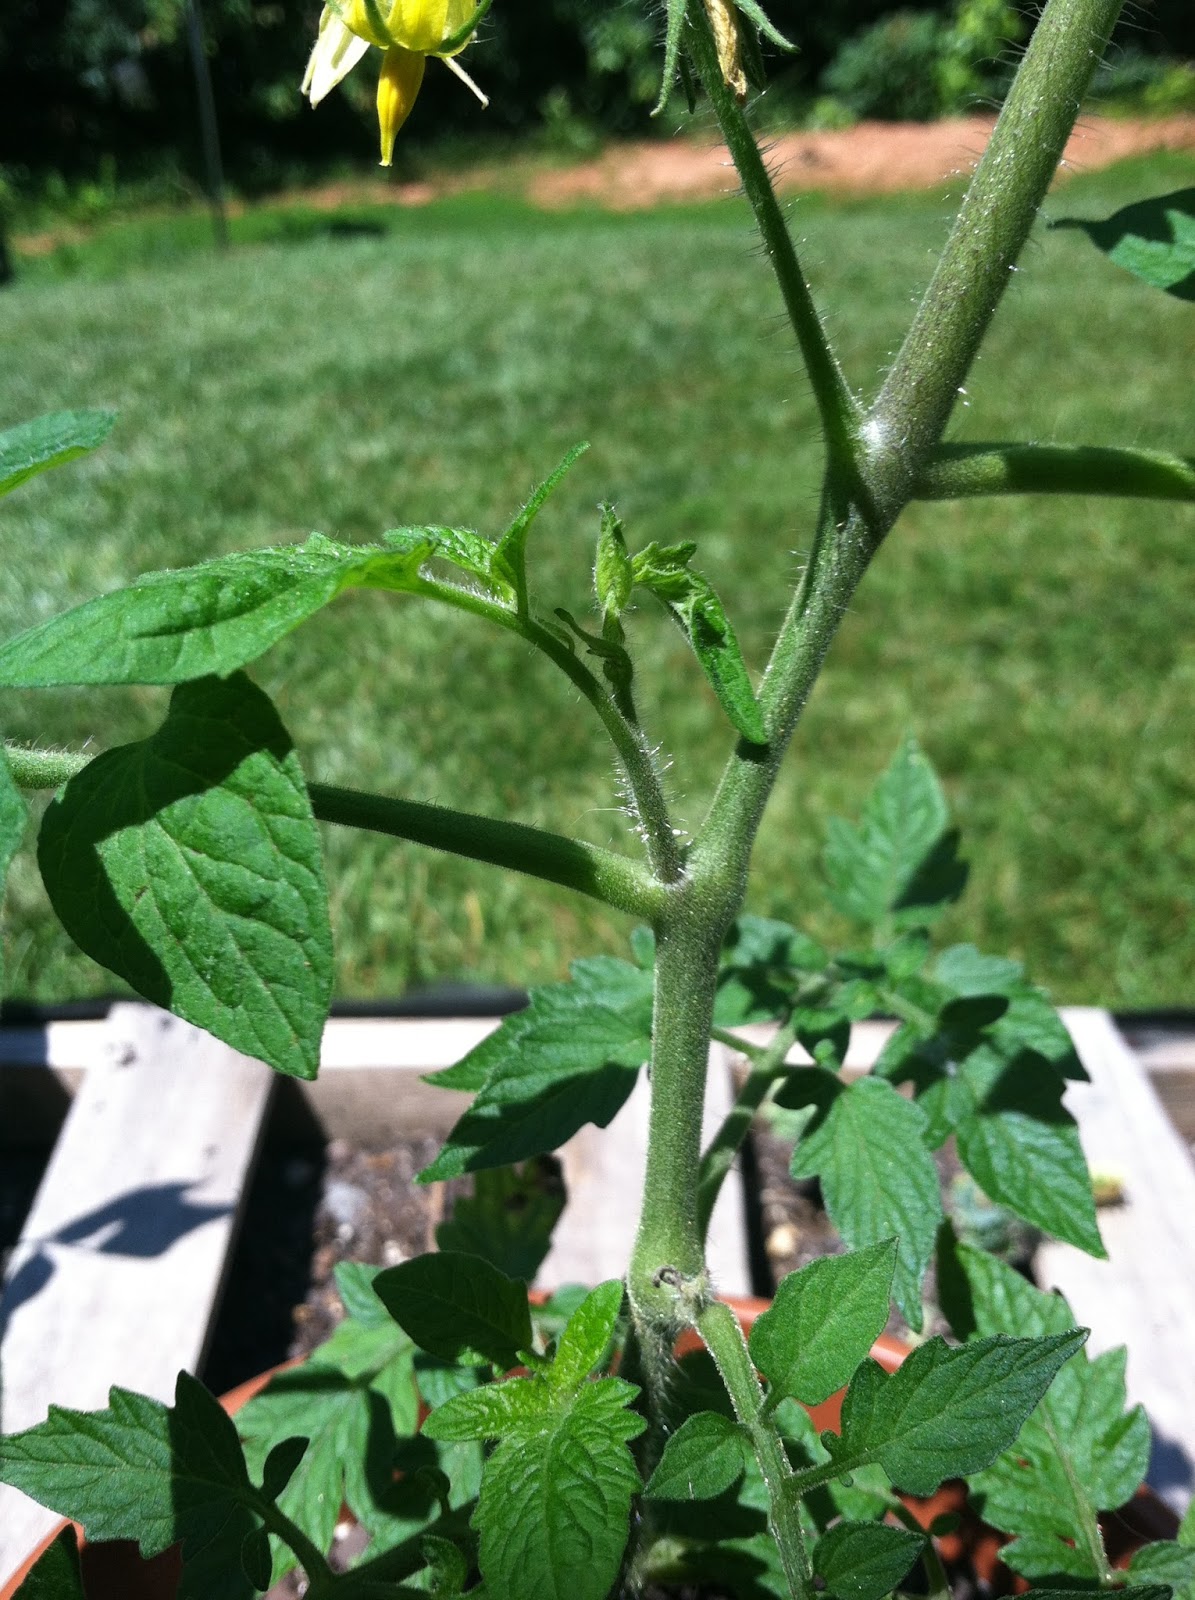
The stem of the plant is the tall, vertical part and the branch is the horizontal part. The sucker you can see right there in between the two. I try to scan for them any time I'm in my "garden" and catch them when they're very little but this one I let grow for a good photo explination.


To remove them, just grasp it as close to the stem/branch corner as you can, pinch it between your fingers or nails and pull.


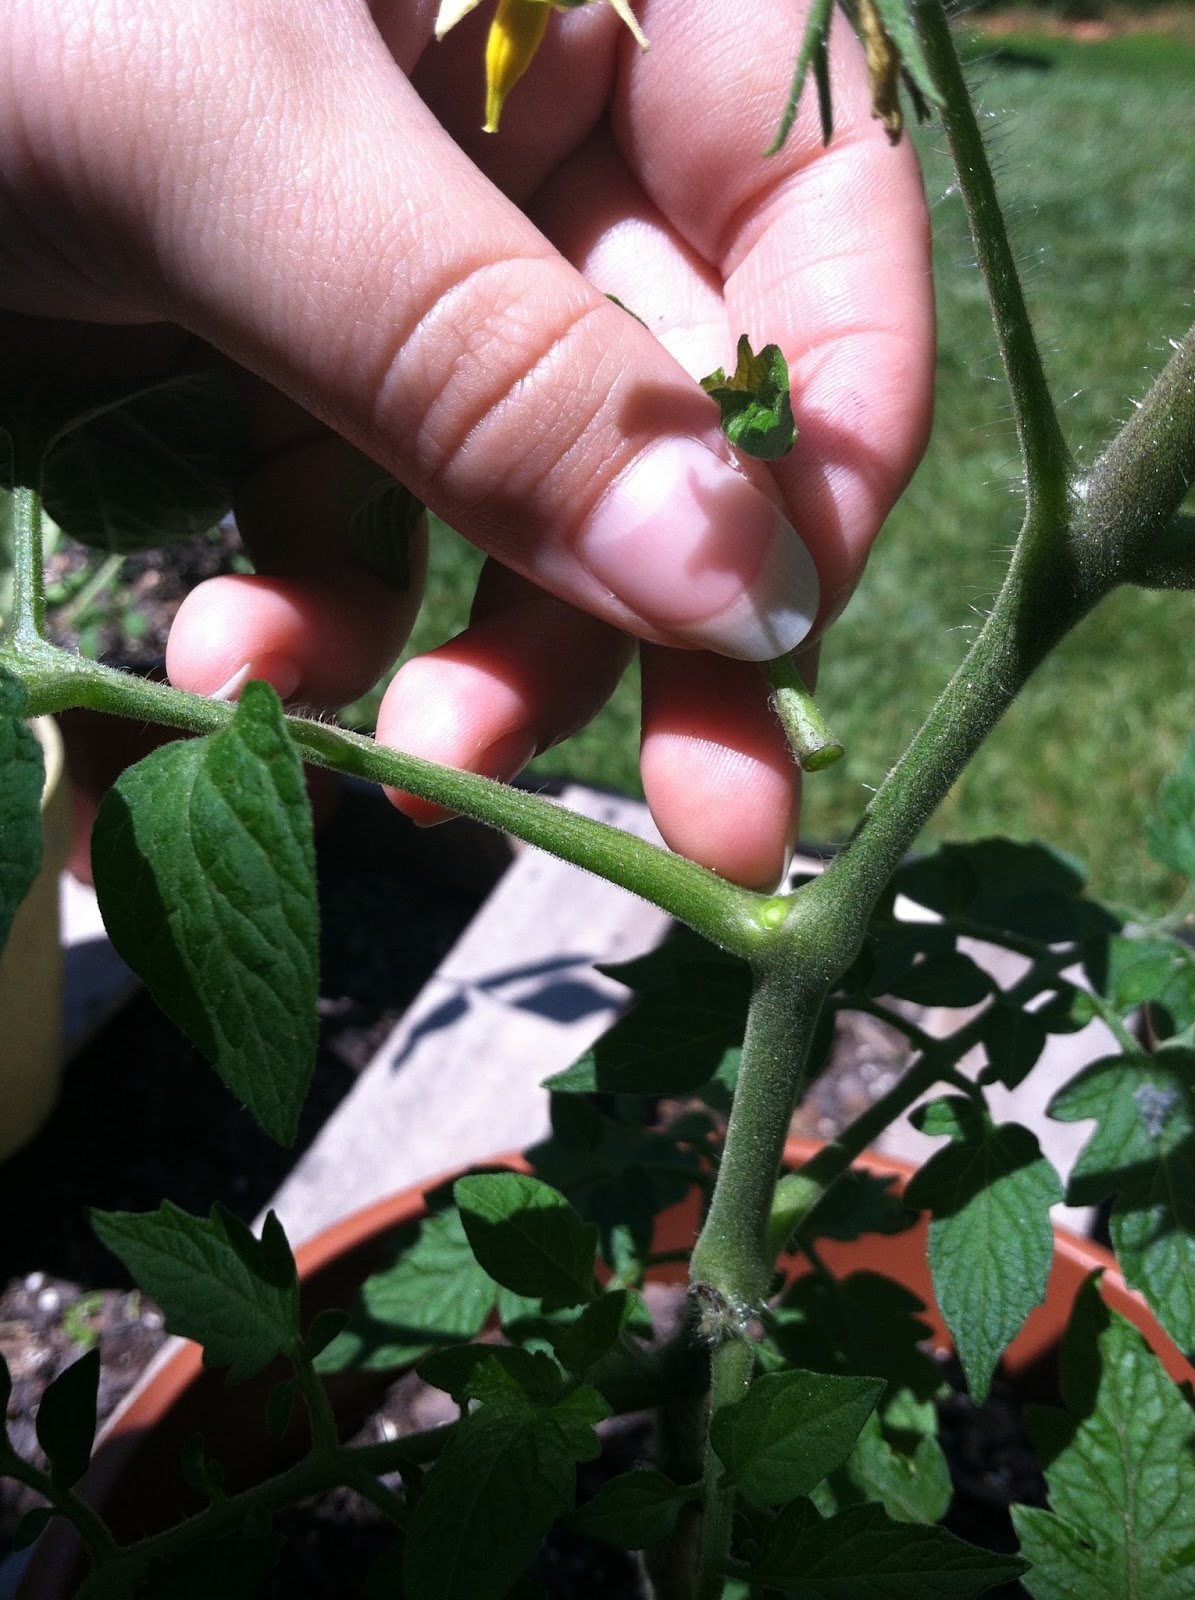
Try to break it all at once and not let it tear. But really, that's all you have to do and then you'll have that yummy-nostalgic-but-kinda-gross tomato plant smell on your hands. You'll thank me later.


I was simply so excited when I was pulling those suckers because I discovered a couple of teeny tiny roma tomatoes starting! 


Here they are just a few weeks later. It felt like months. The anticipation of harvesting food from my little garden was ridiculous! I have since gotten two more romas but not much else. I have four roma plants and about five other tomato plants, some of which are grape and some are Big Boy but until they produce, I really don't remember which was which! Garden surprise!

This is my first year gardening on my own so I've definitely got a lot to learn! My poor little roma plants almost didn't make it because here in Drenchburg, sorry, I mean Lynchburg, it rained most of the summer! That was my first tomato plant lesson. Here are some of the others. 
  1. Tomato plants don't like a lot of water.
  2. Drainage is key.
  3. They love a lot of sunlight.
  4. Pinch those suckers.
  5. One plant per pot.
  6. Make sure those pots are big!
  7. They take a lot of nutrients so be sure to have good soil, compost or fertilizer!

What are some of your tomato growing tricks? What's your favorite tomato to grow and why?

Till next time,

Thursday, April 25, 2013

My Other Container Plants

I recently showed you all how to make an awesome (and cheap!) pallet garden, well, I've also got a few things in pots that are growing on our patio! I've also shown you my container potato plants as well. I've also got a small pallet garden going with herbs but I'll have to share that on another day. 

Apparently I'm just never satisfied! I still want more food to grow! I'm thinking another strawberry plant and a couple blueberry plants...what do you think?


Actually before we made the pallet garden, we went to a local greenhouse and picked up a few plants and some seeds. The soil is the cheap stuff from Ollie's at $2 a bag! What a deal! Even if the quality of the soil isn't too great, I've got my worm farm to supplement it! 

The bag of seeds are Improved Tendergreen Beans. I never knew there were so many types of beans! I just picked the one that looked the most like the classic green beans I used to snap with my grandma. 


I got four Roma Tomato plants. I personally don't like tomatoes (I know, I know!) but my husband does so since he'll be eating them the most, he picked them out. I'll cook with them though!


And my little Allstar Strawberry plant! I can't even tell you how excited I was to get a strawberry plant! It's little, though...definitely think I should get another one. Or two...


Wittle baby strawberries!! They've almost doubled in size in just a couple of weeks!


Ready to plant!


Senor Strawberry seems to be settling in ok!


I doubled up the tomato plants so I didn't have to buy 4 pots. If they grow really large I'll repot them, though. 
Update: Lesson learned...tomato plants need lots of space! They won't thrive if they're crowded!


My little garden in the making! 

What are you growing in your garden?

Till next time,
Catherine

Tuesday, April 23, 2013

DIY: Worm Farm


In addition to my lovely pallet garden that we made last week, we also made a worm composting farm to partner up with our mini garden! This is something I've been wanting to try for a while now but I didn't want to start it until the temperature would be staying above freezing. 

Growing up out in the country, we always recycled everything and we always composted food scraps. Tossing food into the trash can was a huge no-no. Since being married it kills me to throw food in the trash can...it just seems so wrong. Now that we have hungry little composters, no more food will be wasted! Well, except dairy and meat of course. That stuff is no good for worms. 

I think I originally saw this idea on Pinterest but I can't remember for sure. I have an entire list of references at the bottom of the post so you can see all the awesome bloggers/vloggers who helped me figure this project out. 

All you need is:
  • 3 large plastic bins (anywhere from 10 gallon to 18 gallon)
  • A drill and drill bits
  • Newspaper (no shiny stuff)
  • Cardboard/old egg cartons
  • Coconut coir or peat moss
  • 500-1000 Red Wriggler Worms


Directions:


Gather your bins. I found two 10 gallon totes and one 14 gallon tote that fit together perfectly. 


This is how they'll fit together when I'm done. The top layer will house the worms and the scraps. The middle layer is for extra bedding but also for swapping when the top layer is full. The bottom layer is for the "worm tea" which is the liquid that drains from the compost. It's extremely beneficial for plants so don't toss it out!

The reason I bought two smaller bins and one larger bins is so that the bins with the compost in them will be elevated from the liquid in the bottom. You can get three bins of the same size but you will need to add a couple bricks or large rocks to elevate the top bins. Make sense?


I  had a couple of cardboard egg cartons so I ripped them into small pieces for more bedding for the wormies.


Brand new drill bit set and a drill that my aunt and uncle bought for us as a wedding gift! The drill set was only $14 on sale at Lowe's


One of the tutorials I watched highly recommended using coconut coir as bedding because it is pH balanced. Home Depot and Lowe's had them but I would have had to buy large bricks of it and I knew I wouldn't need that much. I found this planter liner at a local nursery for only $3. I'm sure you can find them in most nurseries and greenhouses. 


Newspaper too! These guys need a good foundation. 


Don't forget to paint a colorful sign on the side and be sure to paint it like a 7 year old would. Wait, I think that's just me. 


Get your drill bits out. We used a 1/8" bit for the sides and 1/4" for the bottoms. 


Start by drilling holes all around the top sides of the bins. There's no formula here. Just drill a ton of holes for ventilation! The size of the holes also isn't precise. I used a smaller bit for the sides to hopefully avoid any flying bugs invading the bin.


Drill these side holes in both of the top bins. Do not drill any holes in the bottom bin! 


 Now drill holes in the bottoms of the bins. Be sure to drill holes in the depressions where liquid is more likely to collect. 


Now lay a piece of newspaper in the bottom of the middle bin. This is just extra caution because I was worried the worms might fall into the bottom bin. They shouldn't do that though. 


I put some soil on top of it so that if they make it down to the middle bin they have something to live in and won't dry out before making their way back to the top. 


In the top bin, where the worms will go, I shredded some coconut coir fiber and added just regular potting soil. 


Then I added the torn cardboard. 


And shredded newspaper. 


Then I wet it all down. You want your bedding to stay moist but not soaked. The worms will try to escape if there is too much moisture. 


Now it's time to add your worms! I bought mine from Uncle Jim's Worm Farm. I received mine in about 3 days. They ship worms out on Mondays and it usually takes about 2-3 days so plan accordingly. You want your worm bin ready when they arrive. 


There they are! Wait...where are there?


I see a few of them. 


There they are! They were all clumped together after their long journey. They are shipped in dry peat moss so gently pour about 1/2-1 cup of water over them so they can return to normal. One resource I read said that you should give them 48 hours to settle in before feeding them. I gave them more than a day. I think they should have at least 24 hours to rest and get used to their new surroundings before bombarding them with work.


Their first meal consisted of coffee grounds and a banana peel! That's all I had at the time but they've gotten more goodies since. 

Side note: Starbucks gives away used coffee grounds for FREE so stop by and ask for some for your worm bin or compost pile! Waste not!


There you have it...an easy and cheap worm composting bin for your home! I'll write another post soon about the care and upkeep of your worm farm!

UPDATE 9/17/13: The worms are doing GREAT and working HARD! I've read that they double their population every 3 months so my assumption is that I've now got over 2000 worms turning my scraps into nutrient rich compost! It took a few months before they could handle consistent scraps but now that their numbers are so high, anything I put in there is gone in no time!

References: 


Does your family compost? Wouldn't it be nice to toss scraps to the worms instead of letting them stink up the trash can?

Till next time,
Catherine

I've linked up to {Wow Me} Wednesday #121 with Gingersnap Crafts

Tuesday, February 12, 2013

Grow: Container Potato Plant

Did you know you can plant potatoes in containers and they'll do great? According to many internet sources they do! Since we're still living in a townhouse, we don't have our own land to garden on so I'm trying to do what I can to have a lot of green! 

I've been on the hunt for a cute barrel for quite some time. I had seen them at Lowe's and Home Depot but they just seem so expensive! Like this one at Lowe's is super cute but $35 seems steep to me! 


And then I found this wooden beauty! My husband and I went into a huge estate sale store that was going out of business. It was priced at $7...not bad! But then we get to the counter and we are told everything is 40% off! We paid a little over $4 for this cool little barrel! 


It's not quite as big as I wanted but for $4 how can you go wrong? It's maybe a foot tall. 


There's a tiny hole in the bottom too. Not sure why, though.


We decided to line it with a plastic bag just to be safe so it wouldn't rot the wood. It was pressure fit, sanded and sealed with something so I think it would have been fine, but it can't hurt to have that layer of protection. 


I didn't want to drown my taters so I gathered some old decorative rocks and stones to lay in the bottom.


 Then we filled it most of the way with soil.


We left about 4-6" open from the top. 


I grabbed our quite sprouted potato that I had cut in half a couple days beforehand. You can tell I've been hoping to find a good barrel like this for a while! 


I then set them on top of the soil. Because the roots were so long already, I made sure to bury them into the soil first.


About another 2-3" of soil on top, some water and we're good to go! 


Now we wait! I really hope we get some little potatoes in a few months!


I got my first sprout in just a couple of weeks!


 After over 3 weeks, they've both sprouted and are even growing leaves. I'm so excited!


It's important to note that if the potatoes start showing to cover them up with another inch or two of soil. You want the stem to be under soil by about an inch and a half. 

Stay tuned for updates on the potato growth!

What are some veggies you've grown in containers? Which ones seem to work the best?

Till next time,
Catherine