//Google Analytics
Showing posts with label sugar. Show all posts

Friday, May 24, 2013

Cook-Strawberry Freezer Jam

I've been learning lately that there are many things in our daily lives that we use or consume that we don't realize how simple it is to make it ourselves!


One of these things is strawberry jam (or any jam, really). Yes, jam! It only requires 3 ingredients and takes maybe 15 minutes to make a 6-8 cup batch that will last you months!

Why haven't I been doing this for years?!

Oh and for anyone wondering, jam is made with the FRUIT, jelly is made with the JUICE! I learned that maybe a year ago and it blew my mind. It's the little things, right?

Moving on.

Brian and I went strawberry picking this past weekend and had over 10 quarts (about 15lbs) of strawberries to eat and use!

We've been eating strawberries since we headed home from the strawberry farm! We also prepared and froze a gallon and a half of them, made smoothies and now, freezer jam!

I always thought if you made things like jam you had to can them but that's not true! This recipe is so simple and easy and after the jam sets, you can pop it into the freezer until you need it!

Ingredients:

  • Pectin (I used Sure-Jell but there are other brands that are good)
  • 4 cups of sugar (raw, unbleached, organic is best!)
  • 2 cups of mashed strawberries (over 4 cups whole)
  • 1/4 cup of water

Directions:


Gather and prepare your ingredients. Sure-Jell has a great insert in the box with directions for many kinds of jams and jellies. Sure-Jell has one packet in the box and you use the entire thing. 


Wash your strawberries. 


Hull them. 


Mash them! The fun part! I used my potato masher but I'm sure something like an immersion blender would work as well. Mash them but don't puree them because jam is best with chunks of fruit!


Mine measured at a little over 2 cups. 


 Pour your sugar into another bowl. I know, 4 cups of sugar is A LOT of sugar. I read from many sources that you can't use any more or less because the pectin won't set correctly. Sure-Jell also makes a low-sugar/no-sugar pectin as well which I plan to try soon!


Pour the strawberries into the sugar and mix well.


Mix the water and pectin together in a small saucepan. Bring to a boil for about a minute, stirring constantly. Don't let it get away from you!


When it's done boiling, pour the pectin/water mixture into the strawberry/sugar mixture and stir constantly until the sugar is well dissolved.


Now pour it into cups, bowls, jars, Pyrex or whatever you want to store it in. Be sure they have been washed thoroughly to keep any bacteria out. This is especially crucial if you are canning this recipe. Leave about an inch or more of space between the jam and the top of the jars to allow for expansion. 


I used two 2-cup size plastic containers (Ziploc brand?) and two small jars that previously had jam in them. I estimate they hold about a cup each.


Be sure to leave the lids off or just resting on top for 24 hours to let the jam set properly. 


If you're putting them in the freezer right away, leave the lids off until they're fully frozen, ESPECIALLY if you're using glass! 


Once it's fully set, spread on some toast, have a PB&J or just eat it by the spoonful! This stuff is awesome! 


Best PB&J on the block! On homemade bread, of course! 

Have you ever made your own homemade jam or jelly? What's your favorite combo of fruit? I want to try triple berry!

Till next time,
Catherine


Thursday, April 18, 2013

Bake: No Knead Whole Wheat Amish Cinnamon Bread


How's that for some mouth watering deliciousness??? 

That, my friends, is an amazing recipe I found on Redfly Creations for an alternative to the classic Amish cinnamon bread. You should definitely check out her blog because it's chock full of good stuff! Everything from this Amish Cinnamon Bread to pasta sauce to handy pre-made baking mixes and more! 

I altered her recipe by using whole wheat flour and less sugar but it was still really yummy!! Definitely a semi-healthy little "sweet treat" at night after dinner. Or...ya know...anytime. 


Ingredients (Makes two loaves):

Batter: 
  • 1 cup butter, softened
  • 1 1/2 cups raw unbleached sugar
  • 2 eggs
  • 2 cups buttermilk or 2 cups milk plus 2 Tablespoons vinegar or lemon juice
  • 4 cups flour
  • 2 teaspoons baking soda 

Also, you'll need: 
  • 2/3 cup raw sugar
  • 2 teaspoons cinnamon


This will be for the middle layer/topping. 


Directions:

Preheat your oven to 350ยบ.


Mix your wet ingredients with the sugar till you get  a nice creamy mixture. 


Creamy!


Now add your flour and baking soda. 


Mix well. It will be more of a batter than a dough.


Distribute about 1/2-3/4 of the batter between the two pans. It may sound odd but you want to add the other 1/2-1/4 of the batter on top in a minute. 


Stir together your cinnamon and sugar mixture. 


Sprinkle about 1/2 of the mixture between the two pans.


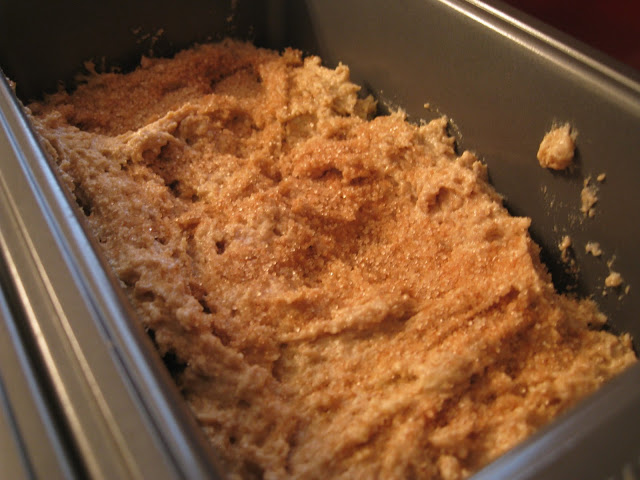
Now spread the rest of the batter on top! Make sense now?


Now pour the rest of the cinnamon-sugar mixture on top of the batter in each pan.


Take a butter knife and stick it into the batter about an inch or so and swirl the batter around. This will help the top have more texture and the inside to be marbled. 


Bake for 45-55 minutes, or until a toothpick comes out clean. Let cool, and enjoy!!


It was so hard to wait!


Baked to perfection! 


Slices of heaven.


Drool worthy indeed.


Eat it warm, cold, warm with butter, cold with butter, early morning, late night, any time, any way this is so good! 

We had a friend visiting for the weekend when I made this and it went so fast! Boy am I glad I tossed the other loaf in the freezer before it was gone too!

Next I want to try The Pioneer Woman's method


I've linked up over at Nourishing Treasures for Wellness Wednesday! Check it out HERE

What's your favorite way to make cinnamon bread? 

Till next time,
Catherine

Thursday, October 4, 2012

Bake: Delicious Homemade Bread

So since attempting to make my own bread a couple of weeks ago, I have fallen in love with it! My first loaf did not go well! It was quite sad actually. It tasted good but it was so dense that it was very unappealing! As you can see...it was...flat. It was supposed to be a rosemary olive oil bread.


I was quite disappointed but I kept trying! My next loaf was just right! I was absolutely thrilled.


 Since then I have made about another 8 loaves. My husband and I are going back to Hanover (North of Richmond, VA) where our families live this weekend so I thought I'd bake them extra bread. So far I've made two honey wheat loaves, another two loaves worth of dough are rising for cinnamon wheat bread, and I will make one more whole wheat loaf when the next two are done.

Very quickly I will try and give you all the baking instructions for making your own bread! It's totally worth it and it's a zillion times healthier for you than store bought bread with God knows what in it!

The initial recipe I started with was from one of my favorite blogs, FabuLESSly Frugal. These gals have so much knowledge and are such a help! The recipe is found here. I didn't go by the recipe exactly, simply because I didn't have all of the ingredients! Here's what I did. If it worked for me, it should work for you!

Ingredients (for 1 loaf of bread):
  • 1 1/4 cup of warm water
  • 1 Tbsp (or 1 packet) of active dry yeast
  • 1/3 cup brown sugar (they note that brown sugar freezes better than using honey)
  • 2 3/4 cups of whole wheat flour 
  • 1 tsp salt
  • 1 Tbsp butter

Ingredients (for 2 loaves of bread):
  • 2 1/2 cups of warm water
  • 2 Tbsp active dry yeast
  • 2/3 cup brown sugar
  • 5-51/2 cups whole wheat flour
  • 2 tsp salt
  • 2 Tbsp butter

UPDATE: I also add about two big spoonfuls of honey and maybe 1/4-1/3 cup (I don't measure) of ground flax seeds. The honey adds a lovely hint of sweet and the ground flax adds a boost of fiber!)

What you'll need:
  • Big mixing bowl
  • Olive oil or baking spray
  • Big spoon (I use a wooden spoon)
  • Bread pan
  • Measuring cups and spoons
  • A clean dish towel or saran wrap
  • A sheet of aluminum foil

Directions:

Mix the warm water, yeast, and brown sugar together in a large bowl and let it sit (proof) for 10 minutes. This is necessary for the yeast to activate. Make sure that your water is warm to the touch, but not hot.

After the 10 minutes are up, add in the flour, salt, and butter. Mix until a nice dough forms. Once it's all formed together, sprinkle flour onto your kneading surface and then place the dough on top. Knead the dough for about 10-15 minutes. It's a great arm work out! Continue to add flour as you feel necessary until the dough is not quite sticky anymore. Form into a ball and put into a greased bowl, covered with a towel or saran wrap for about 1-1 1/2 hours or until the dough has double in size.


After about an hour or so, it should look more like this. Sorry there's no before picture to show the previous size of the dough.


Once the dough has double, punch it down and roll it out into a rectangle, about 1/2 inch thick. Roll it up, and pinch/seal off the sides and place it into the bread pan. Cover again and let it rise to double, usually about 30 minutes. Once it's done rising, place it into the oven at 375 degrees and bake for about 20-30 minutes. On FabuLESSly Frugal they recommend placing a sheet of aluminum foil, shiny side out, on top of the loaf after about 10 minutes to keep the outside from browning too much. You may or may not have to do this step.


The picture is of a cinnamon sugar loaf that my husband had the grand idea for! For this one, just sprinkle cinnamon to cover the flattened dough, and then sugar. I used about 4-5 Tbs of raw sugar and it tasted great to me, but of course you can add your own to taste! I plan to try it with raisins next!

After you've followed all these steps (so simple!) then you should get a beautiful, delicious loaf of bread like these!


These two are honey wheat loaves. Yummm.


And this is what my cinnamon loaf turned out to be! It was heavenly, especially right out of the oven!!

This is a plain whole wheat loaf of bread, but I got "creative" and cut some slits in the dough before putting it in the oven. I think it looks so cool! Like it's fresh from a real bakery!

UPDATE: I've actually decided to always cut the slits in the dough when it's a honey wheat loaf so that I don't get it mixed up if I'm baking different kinds together.


As you can tell, I love baking bread! It's so much fun and I can't wait to try all sorts of new types of bread! What kinds of bread have you made? What's your favorite recipe? Send them my way and I'll try to bake them too!

Carb overload on it's way to my house? Eh, who cares! It's healthy and delicious!!

Do you prefer to bake your own bread or buy from the store? What's your favorite recipe or brand?

Till next time,
Catherine


I've linked up to Less Laundry, More Linking #4 with Life After Laundry and Sensational Creations!