//Google Analytics
Showing posts with label wheat. Show all posts

Wednesday, April 24, 2013

Bake: Herbed Wheat Buttermilk Biscuits

One of my favorite food bloggers is Rachel Cooks. If you've never seen any of her recipes, you need to check her out now! You can find the original recipe HERE. She posted this recipe recently and her biscuits looked so good I knew I had to try it! I used whole wheat flour in my recipe to make it a little healthier. They're so yummy! Fortunately I had the willpower to put them into the freezer before my husband and I ate them all fresh from the oven!

Keep reading for my version!


Ingredients:
  • 4 cups whole wheat flour
  • 4 teaspoons baking powder
  • 1 teaspoon baking soda
  • 1 teaspoon salt
  • 3-5 Tablespoons dried parsley and chives, whatever combo you want
  • 12 Tablespoons softened butter
  • 1 1/2 cups cold buttermilk
  • 2 Tablespoons of melted butter (for brushing biscuits with)

Directions: 

Preheat your oven to 450ยบ F. 


Add all of the dry ingredients together in a medium sized mixing bowl. 


Mix them up.


Add in the wet ingredients. 


Mix well.


Roll it out onto a lightly floured surface. It should be about 1/2"-3/4" thick.


Use your cookie cutter...or in my case, jar lid, and cut out biscuits.


Form extras into dough and roll out again, messing with it as little as possible so you don't warm it up. 


Depending on how thick you make the dough, you can get anywhere from 10-24 biscuits. The original recipe got 8-9 3" biscuits but I made mine thinner and got 24.


Bake in the oven for 12-15 minutes or until golden brown around the tops and edges. If you have two sheets worth, be sure to rotate them halfway through so they both bake evenly. (Sorry for the blurry photos.)


Take them out of the oven and brush butter on the tops of each biscuit. As you can see, they all have character! 


And somehow I managed to get a few monster biscuits in there!


Drool.


These biscuits go well with everything! You could make them into breakfast biscuits, use Italian seasoning for a pasta dinner, add cheddar cheese....oh yum. I think I'll be adding the cheese next time! These biscuits are guaranteed to please either way!

What do you make with buttermilk? Do you have a family recipe passed down for the best biscuits or rolls?

Till next time,
Catherine

Monday, April 22, 2013

Adding Ground Flax to Bulk Your Bread!

About 6 months ago I attempted making healthy whole wheat bread by hand. My first try didn't go so well but after that I must have gotten the hang of it because ever since I feel like each new loaf is an improvement on the last! You can find my original recipe and bread endeavors HERE.  

One of the things that I find essential is adding honey. It gives the bread a little sweetness that goes perfectly with a sandwich or toast or anything! Lately I've also been adding a bunch of ground flax seeds.


The dough is brown because I always use whole wheat flour. If you look close you can see some of the ground flax. 


Here's a better view. I didn't add all that much the first time because I was afraid it would be too noticeable but it's not at all! 


My first loaves with added ground flax were so perfect and delicious! 


Baked to perfection! Golden brown in all the right places! These loaves don't look all that big but I think the flax actually makes them larger too!

Now I dump a lot of flax into the dough. Probably 1/2 a cup? Not sure. I just pour. 

If you make your own bread, I would recommend adding ground flax because it's so healthy for you but your family probably won't even notice it's there! Flax seeds are rich in fiber and omega-3 fatty acids and they're low in carbs! You can't go wrong adding them! You can find ground flax just about anywhere these days. I actually got mine from Big Lots believe it or not! It was Bob's Red Mill ground flax and it was about half of what it normally costs. What a score! Plus it was a huge bag that is lasting me forever! 

I have whole flax seeds as well but I feel like ground flax is easier to add into foods without people being like, "Eww what's this???" I like to be sneaky when I add in healthy foods. Hehe. What they don't know, helps them! I think next time I'll use ground flax and then a small handful of whole flax seeds as well. Ooh maybe I'll buy some oats and make my own honey oat nut bread! Mmm!

How do you use flax seeds? Do you prefer whole or ground? Also, did you catch my two accidental rhymes? I should be a poet! Not. 

Till next time,
Catherine

Wednesday, March 27, 2013

Good Friday Traditions

I have never grown up following any traditions for Good Friday but we went to church on Easter and searched for our Easter baskets when we got home. We also would get together with family but nothing really other than that.

My boss, who is Catholic, mentioned that they don't eat meat on Good Friday. I've also heard that Catholics fast on Friday. I'm not sure of any other traditions, though.

I found a really cool recipe on Pinterest called Resurrection Rolls on the blog Kitchen Kneads. You basically cover a marshmallow with a roll and when you bake it, the marshmallow melts. The entire recipe explains the story of Christ's death and resurrection. I'd love to do this for my niece and nephew! What a cool (and yummy) visual for children, and even adults too! I think that would be a fun tradition to start!

Do you have any Good Friday traditions that you celebrate with your family? How do you share the Easter story with little ones? 

Till next time,
Catherine

Monday, January 7, 2013

Cook: Whole Wheat Spinach & Feta Pizza

My husband and I have an unhealthy obsession with Domino's Spinach and Feta pizza. I know! I know! But sometimes, it's just a guilty pleasure when we don't feel like cooking. While grocery shopping, Brian got the grand idea to buy the ingredients to try and make it ourselves! We had talked about it before and now we finally got around to it and let me just tell you...best decision. 


Just take a look at that! It tastes as good as it looks, I swear it!

Even if you're not a big fan of spinach, trust me, you'll like this! 

Whole Wheat Spinach & Feta Pizza

Pizza Dough Ingredients:
  • 1 1/3 cups of warm water
  • 1/3 cup of sugar
  • 1 Tbs or 1 packet of active dry yeast
  • 6 cups of whole wheat flour
  • 1/4 cup of extra virgin olive oil
  • 2 tsp salt

Toppings: 
  • Drizzle of extra virgin olive oil
  • Sprinkle of garlic salt
  • Grated parmesan cheese
  • Grated romano cheese (optional)
  • Block of shredded mozzarella
  • Fresh spinach leaves
  • Crumbled feta cheese 

Preheat your oven to 400 degrees. Prepare your pizza dough first. Basically you proof the yeast by letting the warm water, yeast, and sugar sit for about 10 minutes, then slowly mix in the flour (add in the salt and olive oil with the first cup of flour). Knead the dough once it is thick enough to be handled, adding flour as needed. Form it into a ball and let it "rest" for about 15 minutes. 


Now roll out the dough. We split the dough into two and they made a somewhat thin crust pizza but we got two instead of just one. I recommend splitting it into two because whole wheat pizza dough tends to be pretty filling, in my opinion. 


Press your fingers into the edges to create a crust on the outside. I made just a little crust so it would keep the sauce from spilling over but not so much that you end up wasting it. 


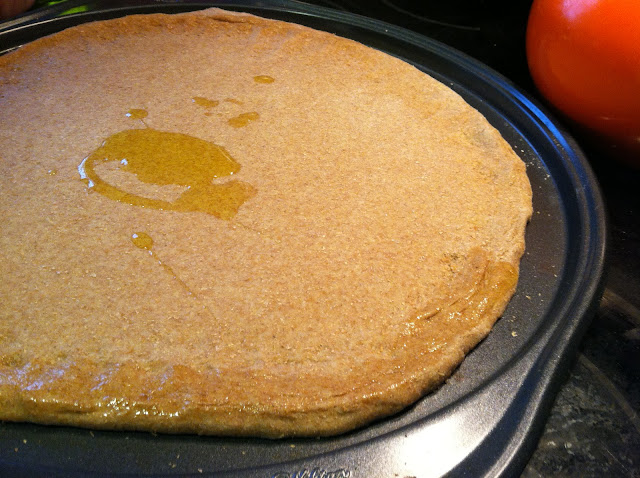
Carefully move the dough to your pizza pan. I brushed olive oil over the surface so that the garlic salt would stick. This step may or may not be needed. 


Sprinkle some garlic salt on the edges for a little delicious addition. 


Now sprinkle your parmesan all over. In hindsight, it's probably a better idea to put the parmesan on after the alfredo sauce because it made it a little more difficult to spread the sauce. 


Pour on the alfredo! 


Spread it to whatever thickness you prefer. We used maybe 1/3 of a jar. 


Mozzarella time! As thick or thin as you want! We like a bit of cheese as you can tell!


Fresh spinach leaves on top. It looks like a lot but they shrink up a bit in the oven. I think next time I'll put almost double this much. 


Sprinkle on your crumbled feta. We also put a little more mozzarella on top of the spinach leaves to help bake them onto the pizza.


Now bake the pizza for about 15-20 minutes. Keep an eye on it though. 


Once the cheese starts to brown it's done!


Sometimes it can be tough to see when whole wheat is done because it's more difficult to see when it's browning. Relying on the cheese turning brown seemed to do the trick for our pizzas.


I used to be a plain cheese pizza kind of girl but after trying the spinach and feta pizza from Domino's, I was hooked! And now that we've mastered it at home, we're both totally hooked. I doubt we'll be calling Domino's anytime soon! The best part is that, despite all the cheese, it's at least whole wheat dough and there's spinach on it! 

We'll be making this again for sure! I think you should too!

Do you like to make your own pizza? What's your favorite kind of pizza to make or buy?

Till next time,
Catherine


I've linked up to Less Laundry, More Linking #5 with Life After Laundry and Sensational Creations!


Tuesday, November 20, 2012

Bake: Soft Honey Wheat Dinner Rolls

Today, I'm thankful for my pets. I've always been an animal person and I just don't see how some people aren't! I currently have two dogs (an old beagle and an even older dachshund), a cat (gray tabby), two goldfish and three hermit crabs. Obviously the fish and crabs aren't any source for snuggling but they're cute and they can be entertaining. I swear I felt like I rescued the crabs when I bought them in the Outer Banks, NC! They're neat little creatures and are fun to have. As far as my furry pets, I'm so thankful for the warmth and love they give unconditionally. They're always keeping us laughing and rarely turn away from a cuddle on the couch (only the cat chooses to turn those down sometimes!). I also occasionally volunteer with a local animal rescue and seeing those poor, neglected animals just breaks my heart. All they want is a warm home with lots of love. Moral of the story...don't shop, adopt and spay/neuter your pets! If you don't have a pet...go get one! They'll be a great addition to your life! 

Blair update: She's finally getting out of the ICU and is moving to the Progressive Care Unit instead. She will be starting physical therapy soon to get her muscles working again. She's ready to be out but she will likely stay another week or two. They still want to keep her visitors very limited to keep germs at bay. I'm really hoping I can go see her, or at least drop off her care package I made, when we're in town for Thanksgiving. Unfortunately I caught a mild version of whatever my husband had, so visiting may not be possible at all. I've barely got a stuffy/runny nose anymore so I doubt I'm contagious, or won't be in a few days...but at the same time, why risk it. On the down side, she's been diagnosed with cardiomyopathy which can become very serious. So if you've been praying...keep praying! 


Mmm...just the thought of these on the side of any dinner is just mouth watering! I know, I know...it's so much easier to grab the frozen ones from the store and just toss them in the oven. Trust me, these are better! And who doesn't love the satisfaction of watching people enjoy and devour something they just made by hand, from scratch?! 

I found this recipe on Pinterest, of course. The pin directed me to the blog, An Oregon Cottage. The author listed this delicious recipe for the softest, yummiest dinner rolls you've ever had...AND they're made with healthy, 100% whole wheat! I originally thought they would be a great addition to the mounds of food we'll be making for Thanksgiving but these rolls are perfect for anytime! The first time I made them my husband and I ate them with just regular spaghetti. It was a match made in Heaven! Not to mention they're not any more difficult to make than a loaf of bread. Same basic concept, just a bit of variation in ingredients and technique. 

Oh you want me to hurry up and get on to the recipe? Ok, ok! 

Ingredients: 
  • 2  tablespoons of active dry yeast
  • 1/2 cup of warm water
  • 1/2 cup of butter, softened
  • 1/2 cup of honey
  • 1/4 cup of sugar (raw, unbleached is best!)
  • 3 eggs
  • 1 cup of milk
  • 4 1/2-5 cups whole wheat flour
  • 1 1/2 teaspoon of salt
Directions: 


Proof your yeast by putting the sugar, yeast, warm water (remember, you want it to be warm, not hot to the touch) in a medium/large mixing bowl. You'll want to let it proof for about 10 minutes. In the original recipe, the writer uses a stand mixer but I don't have one. My rolls turned out great just using a little elbow grease! You could add the sugar with the next step but I feel like the yeast proofs better when it feeds on sugar. 


While the yeast is proofing, go ahead and whisk your butter, honey, and eggs. Also, warm up your milk in the microwave. You can also use buttermilk if you have it and prefer it.


Once the yeast is done proofing, mix in the butter/honey/eggs and the warm milk. You can also add the salt as well. Whisk everything real quick so it's mixed well. 


Now start adding your flour. Add in about a cup at a time and keep mixing. Once a dough forms, drop it onto a floured surface and knead till the stickiness is mostly gone. Try not to use too much flour because you want these to be light and fluffy!


 Once you've kneaded enough, grease the inside of your mixing bowl (I just toss a little EVOO [Extra Virgin Olive Oil] in the bowl and spread it with my hand) and put the dough back. Lay a towel or saran wrap on top and let it sit and rise for about an hour. You'll want it to be about double the original size.


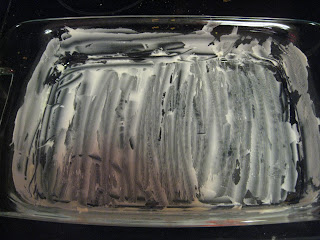
Meanwhile, give your 9x13 pan a good rub down with some butter. I always buy butter made with olive oil and sea salt so I don't feel as guilty about using a little extra here and there ;) 


After it's done rising, drop it back onto a floured surface again. Remember, go easy on the flour here. Just enough to reduce the stickiness. 


Now here's the trickiest part. This is the best method I've found to get evenly sized rolls. Press the dough into a rectangular shape and then cut the dough into about 24 even pieces. Maybe I'm not that great at estimating but it still took me a few minutes before I was able to get it to work right! 


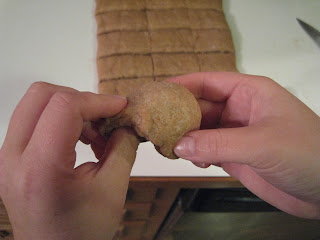
In order to make them all round with no seams showing, take each piece and press it over your thumb like this. 


Then just pinch the seams together. 


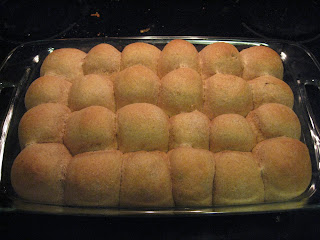
Place them in your 9x13 pan so that they're all touching, seems facing down. Rows of 4x6 fit nicely if you end up with 24 rolls. Now cover it back up with a towel and let it rise for another hour or so. 


I actually only let mine rise for about 45 minutes...I got impatient! They were plenty big enough, though. Be sure to set a timer for 45 minutes so you can preheat the oven to 350...that way the oven will be ready when the rolls are! Now, pop 'em into the oven for about 20-25 minutes!


I set a timer for 10 minutes and then rotated the rolls so that they baked evenly. I could have left them in there for a few more minutes and let them get a little more golden brown but again...impatient!


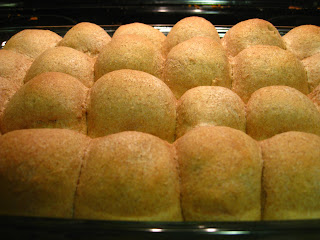
C'mon...you know that looks delicious!


As soon as you pull them out of the oven, brush them with melted butter. You could also brush a little honey on there too! 


You know this is the best part...pull them apart and enjoy! These rolls are so soft and delicious. My husband devoured them with his spaghetti!


Soft, delicious, yummy, healthy made-from-scratch dinner rolls! Wasn't that easy? You can imagine one of the items I'm making for Thanksgiving!

Do you have a family recipe for the best dinner rolls? Do you have any kind of secret ingredient? Care to share?

Till next time,
Catherine