I have never grown up following any traditions for Good Friday but we went to church on Easter and searched for our Easter baskets when we got home. We also would get together with family but nothing really other than that.
My boss, who is Catholic, mentioned that they don't eat meat on Good Friday. I've also heard that Catholics fast on Friday. I'm not sure of any other traditions, though.
I found a really cool recipe on Pinterest called Resurrection Rolls on the blog Kitchen Kneads. You basically cover a marshmallow with a roll and when you bake it, the marshmallow melts. The entire recipe explains the story of Christ's death and resurrection. I'd love to do this for my niece and nephew! What a cool (and yummy) visual for children, and even adults too! I think that would be a fun tradition to start!
Do you have any Good Friday traditions that you celebrate with your family? How do you share the Easter story with little ones?
Till next time,
Catherine
Showing posts with label rolls. Show all posts
Showing posts with label rolls. Show all posts
Wednesday, March 27, 2013
Tuesday, November 20, 2012
Bake: Soft Honey Wheat Dinner Rolls
Today, I'm thankful for my pets. I've always been an animal person and I just don't see how some people aren't! I currently have two dogs (an old beagle and an even older dachshund), a cat (gray tabby), two goldfish and three hermit crabs. Obviously the fish and crabs aren't any source for snuggling but they're cute and they can be entertaining. I swear I felt like I rescued the crabs when I bought them in the Outer Banks, NC! They're neat little creatures and are fun to have. As far as my furry pets, I'm so thankful for the warmth and love they give unconditionally. They're always keeping us laughing and rarely turn away from a cuddle on the couch (only the cat chooses to turn those down sometimes!). I also occasionally volunteer with a local animal rescue and seeing those poor, neglected animals just breaks my heart. All they want is a warm home with lots of love. Moral of the story...don't shop, adopt and spay/neuter your pets! If you don't have a pet...go get one! They'll be a great addition to your life!
Blair update: She's finally getting out of the ICU and is moving to the Progressive Care Unit instead. She will be starting physical therapy soon to get her muscles working again. She's ready to be out but she will likely stay another week or two. They still want to keep her visitors very limited to keep germs at bay. I'm really hoping I can go see her, or at least drop off her care package I made, when we're in town for Thanksgiving. Unfortunately I caught a mild version of whatever my husband had, so visiting may not be possible at all. I've barely got a stuffy/runny nose anymore so I doubt I'm contagious, or won't be in a few days...but at the same time, why risk it. On the down side, she's been diagnosed with cardiomyopathy which can become very serious. So if you've been praying...keep praying!

Mmm...just the thought of these on the side of any dinner is just mouth watering! I know, I know...it's so much easier to grab the frozen ones from the store and just toss them in the oven. Trust me, these are better! And who doesn't love the satisfaction of watching people enjoy and devour something they just made by hand, from scratch?!
I found this recipe on Pinterest, of course. The pin directed me to the blog, An Oregon Cottage. The author listed this delicious recipe for the softest, yummiest dinner rolls you've ever had...AND they're made with healthy, 100% whole wheat! I originally thought they would be a great addition to the mounds of food we'll be making for Thanksgiving but these rolls are perfect for anytime! The first time I made them my husband and I ate them with just regular spaghetti. It was a match made in Heaven! Not to mention they're not any more difficult to make than a loaf of bread. Same basic concept, just a bit of variation in ingredients and technique.
Oh you want me to hurry up and get on to the recipe? Ok, ok!
Ingredients:
- 2 tablespoons of active dry yeast
- 1/2 cup of warm water
- 1/2 cup of butter, softened
- 1/2 cup of honey
- 1/4 cup of sugar (raw, unbleached is best!)
- 3 eggs
- 1 cup of milk
- 4 1/2-5 cups whole wheat flour
- 1 1/2 teaspoon of salt
Directions:

Proof your yeast by putting the sugar, yeast, warm water (remember, you want it to be warm, not hot to the touch) in a medium/large mixing bowl. You'll want to let it proof for about 10 minutes. In the original recipe, the writer uses a stand mixer but I don't have one. My rolls turned out great just using a little elbow grease! You could add the sugar with the next step but I feel like the yeast proofs better when it feeds on sugar.

While the yeast is proofing, go ahead and whisk your butter, honey, and eggs. Also, warm up your milk in the microwave. You can also use buttermilk if you have it and prefer it.

Once the yeast is done proofing, mix in the butter/honey/eggs and the warm milk. You can also add the salt as well. Whisk everything real quick so it's mixed well.

Now start adding your flour. Add in about a cup at a time and keep mixing. Once a dough forms, drop it onto a floured surface and knead till the stickiness is mostly gone. Try not to use too much flour because you want these to be light and fluffy!

Once you've kneaded enough, grease the inside of your mixing bowl (I just toss a little EVOO [Extra Virgin Olive Oil] in the bowl and spread it with my hand) and put the dough back. Lay a towel or saran wrap on top and let it sit and rise for about an hour. You'll want it to be about double the original size.

Meanwhile, give your 9x13 pan a good rub down with some butter. I always buy butter made with olive oil and sea salt so I don't feel as guilty about using a little extra here and there ;)

After it's done rising, drop it back onto a floured surface again. Remember, go easy on the flour here. Just enough to reduce the stickiness.

Now here's the trickiest part. This is the best method I've found to get evenly sized rolls. Press the dough into a rectangular shape and then cut the dough into about 24 even pieces. Maybe I'm not that great at estimating but it still took me a few minutes before I was able to get it to work right!

In order to make them all round with no seams showing, take each piece and press it over your thumb like this.

Then just pinch the seams together.

Place them in your 9x13 pan so that they're all touching, seems facing down. Rows of 4x6 fit nicely if you end up with 24 rolls. Now cover it back up with a towel and let it rise for another hour or so.

I actually only let mine rise for about 45 minutes...I got impatient! They were plenty big enough, though. Be sure to set a timer for 45 minutes so you can preheat the oven to 350...that way the oven will be ready when the rolls are! Now, pop 'em into the oven for about 20-25 minutes!

I set a timer for 10 minutes and then rotated the rolls so that they baked evenly. I could have left them in there for a few more minutes and let them get a little more golden brown but again...impatient!

C'mon...you know that looks delicious!

As soon as you pull them out of the oven, brush them with melted butter. You could also brush a little honey on there too!


Soft, delicious, yummy, healthy made-from-scratch dinner rolls! Wasn't that easy? You can imagine one of the items I'm making for Thanksgiving!
Do you have a family recipe for the best dinner rolls? Do you have any kind of secret ingredient? Care to share?
Till next time,
Catherine
Monday, November 12, 2012
Cook: Lasagna Spinach Rolls
Today, I'm thankful for honesty. I love when people are able to get over themselves and just be honest. Honest in the little things, honest in the big things. More honesty in this country would make this country a better place. But today, I'm thankful for those who are being honest already and make it a point in their daily lives to be an honest, genuine person.

Looks delicious, right? It is! It's like your own personal roll of lasagna heaven. I pinned this recipe on Pinterest a while back and am SO glad I finally made it! I used that recipe as a guideline but added my own taste to it. My recipe also makes double what the original recipe makes. So, be prepared to put half in the freezer or feed a large family! Or, just half the recipe!
Ingredients:
- 1 box of lasagna noodles (20 in the box, used 19 because 1 broke)
- 1 10oz frozen package of spinach, thawed and drained
- 15oz container of ricotta cheese
- 16oz container of cottage cheese
- 1/2 cup parmesan cheese (more or less to taste)
- 1/2 cup shredded mozzarella (more or less to taste)
- 2 eggs
- Salt
- Pepper
- Jar of tomato pasta sauce
- Jar of alfredo sauce
Directions:
Boil your noodles ahead of time then strain them and lay them out so they cool off. You should probably use wax paper, but I didn't have any, so I used aluminum foil. It worked fine. Also, preheat the oven to 350.

Put your spinach, ricotta cheese, cottage cheese, parmesan, eggs, and a dash of salt and pepper into a medium bowl.

Mix tit together well. Mostly be sure your eggs and spinach are mixed in. I used a wooden spoon that I guess might be considered a spork and that helped separate the spinach.

Spoon out maybe 1/4-1/3 cup of the mixture onto your noodles and spread it evenly. I didn't measure which gave me a little trouble later...whoops!

Roll 'em up!

Before placing them in your pan, pour your pasta sauce in the bottom and spread it around. As you can see, using the whole box of lasagna makes a lot! Once you've done that, place your rolls in the pan...or panS in my case.
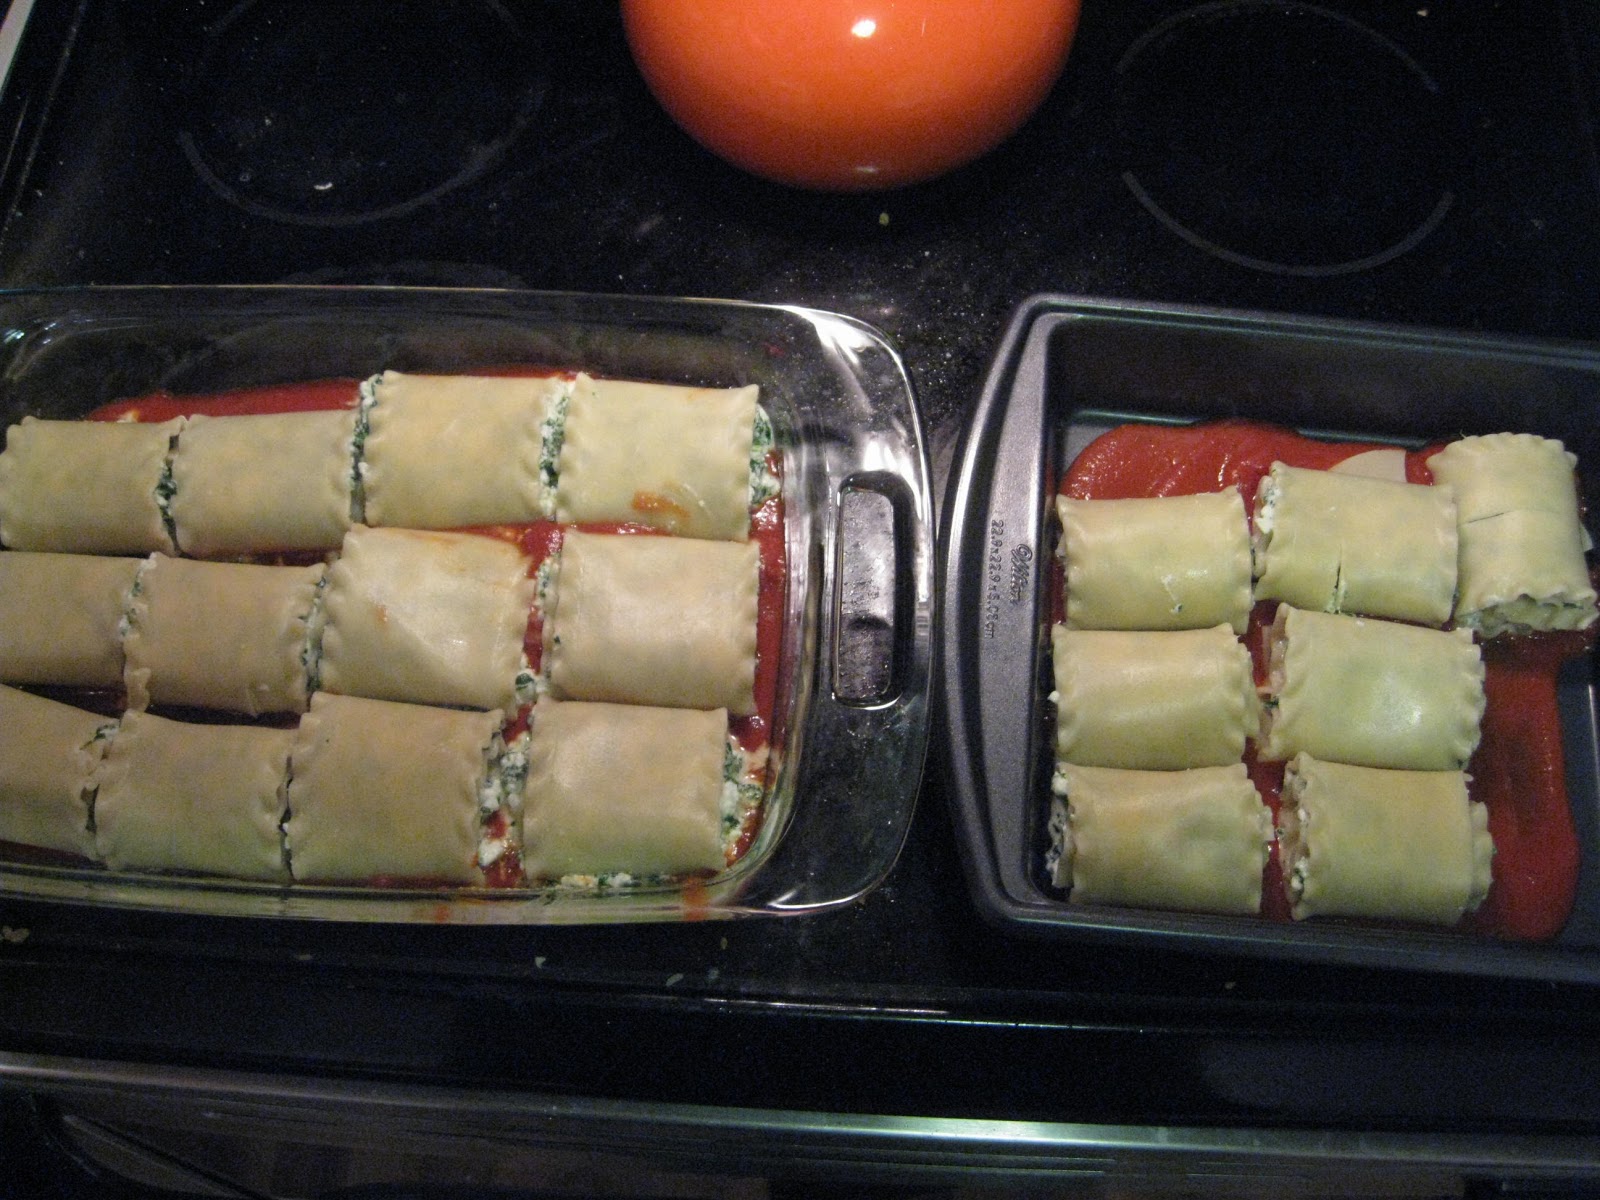
Then, take your alfredo sauce and spoon it over the tops of the rolls. If you don't like alfredo, you don't have to do this. I thought the combination was delicious!

Then, take your shredded mozzarella and sprinkle it on top! It's looking real good now, huh? You could also add more parmesan on top if you wanted. Or do parmesan instead of the mozzarella. All of these choices would be delicious!

Now, pop them into the oven at 350 for about 40-45 minutes. If you did as many as I did where they're all touching, you'll need closer to 45 minutes. If you did less with them not touching, check them after about 30 minutes. If they're getting crispy and a little browned, they're good to go.
Mouth watering deliciousness! I baked the large dish first and put the small one into the freezer for another time.

Mmm mm mm! Enjoy!
A couple recommendations:
- If you plan to make a lot and freeze half, buy some of those metal pans at the grocery store.
- If you want them to be crispier, lay them in the pan so that they are not touching each other.
- Don't put too much in each roll! I started with putting too much in the first 6 but ended up barely having enough for the last few!
- Save your extra sauce for those who like their lasagna extra saucy!
What's your favorite lasagna recipe? Do you like to keep it simple or go all out?
Till next time,
Catherine

I've linked up to Make Your Own Mondays 9/9/13 with Nourishing Treasures!
Subscribe to:
Posts (Atom)