//Google Analytics
Showing posts with label home. Show all posts

Tuesday, July 2, 2013

How to Choose Blinds for Your Home {Guest Post}

Today I'm happy to bring you another guest post! This time, it is Danielle from the Melbourne Blind Company giving us some tips for choosing blinds for our homes! Take it away, Danielle!


Things to consider when choosing new blinds for your home

Maybe you’re sick of your current décor, or you don’t want to repair those old broken ones, buying new blinds can be surprisingly affordable. When you have decided that you prefer blinds to furnish your windows over the more traditional option of curtains, the first thing you will need to ask yourself is, what kind? What would you like your blinds to do; Keep eyes out? Keep light out? Provide privacy? Add colour? Filter light? Create ambiance?

There are a variety of blinds available, and they can be custom designed to suit the style and decor of your home, like those at the Melbourne Blind Company. From translucent roller blinds to romans and timber venetians, there are many to choose from. Blinds are considered a less formal style of window furnishings and are commonly seen in family areas, particularly to block out the sun which provides protection from UV rays by day and the added comfort of insulation at night. 

If you have a really large window space to cover, any kind of vertical blind, including panel blinds, are the best option as they allow for a long stretch of coverage. These come in both light and heavier options, but when the months are getting colder, insulation is what you need. You can layer blinds behind curtains, or purchase blinds that use thicker fabric.


You should look at the materials and the environment in which they will be used. Consider what will work best in wet areas such as bathrooms and laundries where dampness can be a problem if you don't have good ventilation. For the bedroom and living room, think about comfort and which blinds will not only look good, but also provide decent ventilation.

Also, be open to different types of blinds for different rooms. There is no reason for only having Verticals or Romans in every room of the home. Mix and match the style to suit the atmosphere of each room and for bedrooms, the taste of the person who lives in that room. Blinds are a really versatile way to furnish the windows in your home and instantly create a new, vibrant feel.


Thanks so much Danielle for your awesome post! My home is way overdue for some sprucing up with easy additions like blinds and curtains! 

Do you have blinds, curtains, or both in your house? What is your favorite style of blinds? 

Till next time,
Catherine

Tuesday, April 30, 2013

Cook: Homestyle Baked Beans


If you're like my husband and I, you love cookout food! My husband absolutely loves having hot dogs, beans and chips for dinner. He'd do it al the time if I let him. That and spaghetti! Don't worry, we get GOOD all beef hot dogs, not processed mystery meat!

Speaking of hawdogs...


With that being said, hot dogs and beans go together. Baked beans are essential to a delicious cookout meal. I recently decided that I needed to attempt making them myself since buying the cans can get pricey. Buying dried beans is so much more economical, even if it does take a little more time. It's really not bad, though. You just have to soak them the night before you want to cook with them.

I found one set of recipes from Squawkfox. And another from AllRecipes. I used these as a starting point and threw things together to make it my own.

Ingredients:
  • 1lb of Navy Beans (about 4-5 cups dry)
  • 4 cups water
  • 2 chicken bouillon cubes 
  • 1 12oz can of tomato paste
  • 3/4 cup molasses (I used blackstrap but I'm not sure what the differences are)
  • 1-1/2 Tablespoons of salt
  • 1/2 teaspoon black pepper
  • 1 Tablespoon dry mustard
  • 1 Tablespoon onion powder
  • 6-7 strips of turkey bacon (or regular bacon if you prefer)

Directions:


Soak the beans overnight. Mine soaked for almost 14 hours. They over doubled in size in that time. General rule of thumb is that the longer you can soak them, the better. If you don't know much about cooking with dry beans, check out Squawkfox's post How to Soak and Cook Dry Beans. You should also check out her post 10 Reasons Soaking Dried Beans Can Change Your Life. Good stuff!


Strain your beans then put them into your slow cooker with about 4-6 cups of fresh water. Turn the slow cooker to high. 


There's some debate as to whether you should cook the beans in the water that they soaked in or not. I used fresh water. Anyone have a preference and why?


Fry or bake your bacon just before pouring the ingredients into the slow cooker. Or don't. The beans need to cook for so long that it doesn't really matter. If you start the beans and bacon at the same time, just toss the bacon in when you're done! Mine was cool by the time I was ready so I just ripped it into smaller chunks and tossed it into the slow cooker!

Dump all the ingredients into the pot, stir it up and cook on high for 6-7 hours or low for 10-12.


This was less than an hour into the cooking.


This is what it looks like about halfway. Stir every so often if you're around to do so and add more water as needed. Cook for 6-8 hours on high or 10-12 on low.


Serve and enjoy!


Towards the end do a few taste tests and add what you feel it needs. 


I think next time I'll make mine a little sweeter! But overall they were delicious and were a hit with my husband and a friend of ours!


Another great things about this is that there were a ton of leftovers! I divided the rest into 3 quart sized freezer bags for the next time my husband and I are craving hot dogs and beans!

These beans definitely take a long time, though. It's not a quick recipe, but it is easy! Mine cooked for probably close to 9 hours. They definitely weren't mushy like the canned baked beans but were still delicious! It's sometimes difficult to readjust to something when you're so used to the old thing!

All in all, I don't think I'll be going back to store-bought baked beans!

What's your favorite style of baked beans? Homestyle, country style, Boston? Do you ever cook with dried beans?

Till next time,
Catherine

Wednesday, April 24, 2013

Bake: Herbed Wheat Buttermilk Biscuits

One of my favorite food bloggers is Rachel Cooks. If you've never seen any of her recipes, you need to check her out now! You can find the original recipe HERE. She posted this recipe recently and her biscuits looked so good I knew I had to try it! I used whole wheat flour in my recipe to make it a little healthier. They're so yummy! Fortunately I had the willpower to put them into the freezer before my husband and I ate them all fresh from the oven!

Keep reading for my version!


Ingredients:
  • 4 cups whole wheat flour
  • 4 teaspoons baking powder
  • 1 teaspoon baking soda
  • 1 teaspoon salt
  • 3-5 Tablespoons dried parsley and chives, whatever combo you want
  • 12 Tablespoons softened butter
  • 1 1/2 cups cold buttermilk
  • 2 Tablespoons of melted butter (for brushing biscuits with)

Directions: 

Preheat your oven to 450º F. 


Add all of the dry ingredients together in a medium sized mixing bowl. 


Mix them up.


Add in the wet ingredients. 


Mix well.


Roll it out onto a lightly floured surface. It should be about 1/2"-3/4" thick.


Use your cookie cutter...or in my case, jar lid, and cut out biscuits.


Form extras into dough and roll out again, messing with it as little as possible so you don't warm it up. 


Depending on how thick you make the dough, you can get anywhere from 10-24 biscuits. The original recipe got 8-9 3" biscuits but I made mine thinner and got 24.


Bake in the oven for 12-15 minutes or until golden brown around the tops and edges. If you have two sheets worth, be sure to rotate them halfway through so they both bake evenly. (Sorry for the blurry photos.)


Take them out of the oven and brush butter on the tops of each biscuit. As you can see, they all have character! 


And somehow I managed to get a few monster biscuits in there!


Drool.


These biscuits go well with everything! You could make them into breakfast biscuits, use Italian seasoning for a pasta dinner, add cheddar cheese....oh yum. I think I'll be adding the cheese next time! These biscuits are guaranteed to please either way!

What do you make with buttermilk? Do you have a family recipe passed down for the best biscuits or rolls?

Till next time,
Catherine

Tuesday, November 27, 2012

Hermit Crabitat


You may remember reading in a previous vacation blog that I got two more hermit crabs to make a little family of three! I also wrote about how the conditions in the store were awful (dead crabs, smelled bad, etc) and so I really felt like I was rescuing them more than anything! That week in the OBX I ended up doing a bit of hermit crab research and learned SO much. The Hermit Crab Patch is a great resource with so much information about hermit crabs. If you plan to get a hermit crab next year on vacation then please check out that website. There's so much more to them than you thought! Or at least, than I thought. They're really cool little creatures and they need more than a tiny, crummy home than this...


Can you really be surprised when they die within a year?

I have a 10 gallon tank that I had from my first hamster when I was 13 at my parent's house and we picked it up over Thanksgiving. The tank has housed hamsters, gerbils, even a turtle, and now, hermit crabs!


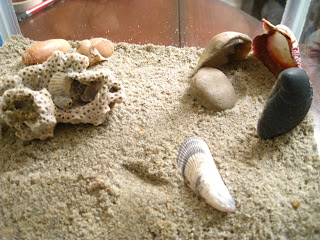
I gathered my shells and other pieces for the tank. I've got various shell halves and a couple larger shells for the crabs to grow into. I also had a sandwich bag full of small shell pieces that I collected from the surf in Avon, NC.


I bought this cool coral piece in a little shop in Avon. I doubt it's actually from the area but I thought it would be cool in the tank and provide a place for the crabs to climb. Oh and did I mention I took home 3 gallon-sized bags of sand as well? I figured 3 gallons would be a good amount in a 10 gallon tank. 

As far as cleaning the sand, I put about half a bag full into a bucket with water. I mixed the water and sand and then dumped the water to get any loose particles out. Then I spread the sand onto a black plastic bag laid out on the patio and let it "bake" in the sun for several days. I've heard you can also boil sand but I figured that would be too time consuming for as much as I had. 


Then all I did was spread the sand into the tank and placed shells throughout. Into their new home they go!


They started exploring right away...I think they like it! I can imagine it's got to be much better than their previous home. 


 I took a plastic tray and filled half with the small shells and poured filtered water in their along with their sponges. This way they have lots of fresh water and can even take a little dip if they want.


Rhett is in the green shell, Scarlett is on top of the right sponge, and Ashley is the blue shell. They're actually all girls but I just love Gone With The Wind!


This is the other side of the tank. They like to hide in the shell "condo" on the right. My husband and I were talking about getting a small heat lamp to place over this side so they can get some warmth, especially over the winter. Not to mention they need warm temperatures and we have yet to even turn the heat on in our house! Brrr!


There we go...happy little hermit crabs! I know it may seem silly but they're cool little animals and I want them to live a good life. I don't want to just buy them as a novelty and let them die! I learned at The Hermit Crab Patch that they usually dig underground when they move into a new shell to molt so hopefully I'll get to see them do that soon!

Side note: I also want to use some of the sand and shells in a shadowbox project! It's such a cute idea...can't wait to try!

Did you have hermit crabs as a kid? Do you buy them for your kids? 

Till next time,
Catherine