For this post, I
technically have my first guest blogger! My husband, Brian! He’s recently been
making props and helmets out of cardboard and hot glue and he’s been having a
lot of fun in the process. I told him he needed to do a tutorial for the blog
and he agreed! Without further ado…
Hey everyone, my name is Brian and I’m Catherine’s husband.
Some friends and I have recently started a film company called Visionwood
Productions. I’ve loved making movies since I could wield a camera and have
fortunately found a great group of people who are as passionate about it as I am.
One of our upcoming projects is a short medieval film and I’ve been working on
props and helmets for us to wear. I’ve hard a crazy hard time finding good
tutorials online on how to make them so I got a basic idea and just ran with
it. My hope is that this blog tutorial will help other people to create awesome
props with minimal expense!
You’ll need:
- Lots of cardboard
- Box cutter
- Rotary board or a hard surface to cut on
- Hot glue gun and lots of glue sticks
- Flat black spray paint
- Metallic spray paint (silver, bronze, gold, whichever you
prefer)
- Junk paint brush
- Paper
- Pencil
- Ruler
Step 1: Gather all your materials and have space to work.
Helpful hint: Play something awesome like a Coldplay station on Spotify!
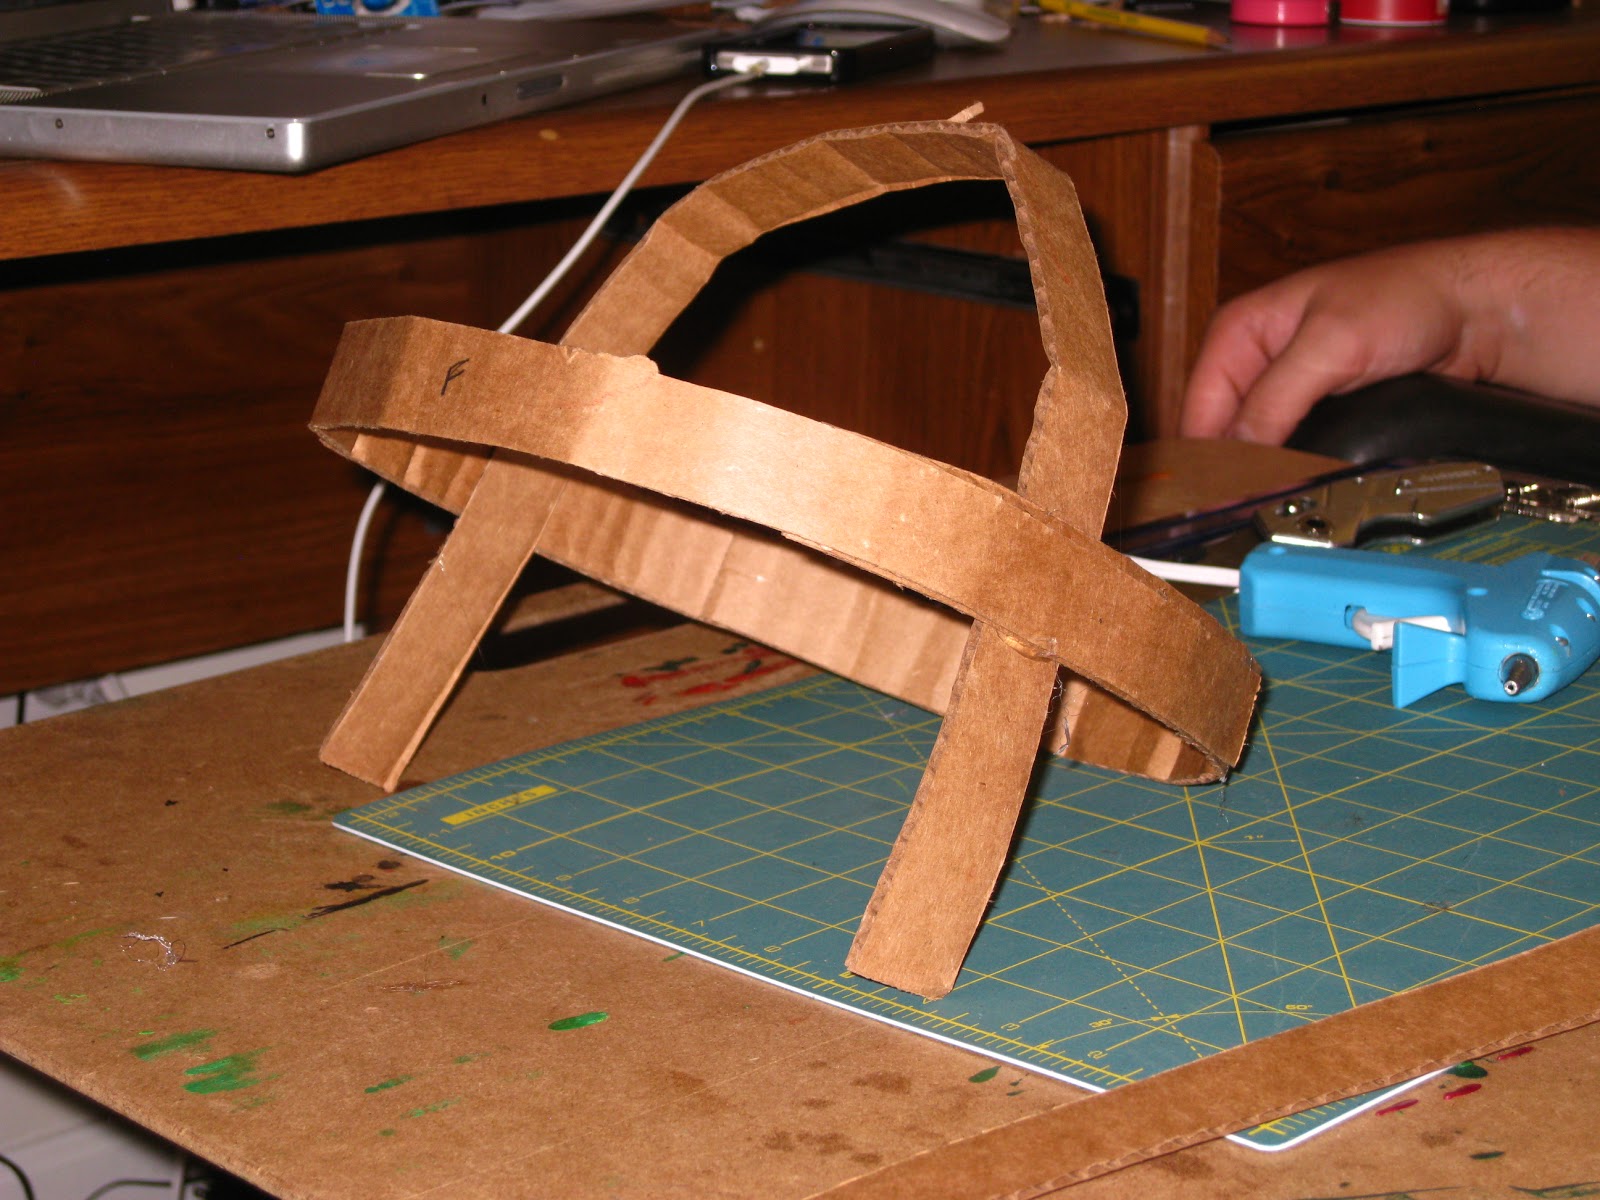
Step 2: Cut four 1” wide strips, about a foot and a half in
length, but the length doesn’t have to be precise, they just need to be long.
Crush the frames so that they are easily bended.
Step 3: Wrap two strips around your head to figure out the
size it will need to be. This will be the basic frame of the helmet. Be sure to
add a couple inches for extra space. You’ll need this later on. You could also
just use a measuring tape first, but this looks more fun! Hot glue the pieces
together to create the size you need.
Step 4: Decide where you want the front to be and stick with
that. Put one strip long ways around the circle to fit your head. Glue it down.
Then put the other strip in the other direction, glue it down and glue the
strips to each other where they meet.
Step 5: Fold the edges up and glue them down. Leave the
front one alone, because that will be the nose guard piece later.
Step 6: Cut out a circle that’s about 3-4” in diameter. Glue
it to the top of the inside of the helmet frame.
Step 7: Cut 4 pieces of cardboard in the shape in the following picture. It’s hard
to describe, it’s like a rounded triangle. Use the measurements you see in the
picture. The lines on the rotary board are 1”x1”. Crush them and make them
pliable. Mush the pieces into the inside of the frame so they touch the frame
on all sides and glue them into place. You can cut them in half if it’s too
difficult to place them as is. It's not exact and pieces will overlap, but that's fine.
Step 8: Fold a piece of paper in half and cut out the
pattern in this picture. This will be your template for the face area of the
mask. Then cut out the pattern on cardboard. When you cut out the eye holes,
save the pieces and use them for decoration later. Again, make the piece
pliable. You have to do the next step before putting on the face mask so just set it aside for a minute.
Step 9: Cut out two more pieces of cardboard in the shape of
the nose piece and glue them over top to reinforce it. Put glue on the sides of
the nose piece for extra reinforcement.
Step 10: Put the face plate on the mask and hot glue it
behind the nose piece.
Step 11: With my head size I then cut a piece of cardboard
that is 23"x5" inches, this will vary with your head size but the 5 inch
height is a good height. Make this piece pliable because this will be the neck
guard of the helmet. Put the neck guard in place and then glue it to the face
plate leaving the back and sides of it unglued. Put it on and see how it fits.
Step 12: Make five 3 ½" cardboard strips and glue them
to the inside of the neck guard gluing them to the top of the helmet at the
same time. This holds the two large pieces together.
Step 13: Fold a piece of paper in on itself till it’s about an inch
across. Place on mask where shown.
Step 14: Attach the eye cutouts onto the outside of each eye
hole.
Step 15: Cut seven ½” x 7” strips and glue them around the
outside of the helmet, spaced evenly apart. This part is purely decoration.
Step 16: Cut a glue stick into little pieces and glue them
around the helmet as decoration. You could also use brass fasteners but I found
this to be easier because it was hard to make a hole through more than one
layer of cardboard.
Step 17: Add cardboard and glue dots as you see fit to make
it as decorated as you want.
Step 18: Paint the entire helmet with a flat black spray
paint. Let it dry completely. I
used the interior/exterior fast dry spray paint from Wal-Mart. We generally try
to avoid Wal-Mart but it’s less than $1 there, and making these helmets tends
to use a lot.
Step 19: Spray a small amount onto your brush and vigorously
brush onto the helmet. Do it in any direction, using more or less where you
think it should be. Do this all over the helmet till you’ve achieved the look
you want.
Step 20: Enjoy!
Front
Right side, the left is the same.
Back
All four of the helmets that I have made in the past week.
Helpful Hints:
Contact your local grocery store or Target and ask if you
can have the boxes that they throw out each week. It’s free and there’s plenty!
Feel free to alter/expand this design as you feel necessary.
Get creative and have fun! These helmets have been a lot of fun to make and I’m
excited about using them in the movie we're going to make!
**NOTE: This is an original project. Please do not sell the
pattern or created project for profit. It is for personal use only. Thanks!**
Hope you enjoyed this tutorial and I’d love to see what you
create! Send us pictures of the helmets you create at CatherinePageWood@gmail.com! Leave a comment if you have any questions! Have fun!
Stay creative,
Brian