//Google Analytics
Showing posts with label save money. Show all posts

Wednesday, October 30, 2013

{Wedding Wednesday} Save the Dates - Guest Post


Today for Wedding Wednesday, I'm proud to announce another guest blogger!  Chloe from How We Flourish (formerly Healthy People, Healthy Planet) is going to tell us all about save the date cards! She has some awesome tips that I couldn't agree more on! I chose not to do save the dates in order to save money, time, stress and the fact that we didn't have that many out of town guests.

Take it away, Chloe!


Save the Date

Whether you have a lot of out of town wedding guests or you just want everyone to be able to plan ahead for your wedding, save-the-dates have become another expected part of wedding planning. But do you really need to spend a dollar a piece PLUS postage for a hundred cards with your face on them? I don't think so!

Do I even need save-the-dates?

Answer: It depends. Technically, no, you don't. There is nothing in wedding etiquette law that says you must send out save-the-dates. If you are having a small or local wedding and everyone already knows your date, feel free to skip! However, depending on your guests, you may want to. Formal invitations typically go out 6-8 weeks before the wedding, so your guests may appreciate a heads up. Save-the-dates can be used not only to inform guests of the date, but also to direct them to a wedding website, where you can post travel and lodging information. This may be extremely useful for out of town guests who need to plan ahead for your wedding. An important point to keep in mind is that if you send someone a save-the-date, you have to send them an invitation. No going back. For this reason, many couples choose to only send save-the-dates to out of town guests and VIPs. Certainly only send them to people you are 100% positive you will want at your wedding. Cutting back on quantity in this way is one way to save money.

Electronic save-the-dates

Okay, so you have decided you should send save-the-dates because your family is scattered across the country, or whatever your reason may be. But maybe you still don't want to print off a hundred cards and mail them out. This is fair: it costs money and there is the environmental burden of printing and shipping to consider. Therefore, if you are not concerned about the formality your save-the-dates are conveying, feel free to let people know via the internet! A simple email may do, or you can make up a design to email out (more on designing later). Keep in mind, however, whether everyone on your list has an email address they check regularly. If your grandparents or great aunt Peggy would have trouble with an electronic save-the-date, consider giving them a call or mailing one to them.

Budget Friendly Printing

For a more formal and accessible save-the-date, you may still want to go with standard paper save-the-dates. With smart shopping and designing, these do not have to cost an arm and a leg! Go with postcards. You may think magnets or hand carved wood slices are cute, and I'm sure they are. However, not only do these products cost more, but you must also pay for envelops and postage. Furthermore, anything weighing more than an ounce or that is rigid will be charged more than standard postage. Postcards, however, are cheap and postage is only 33 cents to send within the United States (at time of posting; max size 6" x 4.25"). Even simple card stock or 80 lb glossy postcards will hold up fine in the mail. Don't buy save-the-dates. This may sound like confusing advice, but hear me out.

Buying save-the-dates from a typical invitation retailer will end up being more expensive than it ought to be. After all, if you put the word "wedding" in front of something, retailers get to jack up the price, right? So instead of shopping for save-the-dates, shop for postcards that allow you to add your own text or upload your own images. A quick search for "postcards" will yield many websites that will sell 100 custom postcards for under $20. Once you find a company you like (many will send you free samples), sign up for their mailing list to keep an eye out for sales and coupons. Don't feel limited by designs. Even if you've found a good price, you may feel stuck choosing a certain design you aren't crazy about. Luckily, many postcard sites let you upload your own picture. No design experience? No problem! Sites like PicMonkey make it easy to edit photos, add text, make collages, and then turn them into a postcard, like the one below:
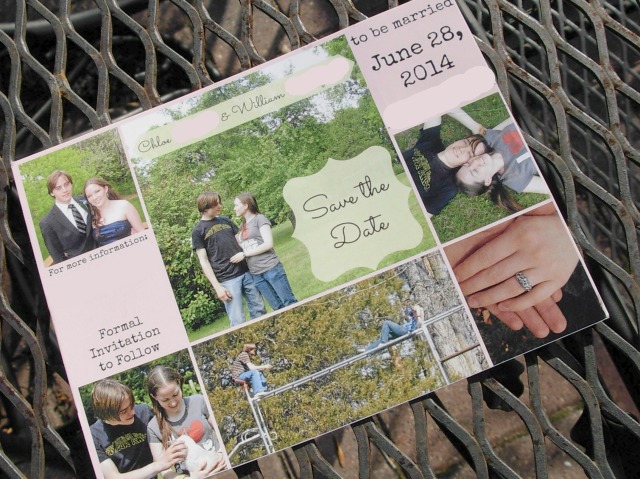
Save the Date
Me: "Why did you take the picture on the patio table?" Fiance: "It's artistic!"
Heck, if you have the creativity and time, you can even make your postcards and print them at home! Keep your eye on the prize Above all, remember that all of this planning is about you marrying the love of your life. Don't worry if your save the dates aren't absolutely perfect. Do what you can and work within your budget. There are always options if you are willing to look for them.

Enjoy your planning, thanks for reading, and a big thank you to Catherine for inviting me to post!

Chloe
How We Flourish


Thanks again to the lovely Chloe!! 

Till next time,
Catherine

If you're a fellow blogger and are interested in guest posting for this series, shoot me an e-mail at CatherinePageWood@gmail.com! Or, even if you're not a blogger and would like to share your wedding story or advice, send me an e-mail! I would LOVE to share your stories!


If you liked this post, be sure to check out the other editions of Wedding Wednesday!


Thursday, February 7, 2013

DIY: Dish Detergent!

Are you tired of spending way too much money on dishwasher detergent/tabs/liquid? Fortunately for me, just before I got married and my husband was living the final bachelor days in our townhouse, I found a big box of 85 dishwasher tabs for about $12. We only just now ran out so it lasted us about a year, which is great! I found this great recipe on Being Creative to Keep My Sanity on Pinterest and it was actually one of the first things I had pinned on my DIY pinboard. I wanted to wait till we ran out of our existing tabs before making more dishwasher detergent. 

Today was that day! Well, it was a few days ago but I knew it could wait. Even better, my awesome husband hand washed all the dishes that had piled up last night! Gave me some extra time which was great because I was having a hard time finding the Arm & Hammer Super Washing Soda. Note: I couldn't find it at Food Lion, CVS, or even Target but they had it at Kroger. 

All you need is: 
  • 1 box of Borax (4lb 12oz - Found in the detergent isle)
  • 1 box of Arm & Hammer Super Washing Soda (3lb 7oz - Found in the detergent isle) 
  • 0.5lb/24 Tbs citric acid (Found in the canning isle but I got mine at a local farm Auburnlea Farm)
  • 3 cups Epsom Salt (Found in the health isle near hydrogen peroxide and such)
  • LemiShine Rinse Aid or Distilled White Vinegar (Especially important if you get hard water spots)


Directions: 

Are you ready for how easy this is?


Mix everything together in a huge bowl. Or even a big bucket. My bowl was just barely big enough. 


Now pour it into your jar/container. I saved this Oxi-Clean container and the dishwasher tab container from before. Everything fit into these two containers and I counted about 16 cups of detergent. And get this...all you need is 1 Tablespoon per load!! Can you imagine how long this will last? My guess is a VERY long time. For my husband and I, we run a load of dishes at least once a week but sometimes twice so this should last us forever!

If you have a problem with hard water you'll definitely want to use the rinse aid, whether it's vinegar or LemiShine. With either one, just sprinkle a little bit in the bottom of the dishwasher before running it. Don't worry, your dishes won't smell like vinegar! 

Price breakdown:

Borax                 $4.80
Washing Soda    $3.29
Citric Acid         $2.65
Epsom Salt         $3.00 (Estimate)
Vinegar              $2.35

Total:                 $16.09

Now that comes to 256 Tablespoons in 16 cups...that's a lot of dishes!!

If you buy LemiShine instead of Vinegar, it's about $4 for a small container. Not sure how long it lasts.

Verdict: Well, not sure yet! I just made it today so I haven't had a chance to use it yet but I will update as soon as I do! I'll do one load without the vinegar as a rinse aid and one with it so I can let you all know how it does.

Oh and here's a fun story for you all. Last week I used a sample detergent that I had. I just assumed it was dishwashER liquid...until the next morning when we got up. My husband was the first one into the kitchen and he called to me to let me know our kitchen floor was FULL of suds. Uh oh. Ok so it wasn't that bad, just a quick clean up with some towels. But, moral of the story...read the label. I felt like such a dummy but it helped us start the day with a good laugh!

UPDATE: I have since washed dishes several times and have not used LemiShine or vinegar as a rinse aid and I haven't gotten any spots on my glassware. I guess we don't have hard water! Just keep in mind if you do have hard water you'll need a rinse aid. Otherwise, the dishes are coming out sparking clean! 

How much do you spend on dishwasher detergent every month? It adds up quick! Or do you wash all your dishes by hand?

Till next time,
Catherine

Wednesday, January 23, 2013

DIY: Make Your Own Vanilla Extract!

Vanilla is a delightful flavor that most of us probably use quite often in the kitchen. If you buy the real stuff, it can be expensive! I've recently learned that it can be made fairly inexpensively. All you need is a couple vanilla beans and some vodka! 

My husband and I really don't drink (if anything, a small glass of wine with family) so buying a whole bottle of vodka just seemed silly. I told my mom about making vanilla and she offered some of hers. That being said, she helped drop the cost of this project for me! The cost of vanilla beans can seem high, but if you're making vanilla, it seems to even out. I paid almost $7 for two vanilla beans at my local Food Lion but you can find them online at a wholesale price. I included an affiliate link below for your convenience!


I first found this nifty DIY on A Beautiful Mess. These girls gave a quick tutorial here. She reused a maple syrup bottle which I think looks adorable! I have real maple syrup in a similar bottle that I wanted to use but it wasn't empty when I wanted to try this! Maybe next time. 


Gather your supplies! 
  • Vodka
  • Vanilla Bean(s)
  • Bottle or jar
  • Liquid measuring cup
  • Scissors
  • A funnel can be helpful


All Natural Madagascar Vanilla Beans


I love this little bottle with a cork stopper. It originally had bread dipping oil in it that my aunt had given to my mom as a gift. I've recently developed a borderline obsession with saving jars and bottles so I made sure she saved it for me! 

Directions:


Cut the beans down the middle long-ways. Some sites have recommended scraping the beans out from the inside. If you do that, you'll need to filter your extract before using it in a recipe to keep the beans out. But then again, it probably doesn't make a difference.


Two beans cut length-ways will give you, obviously, four strips. 


Now measure out your vodka. You will need 4oz for every vanilla bean. (Psst, 8oz=1 cup). I had two beans so I poured a whole cup.


This is where the funnel comes in handy. Shove the beans into the bottle and then pour in the vodka. And this is where I warn you to measure how much your bottle/jar can hold beforehand! My bottle held just under a whole cup. It was maybe 1/10th of a cup too much or some absurdly small amount. I doubt it will effect the extract. I've actually read that you can continue to add vodka as you use the vanilla and it will continue to "brew" more extract. It was also advised on one site to keep the liquid line above the beans so they don't dry out. 


And now, we wait! This picture was taken as soon as I finished. It only took about an hour to begin showing color but it will take about a month before you should start using it. I've got a little bit of store bought extract left so by the time I use that up, I'm sure the homemade stuff will be ready. 


This was taken about 2-3 weeks later.


This is after more than a month. It's dark amber and ready to use! I don't bake a whole lot (trying to keep sweets out of the house!) so I haven't used it yet but I'll try and whip something up soon to tell you all how it was!

Tips: 
  • The brand of vodka isn't very important. It's said that you can basically just get the cheapest one because you're not going to be drinking it so the quality doesn't matter. The alcohol is the necessity. 
  • It will take at least a month before you can use the extract. It takes time for it to age. 6 months is best from what I've read. It can last indefinitely but the beans should probably be cut to shorter lengths so that the liquid does not drop below the tops of the beans.
  • "I don't want to put vodka in my cupcakes!!" ....is what you might be thinking. Don't worry! The alcohol will burn off when you cook whatever treat you're making! Not to mention, the amount of vanilla usually used in a recipe is fairly small in comparison. 
  • Making lots of bottles of vanilla extract would make great gifts! Just keep in mind you'll need to make them at least a month in advance!
  • According to BlogHer, vanilla may be in short supply very soon! So, stock up! 
  • Some helpful websites: Vanilla Review and Amadeus Vanilla Beans

Do you always buy real vanilla extract or do you go with imitation? Can you tell if there's a difference?

Till next time,
Catherine

Disclaimer: I may be compensated for any purchases made through affiliate links. 


I've linked up to Make Your Own Mondays 10/14/13 with Nourishing Treasures!