Pages

Monday, June 24, 2013

Don't Trash Those Eggshells! Why You Should Save Them and How to Prepare Them

Eggshells can be used for a variety of things (you can even eat them!) but they are especially a fantastic fertilizer for your garden! 

Most notably, eggshells are packed with calcium. In addition to calcium, they are also rich in magnesium, phosphorus, potassium, and sodium! All of which are fantastic minerals for pumping up your plants! According to NutritionData, 1/2 teaspoon of crushed eggshell provides 90% of your daily calcium intake.  That's quite a large percentage for such a small amount! 

When I made my pallet garden I just used cheap soil from Ollie's so I knew I'd need to supplement my plants a bit. I made a worm farm as well but a more immediate solution is crushing eggshells and spreading them around my plants!

So instead of throwing your eggshells into the trash can, save them in a bowl and let them dry out. You could also just toss them into your compost or worm bin but if you want pure eggshell to sprinkle on your garden, follow the next easy steps. 


Let them sit for a while so they're completely dry. You can even take the time to rinse each piece to get all of the slimy whites out but it's not necessary. Unless you plan on ingesting them. If you plan to do that you need to completely wash out the whites. For your garden you just want them dry. I've never had an issue with bugs being attracted to the bowl so that shouldn't be a problem. 


Next, dump them into your blender! 


Blend them until they're thoroughly crushed. 


I told you it was easy. 


Now just store them in a jar until you're ready to spread them around your plants! This jar probably has about 2 dozen crushed eggshells in it. 


I sprinkled some of the crushed eggshell around all of my plants. Here you see it on my lettuce blend when they first sprouted. They're doing great now! I'm about ready to thin them out. 

Jill over at The Prairie Homestead has a great list of 30+ Things to Do With Eggshells so go check that out for more ideas!

What other uses for eggshell do you know of? Would you ever eat them?

Till next time,
Catherine


Friday, June 21, 2013

DIY: Skin-Safe Homemade Deodorant {Guest Post}

Look at me on a roll with guest posting lately! Ok, this is only the second one so maybe "on a roll" isn't the best choice of words. Either way, I'm excited to have my good blog buddy Rachael from The Aliso Kitchen guest posting for me! I'm over at her blog today writing about My Biggest Real Food Challenge for her series on the topic. So after you read this post, be sure to visit The Aliso Kitchen for all kinds of awesome recipes, natural alternatives for health and beauty, and real, honest blogging and life and living better. 

Skin-Safe Homemade Deodorant Recipe

Hello! This is my first post for Happily Ever Crafter, but it’s right at home with some of Catherine’s other posts. I’m Rachael, the blogger behind The Aliso Kitchen, and Catherine and I met on Facebook. We have similar interests regarding homemade beauty products, healthy recipes, and gardening. Today, we’re swapping blogs! For me, she wrote a great post on heranti-green thumb, which is her biggest real food challenge.

Today, I’m sharing my kind of messy, but pretty awesome homemade deodorant recipe. Why? Because I love your pits.


Conventional deodorants are scary things. They’re full of all kinds of nasty ingredients, and I’m still not sold about rubbing aluminum anything under my arms. These are special things there, like lymph nodes! I have a pretty high breast cancer risk in my family, and I just can’t wrap my head about placing potentially toxic and carcinogenic substances (like parabens and preservatives) near such sensitive areas. Or anywhere, really.

But when you head to your natural market, you see that many natural deodorants for sale there have different, but similarly weird and unnecessary chemicals. Plus, their prices are way too high.
Instead of wasting my time and money, I decided to whip up my very own deodorant based on recipes 
I’ve seen around the blogosphere.

The cornerstone of my recipe is baking soda as it helps eliminate odors and keeps you fresh!

The ingredients:


-    Coconut oil
-        Arrowroot powder
-        Baking soda
-       Essential oils (I used basil and sweet orange)
     You’ll also need one empty deodorant stick. You can purchase them in bulk on eBay or Amazon, or simply clean out an old tube you have! I used an old Dove stick with an ounce measurement so I could travel through airport security with this stuff.

Did I measure?
…No. Really, I was set to measure! Then, I shook out too much arrowroot powder and realized it didn’t matter. Start off small. Add 1 tbs of baking soda, a couple of drops of a skin-safe essential oil you like (many use tea tree, but it is too harsh for me), and then start mixing in your arrowroot powder and coconut oil. You’ll want a thick paste, so you’ll probably end up using about ½ a cup of arrowroot powder and maybe ¼ - 1/3 c of coconut oil. Maybe less, maybe more! ­


Once you good, thick paste, carefully spoon it into your deodorant stick.


When done, set it in the fridge for a few minutes so it firms up. That’s it!


The only thing I don’t love about this recipe is that it’s a little messy. If you live in a hot environment, the coconut oil will melt. You can remedy this by keeping your deodorant in the refrigerator (weird) or by melting in some beeswax. Since I don’t mind a little mess and do not have any beeswax on hand, I went without. Just a thought!

Why not cornstarch?
Arrowroot powder and cornstarch are two totally different ingredients that feel and do pretty much the same thing. But, arrowroot powder is not a genetically modified food, and is almost a perfect replacement for cornstarch. You can use it to roll out my yogurt dough cracker recipe, to thicken sauces and puddings, as a base for your homemade foundation, or as a skin-sensitive binder in your deodorant.
You could always opt to use just coconut oil and baking soda, but baking soda can be a little rough on the skin in large quantities. Arrowroot powder is the perfect filler: it’s safe for your skin, adds the necessary bulk, and is a healthy ingredient to have around.

Don’t have a stick to use? 
Make a dry deodorant by combining a few tablespoons of arrowroot powder and 1 tablespoon of baking soda in a reusable container. Then, use a makeup puff or cotton balls to dab under your arms when needed.

A note on stink: Some people take time to adjust from conventional deodorants to homemade ones. I was surprised how sweaty and funky I smelled while processing out the traditional, chemically laden stuff. It took about a month for that phase to pass, and now this deodorant is strong enough to get me through long days at the cheese shop. Plus, I have no white build-up or residue on my shirts after. That might vary with people, but it’s a cheap, easy, and safe alternative for me!

Again, thank you, Catherine, for giving me the opportunity to share this with your readers! I’m excited to meet you all, and look forward to next time!


Do you use deodorant? Do you make your own or buy from the store? Have you ever made your own health or beauty products? Tell us below!


Thanks again, Rachael for your great post! I'm planning to try this as soon as I pick up some arrowroot powder! 

Till next time,

Monday, June 17, 2013

DIY: Pillow Covers {Guest Post!}

This is my very first guest post!! My good friend Catherine (yep, same name and same spelling!) made sure to document her first attempt at making pillow covers and I'm so glad she did! I want to try it now!

How to make your own pillow covers at home for cheap! 

What you'll need:


  • More than enough fabric for the size pillows you have
  • Ugly pillows that need a face lift
  • Scissors
  • Matching thread
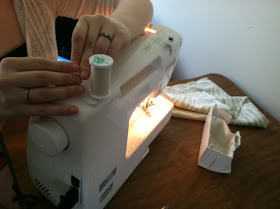
  • Sewing machine


These perfectly sized (clean) pillows were at Goodwill for $1 each! What an awesome score!


My living room theme is animal prints and so I found this awesome animal print to use! I got 1.33 yards of each style for about 18"x18" pillows. It was more than enough but it's better to have too much than not enough! Even so, you could probably get away with 1 yard per standard sized toss pillow.


Directions:

Iron all the wrinkles out of the fabric. 


Cut the fabric down to size. It was about 20"x40". Then fold it in half. 


Keep the fabric inside out and sew 3 of the 4 sides with approximately 1" inseam. Leave one side open so you can easily slip the pillow inside. 

Stuff the pillow inside then hand sew the final side together. Check out this awesome tutorial to do a fancy hidden stitch. 


Now toss them on the couch, sit back, relax and enjoy! 

Don't those look so great? She did such an awesome job! Thank you, Catherine for documenting and providing my little blog with its very first guest post! We'll be looking for more fantastic projects from you soon!

Have you ever made your own pillow covers? Don't you just love that green zebra print?

Till next time,
Catherine

Thursday, June 6, 2013

Happily Ever Crafter - Now on Bloglovin'!

Happily Ever Crafter is now officially on bloglovin'! 

I'm not sure what took me so long to join but I'm here now! Bloglovin' is such a great site to organize all the blogs that you follow and find new ones. There is even a button that says "Similar blogs" when you're looking at one blog so you can easily find new ones that are right up your ally!

 (source)

So click HERE to follow me on bloglovin'! 

If you haven't joined it yet, you definitely should if you're a blog reader like me. Also because Google Reader will be gone very soon. It even shows you which blog posts you have read and which ones still need to be read. It's awesome! I can't wait to find some awesome new blogs to read! Any suggestions? 


And while I'm here I thought I'd remind you all that I've also got a Facebook page for my blog. Don't forget to head over there and LIKE my page! I don't post 100 times a day so don't worry, I won't be blowing up your news feed. I love to interact with my readers and share my latest blog posts with you all and Facebook is just the place for it.


I recently turned my personal Pinterest page into a joint personal/blog Pinterest page. I pin all kinds of cool things from home decorating/organizational ideas, recipes, gardening tips, DIY crafts, funny and cute pictures, and more. Be sure to FOLLOW me on Pinterest! 


And let's not forget good ol' fashioned e-mail! You can contact me with questions or comments or if you just want to chat at CatherinePageWood@gmail.com. You can also enter your e-mail address in the box on the right side of the page to subscribe to Happily Ever Crafter!

Thank you all for your love and support! 

How do you keep up with Happily Ever Crafter using social media? What other forms of social media (Twitter, Google+, Instagram, etc) would you like to see Happily Ever Crafter use? 

Till next time,
Catherine

Wednesday, June 5, 2013

Wally - The beagle with an amazing story (who needs a home!)

This is Wally's story.


"My name is Wal-Mart. Most people call me Wally. I was given this name because I lived outside of the Wal-Mart in Appomattox, Virginia for about 5 years. No one could catch me or touch me but many people loved me and would buy food just for me to enjoy. 


About 6 months ago, animal control officers amped up their efforts to catch me because it was realized that I had an embedded collar. My previous owner put it on me when I wasn't done growing. They managed to catch me and brought me back to the animal shelter. Soon after I was taken to a nearby veterinarian who removed the collar and stitched me back together again. I wasn't sure of anything but I was slowly learning to trust humans. 


While I recovered, I stayed in the pound. It wasn't my favorite place to be but I kept learning to trust people more and more. I stayed for about two months before landing a spot in a foster home, only to be returned because I didn't know how to walk on a leash and my first foster mom was unable to carry my 35lb frame around. 


Next I was brought back to the nice veterinarian man where they took away my manhood and tested me for diseases I could have picked up while living free. Unfortunately I had contracted heartworms and another tick-borne disease called ehrlichia


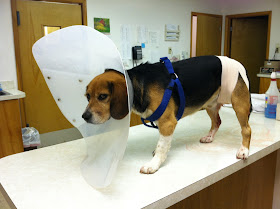
As if having my manhood taken away wasn't bad enough! Not to mention I hated having stitches in my tummy so I kept trying to pull them out. They stapled me, wrapped me up in bandages and put a humiliating cone around my neck! 


I stayed at the vet for many weeks while getting my first round of heartworm treatment, ehrlichia medication and recovering from being neutered. 


During those weeks I really learned to trust people and learned that they provide me with more than just food, but also love and affection! I also house trained myself. I couldn't understand why other dogs would treat their kennel run as a bathroom! Gross! 


I love being petted and rubbed. People are so nice to me! It took time for me to trust them but now I love them! After several weeks, another wonderful lady decided to foster me. She has a securely fenced yard where I love to run and breathe in the fresh air! 


One family brought me to their house for a few days to see how I would fit in. I made myself right at home with their beagle. You'd think we were long-lost cousins!


 I even like hanging around other dogs! Although, I don't really know how to play. Cuddling is more my thing.


I really liked the home and the other dogs, but, I enjoyed chasing their cat too much for their liking and they didn't have a yard for me to run in. I want a home where I can lounge inside at night but run around outside during the day. So now I'm back with my foster mom enjoying the "dog days of summer."


 This sure isn't the end of my story but I can hardly wait for the next chapter in my "furrever" home! Until then, I'll enjoy my time with my foster mom and her dogs but be dreaming of what's next."


If you know someone who may be interested (or are interested yourself) in adopting Wally, please contact Barbe with Friends of Campbell County Animal Control. He has come so far in his journey but needs a loving, forever home.
  • Wally is great with other dogs.
  • He may be ok with certain cats.
  • He is great with kids. 
  • He is shy at first but warms up to both men and women with time.
  • He is house-trained. 
  • He needs a home where he can run in a securely fenced in yard. Nothing he can dig under or climb over. 
  • On the same point, he loves to be cuddled on the couch, so being able to come indoors and cuddle is a must. 
If you haven't guessed, my husband and I are the ones who brought him into our home for a few days before realizing it wasn't the best fit. As much as we love him and wanted to have him, we were being selfish. He needs space to run and it also wasn't fair to our cat because he was always terrified. In all honesty, I think Wally chased the cat simply because the cat ran, I don't think it was a "prey drive" chase. He's the one who ripped the bottom of our cheap-o blinds that we had to fix. He just wanted to see outside the window!

Please share Wally's story so we can find his perfect home! I know it's out there. If we had land and a fenced yard, we would have kept him for sure. He's a super sweet, loving dog with an amazing story. He deserves the best home!

I'll update this page when he gets adopted.

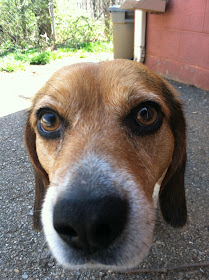
Do you have a rescue pet? What's their story? Doesn't Wally have the sweetest face??

Till next time,
Catherine