For this post, I
technically have my first guest blogger! My husband, Brian! He’s recently been
making props and helmets out of cardboard and hot glue and he’s been having a
lot of fun in the process. I told him he needed to do a tutorial for the blog
and he agreed! Without further ado…
Hey everyone, my name is Brian and I’m Catherine’s husband.
Some friends and I have recently started a film company called Visionwood
Productions. I’ve loved making movies since I could wield a camera and have
fortunately found a great group of people who are as passionate about it as I am.
One of our upcoming projects is a short medieval film and I’ve been working on
props and helmets for us to wear. I’ve hard a crazy hard time finding good
tutorials online on how to make them so I got a basic idea and just ran with
it. My hope is that this blog tutorial will help other people to create awesome
props with minimal expense!

You’ll need:
- Lots of cardboard
- Box cutter
- Rotary board or a hard surface to cut on
- Hot glue gun and lots of glue sticks
- Flat black spray paint
- Metallic spray paint (silver, bronze, gold, whichever you prefer)
- Junk paint brush
- Paper
- Pencil
- Ruler
Step 1: Gather all your materials and have space to work.
Helpful hint: Play something awesome like a Coldplay station on Spotify!
Step 2: Cut four 1” wide strips, about a foot and a half in
length, but the length doesn’t have to be precise, they just need to be long.
Crush the frames so that they are easily bended.


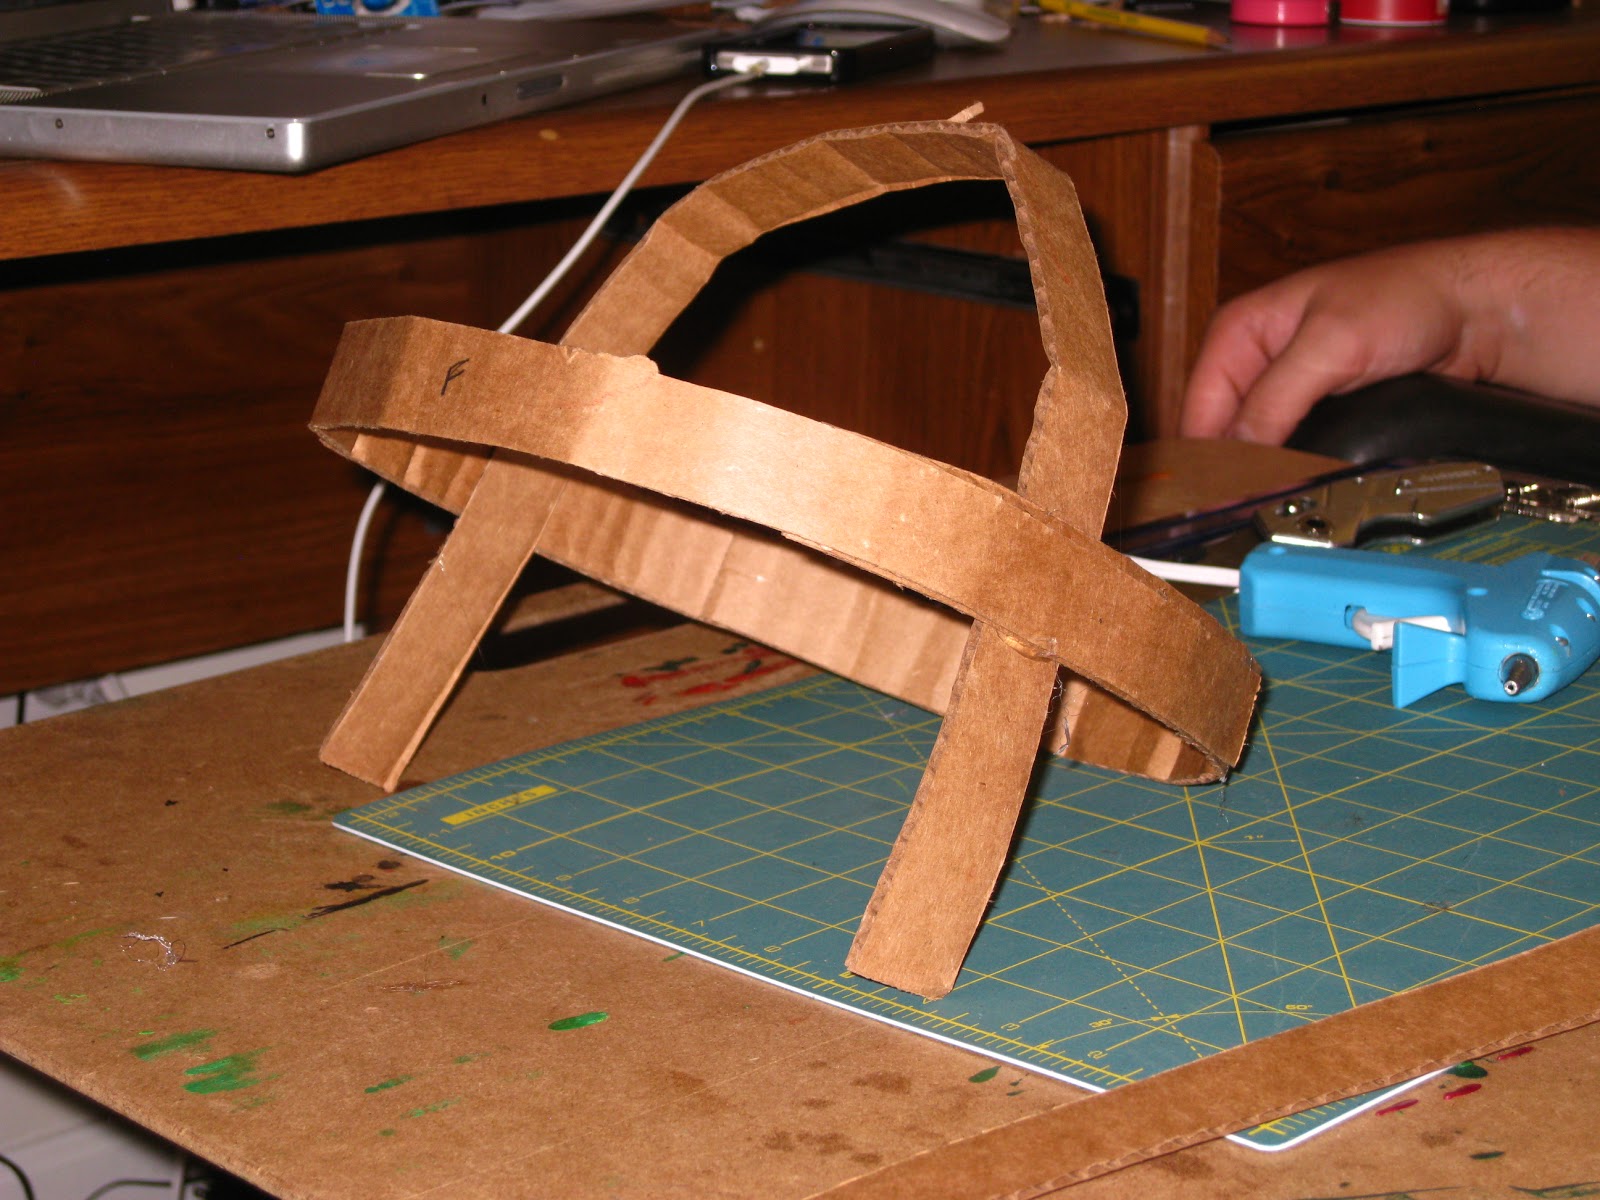
Step 3: Wrap two strips around your head to figure out the
size it will need to be. This will be the basic frame of the helmet. Be sure to
add a couple inches for extra space. You’ll need this later on. You could also
just use a measuring tape first, but this looks more fun! Hot glue the pieces
together to create the size you need.


Step 4: Decide where you want the front to be and stick with
that. Put one strip long ways around the circle to fit your head. Glue it down.
Then put the other strip in the other direction, glue it down and glue the
strips to each other where they meet.

Step 5: Fold the edges up and glue them down. Leave the
front one alone, because that will be the nose guard piece later.

Step 6: Cut out a circle that’s about 3-4” in diameter. Glue
it to the top of the inside of the helmet frame.


Step 7: Cut 4 pieces of cardboard in the shape in the following picture. It’s hard
to describe, it’s like a rounded triangle. Use the measurements you see in the
picture. The lines on the rotary board are 1”x1”. Crush them and make them
pliable. Mush the pieces into the inside of the frame so they touch the frame
on all sides and glue them into place. You can cut them in half if it’s too
difficult to place them as is. It's not exact and pieces will overlap, but that's fine.


Step 8: Fold a piece of paper in half and cut out the
pattern in this picture. This will be your template for the face area of the
mask. Then cut out the pattern on cardboard. When you cut out the eye holes,
save the pieces and use them for decoration later. Again, make the piece
pliable. You have to do the next step before putting on the face mask so just set it aside for a minute.


Step 9: Cut out two more pieces of cardboard in the shape of
the nose piece and glue them over top to reinforce it. Put glue on the sides of
the nose piece for extra reinforcement.


Step 10: Put the face plate on the mask and hot glue it
behind the nose piece.

Step 11: With my head size I then cut a piece of cardboard
that is 23"x5" inches, this will vary with your head size but the 5 inch
height is a good height. Make this piece pliable because this will be the neck
guard of the helmet. Put the neck guard in place and then glue it to the face
plate leaving the back and sides of it unglued. Put it on and see how it fits.


Step 12: Make five 3 ½" cardboard strips and glue them
to the inside of the neck guard gluing them to the top of the helmet at the
same time. This holds the two large pieces together.


Step 13: Fold a piece of paper in on itself till it’s about an inch
across. Place on mask where shown.

Step 14: Attach the eye cutouts onto the outside of each eye
hole.

Step 15: Cut seven ½” x 7” strips and glue them around the
outside of the helmet, spaced evenly apart. This part is purely decoration.

Step 16: Cut a glue stick into little pieces and glue them
around the helmet as decoration. You could also use brass fasteners but I found
this to be easier because it was hard to make a hole through more than one
layer of cardboard.

Step 17: Add cardboard and glue dots as you see fit to make
it as decorated as you want.


Step 18: Paint the entire helmet with a flat black spray
paint. Let it dry completely. I
used the interior/exterior fast dry spray paint from Wal-Mart. We generally try
to avoid Wal-Mart but it’s less than $1 there, and making these helmets tends
to use a lot.


Step 19: Spray a small amount onto your brush and vigorously
brush onto the helmet. Do it in any direction, using more or less where you
think it should be. Do this all over the helmet till you’ve achieved the look
you want.


Step 20: Enjoy!

Front

Right side, the left is the same.

Back

All four of the helmets that I have made in the past week.
Helpful Hints:
Contact your local grocery store or Target and ask if you
can have the boxes that they throw out each week. It’s free and there’s plenty!
Feel free to alter/expand this design as you feel necessary.
Get creative and have fun! These helmets have been a lot of fun to make and I’m
excited about using them in the movie we're going to make!
**NOTE: This is an original project. Please do not sell the
pattern or created project for profit. It is for personal use only. Thanks!**
Hope you enjoyed this tutorial and I’d love to see what you
create! Send us pictures of the helmets you create at CatherinePageWood@gmail.com! Leave a comment if you have any questions! Have fun!
Stay creative,
Brian

I've linked up with Fluster Buster and Just Dip It In Chocolate for their Fluster Creative Muster Link Party #34!

I've linked up to Pinworthy Projects Link Party 10/11/13 with Just Us Four, Planned In Pencil, and Atkinson Drive!

I've linked up to Pinworthy Projects Link Party 10/11/13 with Just Us Four, Planned In Pencil, and Atkinson Drive!
That is really cool and easy to make, thanks!
ReplyDeleteGlad you enjoyed it! Check back for more cardboard craft tutorials! There are more in the making!
DeleteMy son has a Medieval co-op class as part of our homeschool. He needed medieval costume for the last class/feast. This was perfect. The most authentic looking I've seen.....and we need cheap to make :)
DeleteThanks so much. Keep up the great work.
These is by far the best helmets I've encounter on the web. It looks authentic, cheap and sturdy. I have two questions. 1, do you make any other armour types? Like gauntlets, greaves, breastplate ect. And 2, what is your sort medieval movie going to be called?
DeleteSorry auto-correct, what I meant to say, was what is the name of your medieval film?
DeleteI've made gauntlets but haven't done a tutorial as of yet but plan to. I think a breastplate would be difficult with cardboard. The movie is still untitled right now and in pre-production. Subscribe to VisionWood Films on YouTube to stay on top of our current work! Thanks for visiting and commenting!
Delete-Brian
Thanks so much! Able to make it in a few hours. Needed to make a helmet for a school project…worked perfectly!
ReplyDeleteThank YOU! I'm so glad it was helpful!
DeleteThank You. Coincidentally, I needed this for a school project too. Thanks so much!
ReplyDeleteYou're welcome! I'm happy to hear it helped you! What class and what kind of project was it for?
DeleteThese are great! Thanks so much for posting. I especially like the glue dot rivets!
ReplyDeleteThank you so much! My husband is so creative! Be sure to check back for more cardboard projects!
DeleteThis is just what we needed for our upcoming VBS!!! Thanks so much.
ReplyDeleteI'm so glad to hear it helped you! What is the VBS theme?
Deleteooh ooh ohh!!! So cool! Can't wait to get this done! Doing Kingdom Rock VBS and playing a knight-- perfect!!!!!! Deb
ReplyDeleteThat's so cool!
Deletequestion- when you are measuring the head-- first step- do you add extra so the goes beyond the nose? Should you not measure the head from tip of nose and round, leaving a little extra for movement? Deb
ReplyDeleteStep 3 is where you'll add a couple inches of extra space for your nose and step 4 when you make the nose piece is where you see where it will actually fall on your nose. And fortunately since it's just cardboard, you can always cut it and add more as you need it. Hope this helps! We would love to see a picture of your helmet when it's done!
DeleteOh my goodness!!!
ReplyDeleteThis is soooo freaking amazing !!!
It looks sooo real.
Thanks so much! I appreciate your kind words! :)
DeleteHaven't painted it yet but it is looking good. Really should add more than 2 inches to accommodate nose. It fits small but that's ok-- only need it for a week. Your key- which you said over and over- was to really bend up and break the cardboard. I used an old cereal box for the final two paper strips on the face. Very excited. Waiting for the paint from the store. :) Deb
ReplyDeleteYes, it really just depends on your face size/shape but I'm glad it worked out for you!
DeleteHow do I send you a picture? Deb
ReplyDeleteYou can e-mail it to me at CatherinePageWood@gmail.com. I'll even post it if you don't mind! :)
Deletedid you get the picture?
ReplyDeleteI did! It looks awesome! Sorry I hadn't replied yet. I'll try and work on a post for it soon! Thanks so much, it really looks great!
Deletewe had so much fun at vbs this week and the helmet was a huge hit. Thanks so much for the wonderful directions! Deb
ReplyDeleteI'm so glad to hear it!
DeleteThis is like the coolest helmet ever! Not just for Halloween but if you have a kid who loves to play dress up, this will take adventure time to a whole new level, see...I have a little Mike The Knight at home and he would go crazy over this helmet, besides we are planning on going to the Medieval Festival and wow...he will fit right in! Thanks for sharing such a detail tutorial at the Fluster Buster Party! can't wait to see what would you share next week, Lizy your party co host!
ReplyDeleteThanks! It looks like a lot of steps but he did it in no time! If you end up making one for your little boy, take a picture and send it to me! I'd love to see how it turns out :)
DeleteThey ALL look amazing! I don't think that I would have the patience to complete one, let alone four. Thank you for sharing this amazing project on Fluster's Creative Muster. Now that you found our party I hope that you will continue to join us every Tuesday evening.
ReplyDeleteRobin @ Fluster Buster
Thank you! My husband is ecstatic with all of these nice comments! I definitely hope to keep linking up with you guys :) Thanks for hosting!
DeleteOWO this Is a awesome idea, I'll probably give this a try :)
ReplyDeleteDefinitely try it! I'd LOVE to see pictures of how it turns out if you try!
DeleteI made two! Thanks
ReplyDeletehttp://deannasbluekitchen.blogspot.ca/2013/10/before-and-after.html
Wow Deanna they look awesome!! I'm sure your kids will love them!
DeleteCan I use this in a larp costume?
ReplyDeleteI'm not sure how much protection it would provide but I don't see why not!
DeleteYou are the most awesome helmet maker ever.
ReplyDeleteThank you!!! My son's Cub Scout Pack is having a Knights themed Blue and Gold Banquet, and I've been searching all day for ideas on how to make our own cardboard helmet. Your instructions are very easy to follow, and very simple to make. Only thing we're going to tweak is to make the front look like the Skyrm Yngol Helmet. No horns, just an open face (he doesn't like his face being completely enclosed). The glue dots are also a great idea for the rivets. Thanks again!
ReplyDeleteWe're so glad it could help!! We'd love to see pictures if you have them! I hope he had an awesome time!
DeleteHello, I was wondering, is the base ( helmet part ) of the hat fit for all the styles? Do I just add different bottom parts, or is there different designs? Either way, I'm very thankful, I have a school project soon, and I also would like this for videos. Plan on making it into a dragonborn helm! Thank you soooo much!
ReplyDeleteE-mail is isrivera2019@hightechhigh.org
DeleteYes! All of the helmets are based on that main "ring." If you start with that base, you can build as far as your imagination will take you! :) We'd love to see pictures of your finished project if you have them! Gald we could help! Thanks for stopping by!
Delete(I also e-mailed you the same comment to be sure you received it!)
I wonder if it will make Brian happy to know that his tutorials will help a small military community theater out in the middle of Korea! We are learning from this tutorial how to make helmets for our upcoming performance of Spamalot! Thanks!
ReplyDeleteThat is awesome!! We're so glad this tutorial has gone so far! :)
DeleteThese helmets are amazing! i made one but alas, i made it too small. Oh well still looks epic! and this 2nd degree burn from the glue gun was only a minor drawback!
ReplyDeleteKeep trying! You'll get it! Hot glue gun burns are just part of the deal, sorry we failed to mention it ;) haha
DeleteThis is awesome!! So glad you posted it!! I am a Sunday School teacher and our lesson coming up is going to be The Whole Armor of God....I made entire outfits for all 15 kids and I am attempting the helmets now!! Wish me luck!!
ReplyDeleteThat's amazing! What a great idea! We'd love to see pictures if you have any!
DeleteThanks for taking the time to share this idea! We followed your template but used the supplies we had on hand, which were staples and duct tape. :-) My kids wore them to our homeschool group's medieval dress up day.
ReplyDeleteKudos for being resourceful!! :)
DeleteI have read several online instructions as to how to make a helmet like this. However, none of the suggest adding a circle of cardboard to the top. I hope this can solve my problems with bending the cardboard. Good helmets, by the way.
ReplyDeleteWe're glad you've found this tutorial to be so helpful! Thanks so much!
DeleteThis technique also works really well with the thick cardboard from cereal boxes and the like. That cardstock is sturdy and doesn't have the ridge effect that corrugated has. That circle in the top of the helm is the secret to getting all of the pieces to attach properly.
ReplyDeleteSee the profile pic for an helmet I created using the same basic Rib-Rim technique Brian discussed. The core of this helm is made from cereal boxes with craft foam heated and stretched over it with some creative paint. :D
DeleteGreat idea! Cereal boxes are easy to come by too. Your helmet looks awesome! Plus, we love that Gandalf is in your profile picture ;)
DeleteBest tutorial I've found for this type of helmet. I'm trying to create a life size knight (from cardboard) for our church vacation Bible school. Thank you so much!!!
ReplyDeleteYou're so welcome! We're glad this tutorial is so helpful for so many! God bless! We'd love to see pictures if you have any!
DeleteI made 2 helmets, one directly copying the instructions and one viking helmet (minus face and addition of horns). Your idea and plan is very useful, thanks. :)
ReplyDeleteAwesome! So glad it worked for you! Thanks for stopping by! :) We'd love to see a picture of your finished product if you have a chance! CatherinePageWood@gmail.com
DeleteWe are planning to use this for a school project (for a pumpkin!) It looks wonderful. We will likely end up making a few for our 3 little knights to play with at home. Thank you for generously sharing this!
ReplyDeleteAww that sounds fun! Thanks for visiting and we'd love to see a picture when you're done! CatherinePageWood@gmail.com
DeleteTo make it more fun and if you have more time on your hands you can do a papier mâché afterwards :)
ReplyDeleteThat's a great idea, thanks! :)
DeleteReally good job. Can you make one so the visor can raise?
ReplyDeleteThanks! You could try brass fasteners or even bolts/nuts/washers to make the hinge! Great idea!
Deletejust stumbled across this really helpful tutorial ... can I ask how did you the sort of raised "weld lines" type marks on the helmets ? many thanks Simon
ReplyDeleteThis comment has been removed by the author.
ReplyDeleteFound best medieval helmets in retrohandicraft.com
ReplyDeleteBună numele meu este Gabriel SĂNDIȚĂ și sunt cavaler cruciat
ReplyDelete